PowerPoint Morph Transition Explained: Step-by-Step Guide
PowerPoint slides can feel disconnected when objects suddenly change position, size, or direction from one slide to the next. Basic transitions may not create the smooth movement needed to connect ideas clearly.
This can make a presentation feel less polished. It may also make it harder for viewers to follow changes in text, images, shapes, or other slide elements. A sudden change can distract from the main message.
PowerPoint Morph offers a simple way to create smooth movement between slides. It can move, resize, and change objects with little manual animation work. This guide explains what Morph does, how to create it step by step, and how to use it with different slide elements. You will also learn useful tips and ways to fix common problems.
What Is the Morph Transition in PowerPoint?
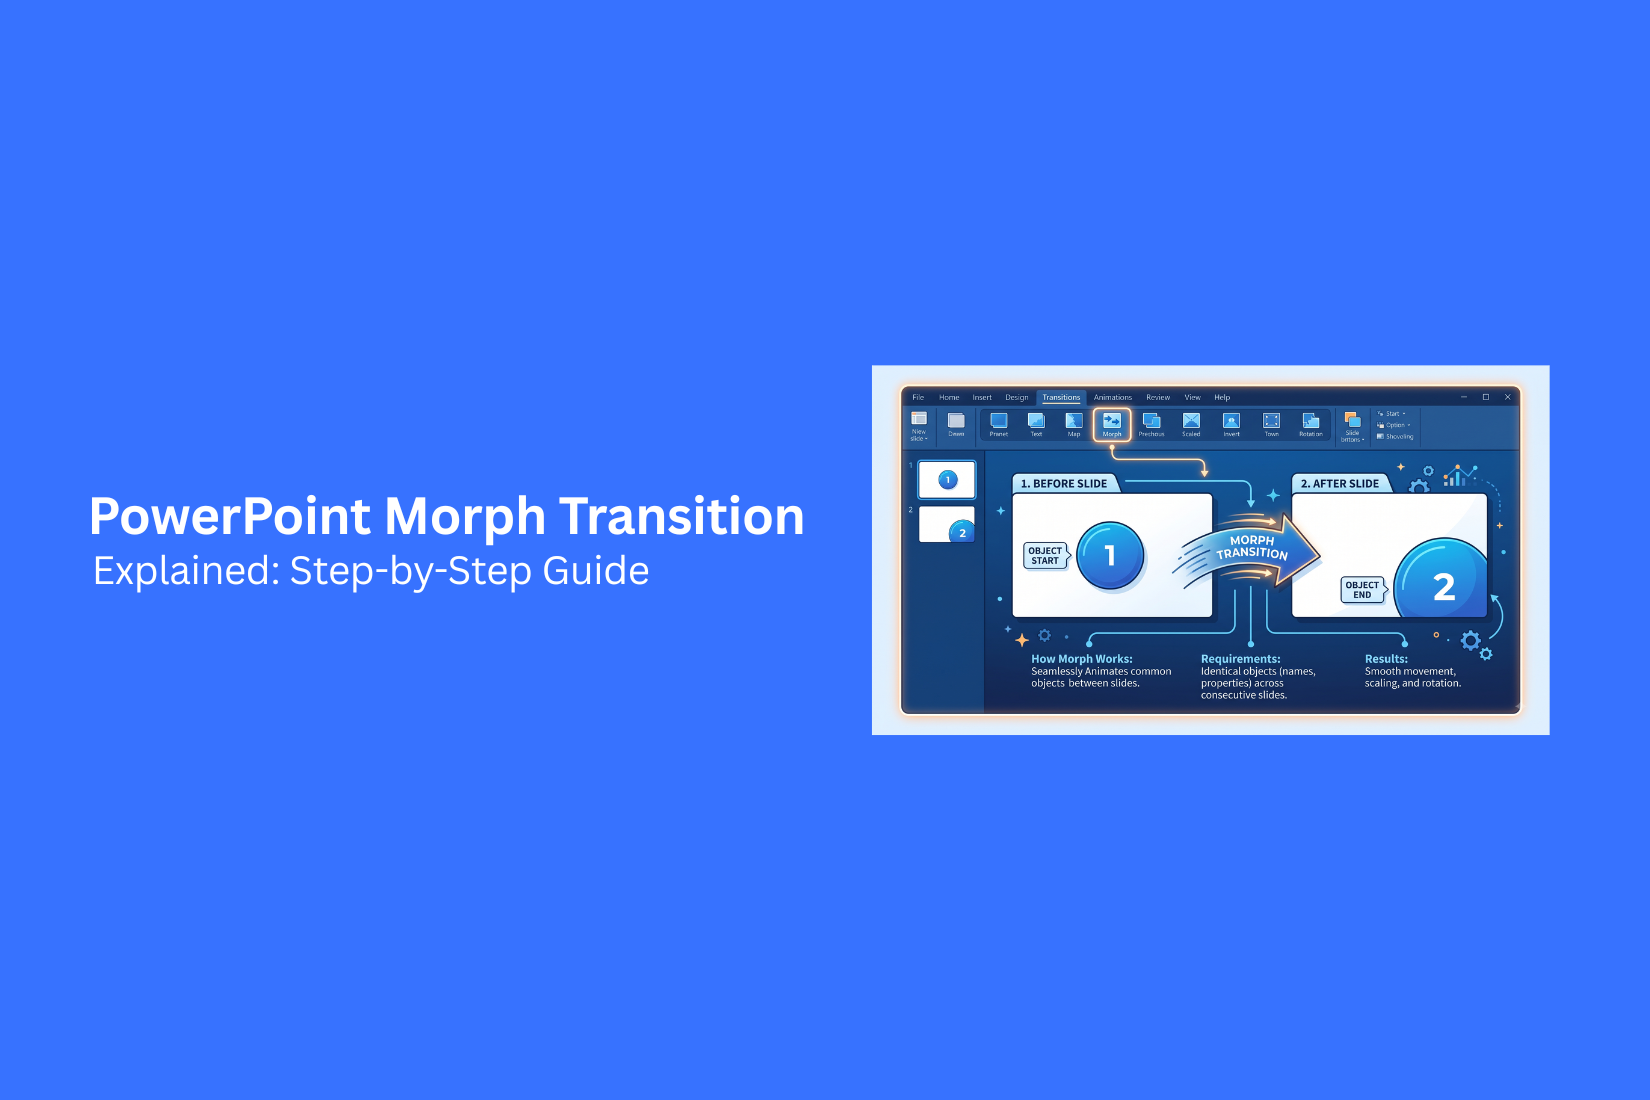
The Morph transition is a PowerPoint feature that creates smooth movement between two slides. It makes objects appear to move, change size, rotate, or shift from one position to another. Morph works by comparing objects on two slides. PowerPoint looks at the objects that appear on both slides and creates the movement between them. This can make a presentation feel more connected and easier to follow.
For example, a shape can move from the left side of one slide to the right side of the next slide. An image can also grow larger or become smaller. Text can change its position, size, or style. The key is to use the same object on both slides. Then, make a change to its position or appearance on the second slide. The Morph transition handles the movement between the two slides.
Morph is useful for:
• Moving objects across slides
• Creating smooth zoom effects
• Changing the size of images or shapes
• Showing step-by-step changes
• Making slide changes feel more connected
How to Add the Morph Transition in PowerPoint
Adding the Morph transition in PowerPoint takes only a few steps. The effect works best with two slides that share the same objects. PowerPoint compares the two slides and creates movement between them. You can use Morph with text, shapes, images, icons, charts, and other supported objects. The first slide shows the starting position. The second slide shows the ending position. The transition connects these two states with smooth movement.
Step 1: Create Your First Slide
Start with a blank slide or an existing slide in your presentation. Add the objects you want to move. These may include text boxes, shapes, pictures, icons, or other elements. Place each object in its starting position. For example, put an image on the left side of the slide. Add a title at the top. Place a shape near the bottom.
Your first slide sets the starting point for the effect. Take some time to arrange the content before creating the second slide. Keep the slide design simple. A clear layout makes the movement easier to follow. It also helps you see how each object changes from one slide to the next.
Step 2: Duplicate the Slide
After your first slide is ready, duplicate it. Right-click the slide thumbnail in the left panel and select Duplicate Slide. You now have two slides with the same content. This is useful because the second slide keeps the same objects, text, images, and formatting.
The duplicated slide becomes the ending point for the Morph effect. You can now change the position or size of the objects without rebuilding the slide. Avoid creating a new blank slide for this step. A new slide may not keep the object connection that Morph needs for smooth movement.
Step 3: Edit the Second Slide
Select the duplicated slide and change the objects to create the final layout. Move an image from the left side to the right side. Make a shape larger. Rotate an object. Move a title to a new position. Change the size of a picture. You can also create a greater visual change by moving several objects at once.
For example, the first slide can show a large image on the left with text on the right. The second slide can move the image to the center and place the text below it. The objects should remain on the second slide. Their new positions tell PowerPoint where each object should move. This step gives you the most control over the final effect. Small changes create simple movement. Larger changes create more noticeable motion.
Step 4: Select the Morph Transition
Now select the second slide. Go to the Transitions tab in the PowerPoint ribbon. Find the Transition to This Slide section. Select Morph from the available transition options. The Morph effect applies to the slide you selected. It does not need to be added to both slides. The first slide acts as the starting point, while the second slide receives the transition.
PowerPoint will create the movement between the two slides. You can use the preview option to see the effect without starting the full presentation. If the objects move in an unexpected way, check the second slide. Look at the position, size, and presence of the objects on both slides.
Step 5: Adjust the Transition Duration
The Duration setting controls how long the Morph effect takes to complete. A short duration makes the movement quick. A longer duration gives the objects more time to move across the slide. The right timing depends on the type of content. A simple image movement may need only a short transition. A slide with several moving objects may look better with more time.
Avoid making the transition too slow. Long movement can distract from the main message. Very short movement can also make the effect hard to follow. Start with the default duration. Play the slide and check how the movement feels. Adjust the duration until the objects move at a comfortable speed.
Step 6: Preview the Morph Effect
After setting the transition, click Preview on the Transitions tab. Watch the movement from the first slide to the second slide. Check each object carefully. Look for sudden changes, unwanted movement, or objects that stay in place. Pay attention to the main visual element first. The most important object should move in a clear way. Text should also remain easy to read during the transition.
Make changes to the second slide if the effect does not look right. Move objects, resize them, or adjust their placement. Preview the transition again after each major change. This process helps you refine the effect without adding extra animations. A well-planned pair of slides can create a smooth visual change with just the Morph transition.
How to Create a Morph Transition Step by Step
PowerPoint Morph works by comparing two slides. You create the first slide, make a copy, then change the objects on the copy. Morph then creates the movement between the two slides.
Step 1: Add Objects to Your First Slide
Start with a blank slide or a simple layout. Add the objects you want to move or change. You can use text, shapes, icons, pictures, or other slide objects. Place each object where you want the animation to start. Keep the first slide simple. A clear starting layout makes the final effect easier to control.
Step 2: Duplicate the Slide
Create a copy of your first slide. This keeps the same objects on both slides. Right-click the slide thumbnail and select Duplicate Slide. You now have two slides with the same content. The first slide acts as the starting point. The duplicate becomes the ending point for the Morph effect.
Step 3: Change the Position or Size of Objects
Select objects on the second slide and make your changes. Move a shape to a new spot. Make a picture larger or smaller. Change the position of text. You can also rotate objects or make other supported changes. Try one clear change at a time. Small changes can create smooth movement. Larger changes can create a stronger effect.
Step 4: Apply Morph to the Second Slide
Select the second slide. Open the Transitions tab in PowerPoint. Choose Morph from the transition options. PowerPoint will use the changes between the two slides to create the transition. Set the transition duration based on the effect you want. A shorter time creates quick movement. A longer time gives the objects more time to move.
Step 5: Preview and Refine the Effect
Preview the transition from the first slide to the second slide. Watch how each object moves. Check for awkward movement, sudden changes, or objects that do not move as expected. Return to the second slide and adjust the object positions or sizes. Preview the effect again after each major change. Keep refining the slides until the movement looks clean and matches your presentation.
PowerPoint Morph Transition Examples
PowerPoint Morph can create smooth movement between two slides. You can use it to move text, shapes, images, and other objects. The key is to place the same object on both slides and change its position or size on the second slide. These examples show how Morph can make common slide changes feel more natural.
Morph Between Different Text Positions
Morph can move text from one spot to another. Start with a slide that has the text on the left side. Duplicate the slide. Move the same text to the right side on the second slide. You can also change its size or alignment. Apply the Morph transition to the second slide. PowerPoint will animate the text from its first position to the new one. This works well for title slides, section headers, and key points.
Morph Shapes Into New Positions
Shapes can move across a slide with Morph. Add a shape to your first slide. Duplicate the slide. Move the shape to a new position on the second slide. You can also resize it. Apply Morph to the second slide. The shape will move from its old position to its new one. Try this with circles, rectangles, arrows, or other basic shapes.
Create a Zoom-In Effect
Morph can create a simple zoom effect without using complex animations. Place an image, shape, or text on the first slide. Duplicate the slide. Make the object much larger on the second slide. Keep the main part of the object in view. Apply Morph to the second slide. The object will appear to move closer as the slide changes. This effect works well for product details, charts, photos, and key parts of a design.
Move Images Across Slides
Morph can move an image from one side of a slide to another. Add an image to the first slide. Duplicate the slide. Move the image to a new position on the second slide. You can also change the image size. Keep the same image on both slides. Apply Morph to the second slide. The image will move smoothly between the two positions. This can help guide the viewer from one part of the slide to another.
Create a Before-and-After Effect
Morph can show a clear change between two versions of a design. Place the first version on one slide. Duplicate the slide. Replace or adjust the content for the second version. Keep shared objects in the same place. Move or resize the parts that need to change. Apply Morph to the second slide. The movement can make the change easier to follow. This works well for design updates, layout changes, photo edits, and other visual comparisons.
Build a Simple Timeline Animation
Morph can make a timeline appear step by step. Create a timeline on the first slide. Add the first point or event. Duplicate the slide and add the next point. Continue this process for each stage. Keep the existing timeline elements in the same positions. Add or move only the new parts. Apply Morph to each new slide. The timeline will appear to build as you move through the slides.
Create a Product Showcase
Morph can help present different parts of a product. Place the product image on the first slide. Duplicate the slide. Move or enlarge the product image on the second slide. Add text that points to a key feature. Use another slide to focus on a different part of the product. Apply Morph to each slide. The product can move and change size as you show each feature. This creates a clean product walkthrough with simple slide changes.
Create a Map Movement Effect
Morph can create the look of moving across a map. Add a map to the first slide. Duplicate the slide. Zoom in or move the map to show a different area. Keep the same map on both slides. Change its size or position on the second slide. Apply Morph to the second slide. PowerPoint will animate the map between the two views. You can use this effect to show locations, routes, regions, or changes across different areas.
How to Control What Morphs
PowerPoint Morph works by matching objects across two slides. It looks for objects that appear on both slides. You can control this match to get the movement you want. A few simple settings can give you more control. You can also use the Selection Pane to manage objects with similar names.
Use Matching Object Names
PowerPoint uses object names to decide which items should morph. Give related objects matching names to create a clear connection between two slides. The Selection Pane shows the name of each object. Rename the objects that should match across slides. This helps PowerPoint connect the right objects. Object names can be useful in slides with many shapes, images, or text boxes. They give you more control over the Morph effect.
Use the Selection Pane
The Selection Pane lets you view and rename objects on a slide. You can find it under Home > Select > Selection Pane. Use clear names for objects that need to match. For example, you can name two related shapes Box1 on both slides. The pane also helps you find hidden or overlapping objects. This makes it easier to manage complex Morph animations.
Use Morph With Text
Morph can create smooth text movement between slides. Keep the same text box on both slides. Then change its position, size, font size, or other settings. You can move a heading from the center of a slide to the top. You can also make large text smaller on the next slide. For better control, keep the text box connected across the two slides. Matching object names can help with more complex layouts.
Use Morph With Shapes
Shapes work well with Morph. You can change their position, size, shape, or rotation between slides. For example, start with a large circle in the center. On the next slide, move it to the side and make it smaller. Morph creates the movement between those two states. You can also use shapes to build simple visual effects. A rectangle can expand into a larger panel. A circle can move across the slide. These changes can guide the viewer from one part of the presentation to another.
Use Morph With Charts and SmartArt
Morph can help move and resize charts and SmartArt between slides. Keep the same object on both slides. Then adjust its size or position on the second slide. For example, a chart can start as a small object. The next slide can show the chart in a larger position. Morph creates a smooth movement between the two slides.
SmartArt can also move from one area of the slide to another. You can change its size or position to create a clear visual change. For more detailed control, use separate objects instead of relying on one large chart or SmartArt object. This gives you more control over each part of the layout.
Use Morph With Images
Images can move, resize, rotate, and change position with Morph. Place the same image on both slides. Then change its position or size on the second slide. For example, an image can start as a small thumbnail. The next slide can show the same image as a large visual. Morph creates the movement between the two sizes. You can also move an image from one side of the slide to another. This works well for product images, photos, screenshots, and other visual content.
PowerPoint Morph Transition Tips
PowerPoint Morph works best when the slides have a clear visual connection. Small changes can create a smooth effect. Large or random changes may make the transition hard to follow. Use these tips to keep your Morph transitions clean and easy to watch.
Keep Object Placement Consistent
Keep the same objects on both slides when possible. Place them in a clear starting position on the first slide. Then move, resize, or rotate them on the next slide. This gives Morph a clear path to follow. A small position change can create a smooth motion. Large changes may look less natural.
Use Simple Slide Changes
Keep each slide focused on one main change. Move an image, change a shape, or adjust a text box. Avoid changing too many things at once. Simple changes make the effect easier to follow. They also help the main point of the slide stand out.
Limit the Number of Moving Objects
Too many moving objects can make a slide feel busy. Pick only the objects that need motion. Keep background elements fixed. Use Morph for key images, shapes, icons, or text. This creates a cleaner effect and keeps attention on the main content.
Choose the Right Duration
The duration controls how quickly the Morph effect plays. A short duration works well for small movements. A longer duration can help with larger changes. Start with the default duration. Play the transition and adjust it based on how the movement looks. The goal is a smooth pace that does not feel too slow or too quick.
Use Consistent Design Elements
Keep fonts, colors, shapes, and other design elements consistent across the slides. This helps the slides feel connected. For example, use the same font and color style before and after the Morph transition. You can still change the size or position of an element to create movement.
Preview Every Transition
Always preview the Morph effect before presenting. Play the slides from the start and watch how each object moves. Check for sudden jumps, unwanted movement, or text that becomes hard to read. Make small changes until the transition looks clear and natural.
Common Morph Transition Problems
PowerPoint Morph can create smooth movement between slides. A few setup issues can cause strange results. The fix often comes down to slide order, object placement, or object names.
Morph Is Not Working
Morph may not work if the transition is not set on the second slide. Select the second slide and open the Transitions tab. Choose Morph from the transition options. Also, make sure the same object appears on both slides. PowerPoint needs a matching object to create the movement.
Check these items:
• Morph is applied to the second slide.
• The object exists on both slides.
• The object has not been replaced with a new copy.
• The two slides are next to each other.
Objects Jump Instead of Moving Smoothly
Objects may jump if PowerPoint does not match them correctly. This can happen with duplicate objects or objects that have been copied and changed. Keep the same object on both slides. Move or resize it instead of deleting it and adding a new one. For more control, use matching object names. Open the Selection Pane and give the matching objects the same name. Add two exclamation marks before the name, such as.
Text Does Not Morph Correctly
Text can behave differently from shapes and other objects. PowerPoint may treat changed text as a new object. Keep the same text box on both slides. Change the text inside the box instead of deleting the box and adding another one. Text size, font, and position can also affect the result. Keep these settings close between the two slides for a cleaner transition.
Images Do Not Transition as Expected
Images need to be matched across the two slides. Replacing an image with a new file can stop Morph from treating it as the same object. Use the same image on both slides. Then change its size, position, or crop on the second slide.
For a smooth image effect:
- Add the image to the first slide.
- Duplicate the slide.
- Move or resize the image on the second slide.
- Apply Morph to the second slide.
- Preview the transition.
Morph Creates Unexpected Movements
Unexpected movement often comes from objects that PowerPoint cannot match clearly. Extra shapes, duplicate images, and changed object names can affect the result. Open the Selection Pane to check the objects on both slides. Remove objects that are not needed. Give matching objects the same name when you need more control. Preview the transition after each major change. Small edits can help you find the object that causes the unwanted movement.
Morph Transition vs. Other PowerPoint Transitions
PowerPoint has many transition effects. Each one works in a different way. Morph stands out because it can move objects from one slide position to another.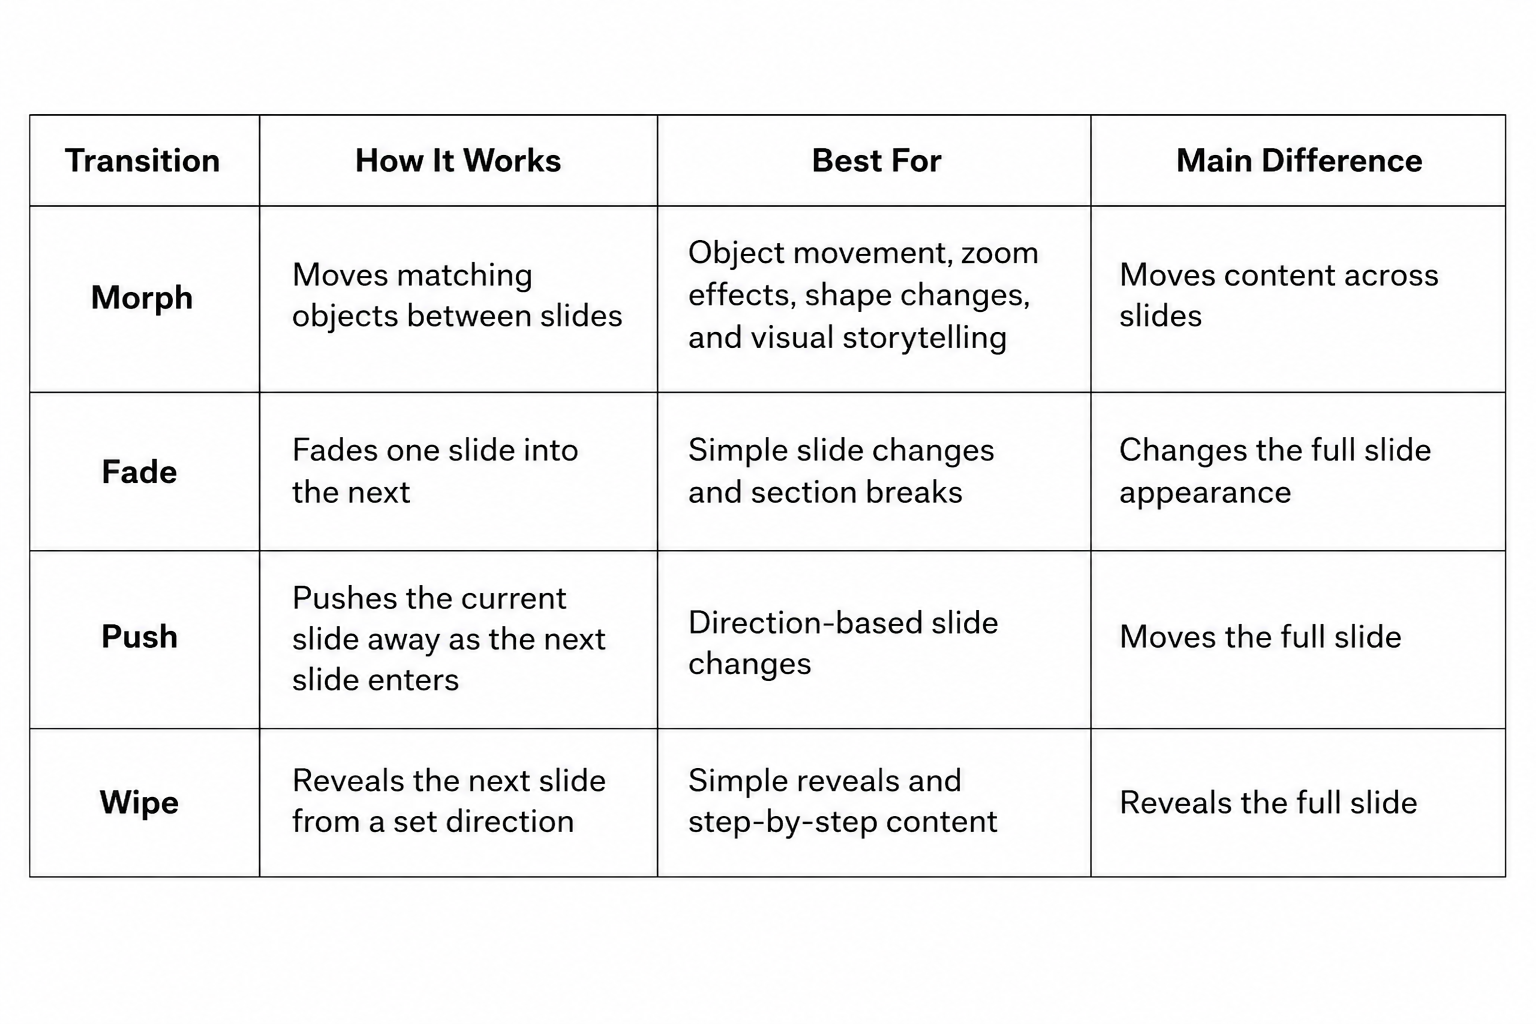
Morph vs. Fade
Fade creates a soft change between two slides. The first slide fades out as the next slide appears.
Morph works with objects that appear on both slides. PowerPoint can move these objects from their old position to their new position.
Use Fade for:
• Simple slide changes
• Clean presentations
• Section breaks
• Minimal movement
Use Morph for:
• Moving images
• Changing object positions
• Zoom effects
• Showing changes between slides
Fade keeps the slide change simple. Morph adds movement to the content.
Morph vs. Push
Push makes one slide move away as the next slide enters. The new slide can enter from different directions. Morph focuses more on the objects inside the slides. It can move matching objects from one position to another.
Use Push for:
• Simple slide movement
• Direction-based effects
• Quick slide changes
Use Morph for:
• Moving shapes
• Moving text
• Changing image size
• Creating smooth object movement
Push moves the full slide. Morph can move specific objects.
Morph vs. Wipe
Wipe reveals the next slide from a selected direction. The new slide appears across the screen as the effect plays. Morph creates movement between matching objects. This makes it useful for showing a change from one slide to the next.
Use Wipe for:
• Simple reveals
• Step-by-step content
• Section changes
• Direction-based effects
Use Morph for:
• Object movement
• Image changes
• Shape changes
• Visual storytelling
Wipe changes how the next slide appears. Morph shows how content moves or changes.
When to Use Morph
Morph works best when movement helps explain the content. It can show a process, compare ideas, zoom into details, or guide attention across a slide.
Use Morph for:
• Showing a process: Move an object through different steps.
• Comparing layouts: Change the position or size of objects on the next slide.
• Zooming into details: Move and resize an image to focus on one area.
• Moving objects: Shift shapes, text, or images to new positions.
• Showing change: Use two slides to show how an idea changes.
• Creating visual flow: Guide the audience from one part of the slide to another.
Morph does not fit every slide. Fade works well for a basic section change. Morph is a better choice when movement helps the audience understand the content.
Best Practices for Using Morph in Presentations
Morph works best when it helps the audience follow your message. A good Morph effect should support the slide content, not distract from it. These simple practices can help you use the effect with more control.
Use Morph to Explain Change
Morph can show how something changes from one slide to the next. Use it to move an object, resize an image, or change the position of text. This makes the change easier to follow. For example, you can show a small chart on one slide and make it larger on the next slide. The movement creates a clear link between the two slides.
Use Morph to Guide Attention
Morph can direct the audience to a specific part of your slide. Move an image, shape, or text block into a new position to shift focus. Keep the movement simple. A clear change helps the audience know where to look next.
Avoid Overusing the Effect
Morph can lose its value if every slide uses it. Too many moving objects can make a presentation feel busy. Use Morph on slides where movement adds meaning. Use simple transitions for slides that do not need movement.
Keep Transitions Consistent
A presentation feels easier to follow when similar changes use similar movements. Keep the direction and style of Morph effects consistent across related slides. For example, use the same movement style for a series of product steps. This creates a clear visual pattern for the audience.
Match Morph Effects to Your Story
The effect should support the point you are making. Use movement to show progress, compare ideas, explain a process, or reveal a new detail. Ask yourself one simple question: Does the movement help explain the message? If the answer is yes, Morph can add value to the slide. If the movement only adds decoration, a simple transition may work better.
Final Notes
PowerPoint Morph is a useful way to connect slides with smooth object movement. It can move text, images, shapes, charts, and other slide elements from one position to another. The key is to keep the same objects on both slides. Duplicate the first slide, make the needed changes on the second slide, and apply Morph to that slide. Use the Selection Pane and matching object names for better control over complex slides.
Keep the movement simple. Use Morph only where it helps explain a change or guide attention. Preview each transition before presenting. Small adjustments to object placement, size, and duration can make the effect much cleaner. With the right setup, Morph can help your slides feel connected and make visual changes easier for your audience to follow.
FAQs
What is the Morph transition in PowerPoint?
Morph is a PowerPoint transition that creates smooth movement between two slides. It can move, resize, rotate, and change the position of matching objects.
How do you add Morph to a PowerPoint slide?
Create your first slide, duplicate it, and edit the objects on the second slide. Then select the second slide, open the Transitions tab, and choose Morph.
Does Morph need to be added to both slides?
No. Apply Morph to the second slide. The first slide acts as the starting point for the transition.
Why is Morph not working in PowerPoint?
Check that Morph is applied to the second slide. Also, make sure the same objects appear on both slides. Replacing an object with a new copy can stop PowerPoint from matching it correctly.
How do you make objects move smoothly with Morph?
Keep the same object on both slides. Duplicate the first slide, then move or resize the object on the second slide. Morph creates the movement between the two positions.
Can PowerPoint Morph animate text?
Yes. Morph can move and resize text. Keep the same text box on both slides. Change its position, size, or other settings on the second slide.
Can you use Morph with images?
Yes. Morph can move, resize, and rotate images. Use the same image on both slides, then change its position or size on the second slide.
Can you use Morph with shapes?
Yes. Morph works well with shapes. You can move, resize, and rotate shapes between slides.
How do you control which objects Morph?
Use matching object names in the Selection Pane. Give related objects the same name on both slides. For more control, add two exclamation marks before the name, such as !!Box.
What is the best duration for a Morph transition?
The right duration depends on the amount of movement. Short movements can use a shorter duration. Larger movements may need more time. Start with the default duration and adjust it after previewing.
Can Morph create a zoom effect?
Yes. Make an image, shape, or text larger on the second slide. Morph can create the look of zooming into the object.
What is the difference between Morph and Fade?
Fade changes the full slide appearance by fading from one slide to the next. Morph moves matching objects between slides.
When should you use Morph instead of other transitions?
Use Morph when movement helps explain the content. It works well for processes, comparisons, zoom effects, object movement, and visual changes. Use simpler transitions for basic slide changes.
Why do objects jump instead of moving smoothly with Morph?
PowerPoint may not be matching the objects correctly. Keep the same objects on both slides and avoid replacing them with new copies. Matching object names can also give you more control.
Can Morph be used for charts and SmartArt?
Yes. Morph can move and resize charts and SmartArt between slides. Keeping the same object on both slides helps create a smoother effect.


You may also be interested in ...

How To Create An Eye-Catching Portfolio
If you’re looking to create an eye-catching portfolio, this post will come in handy. In this article, you can find the easies...
23 Jun, 2024

How To Easily Create An Infographic
Infographics are the perfect way to make a presentation that will impact an audience, but their design and composition might...
08 Jun, 2024

PowerPoint Template Tips & Tricks You Ne...
PowerPoint seems to be an unknown world for many people, especially those who have been assigned to create a presentation out...
08 Jun, 2024