How to Add and Customize Sticky Notes in PowerPoint
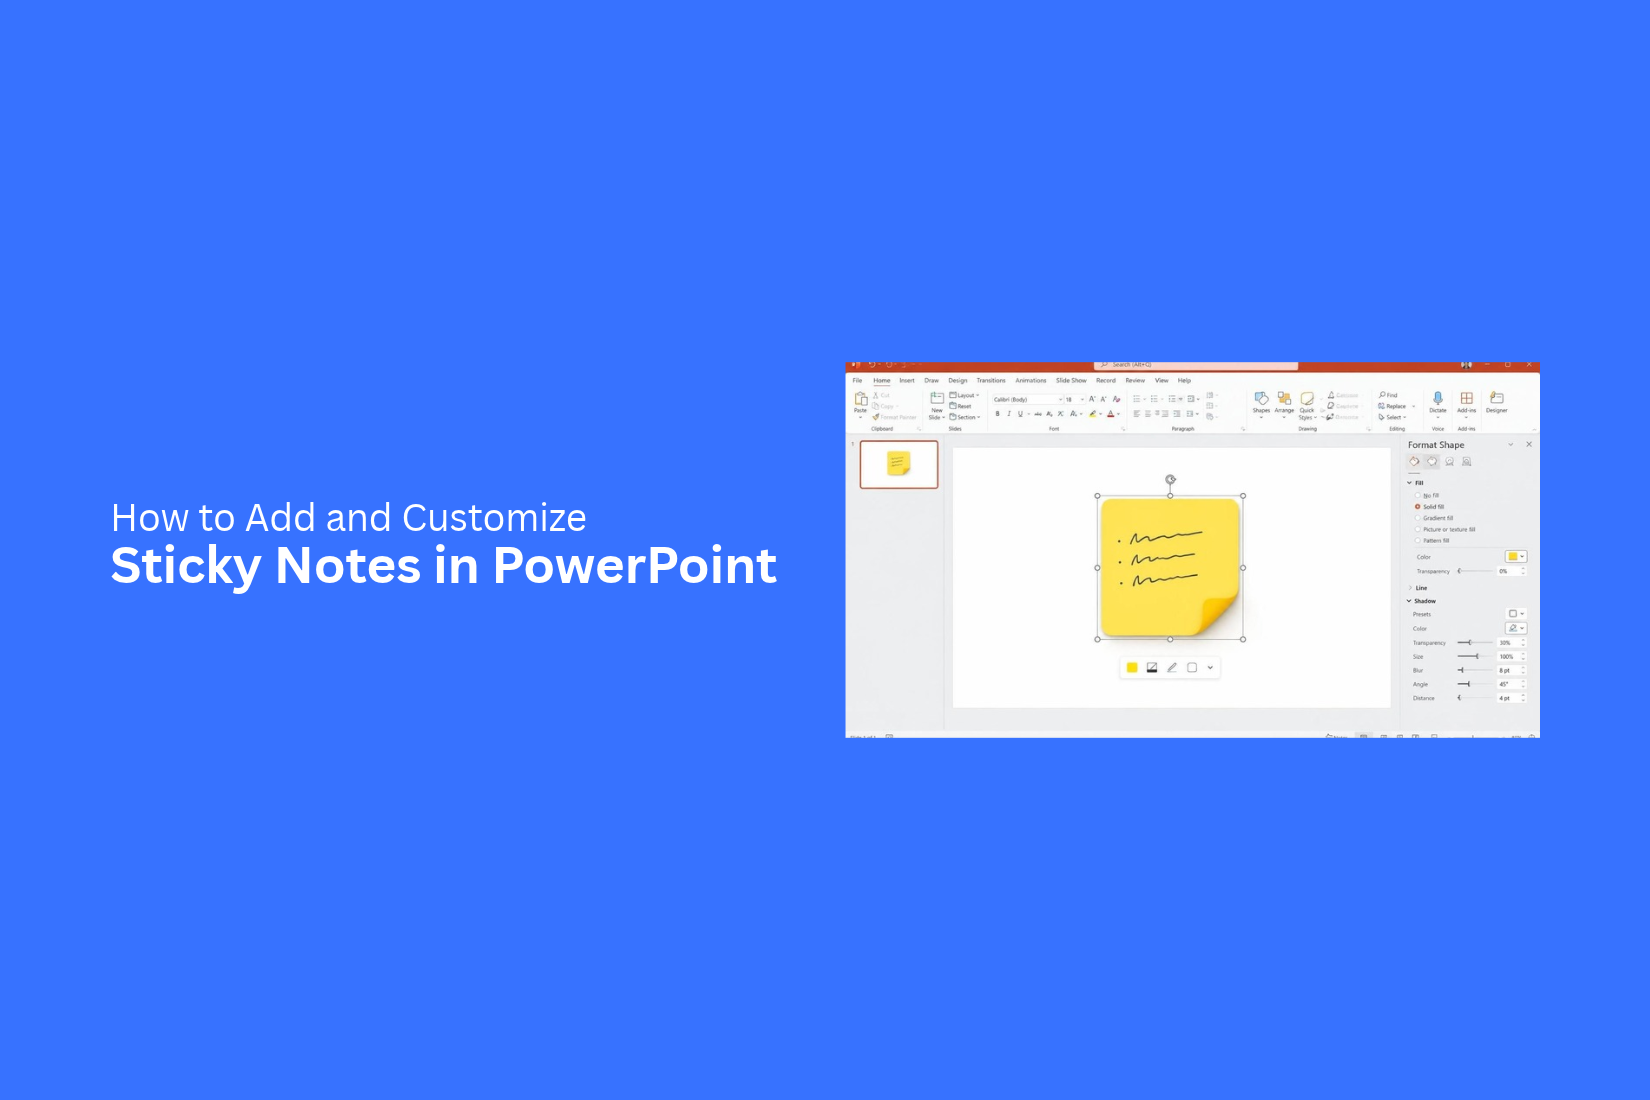
Sticky notes are a simple way to add short messages, reminders, and key points to PowerPoint slides. However, plain text boxes may not give your notes the look you want. They can also make your slides feel less organized.
A well-designed sticky note can do more than hold text. Poor colors, uneven spacing, or too many design effects can make your notes hard to read. This can take away from your main message.
PowerPoint gives you the tools to create custom sticky notes with shapes, colors, text, borders, and shadows. In this guide, you will learn how to make, customize, arrange, and reuse sticky notes. You will also find creative ways to use them in your presentations.
What Are Sticky Notes in PowerPoint?
Sticky notes in PowerPoint are small text boxes that look like paper notes. You can use them to add short messages, reminders, ideas, or comments to your slides. They help you share extra details without adding long blocks of text.
You can create sticky notes with shapes, text boxes, and colors. Add a square or rectangle, choose a fill color, and type your message inside it. You can also change the font, size, and position to match your slide design. Sticky notes work well for brainstorming sessions, team meetings, project plans, and classroom presentations. They make key points easy to spot and keep extra information organized.
Sticky Notes vs. Speaker Notes in PowerPoint
Sticky notes and speaker notes serve different purposes in PowerPoint. Both help you add extra information to a presentation. However, they work in different ways.
Sticky notes are visual notes that appear directly on your slides. You can use them to add reminders, comments, questions, or short messages. They help you keep track of ideas during the design process. You can also use custom shapes and colors to make them stand out.
Speaker notes stay below the slide in the Notes pane. They are not part of the main slide design. They help you prepare what to say during a presentation. You can add talking points, key details, or extra explanations without adding more text to the slide.
Here is a quick comparison:
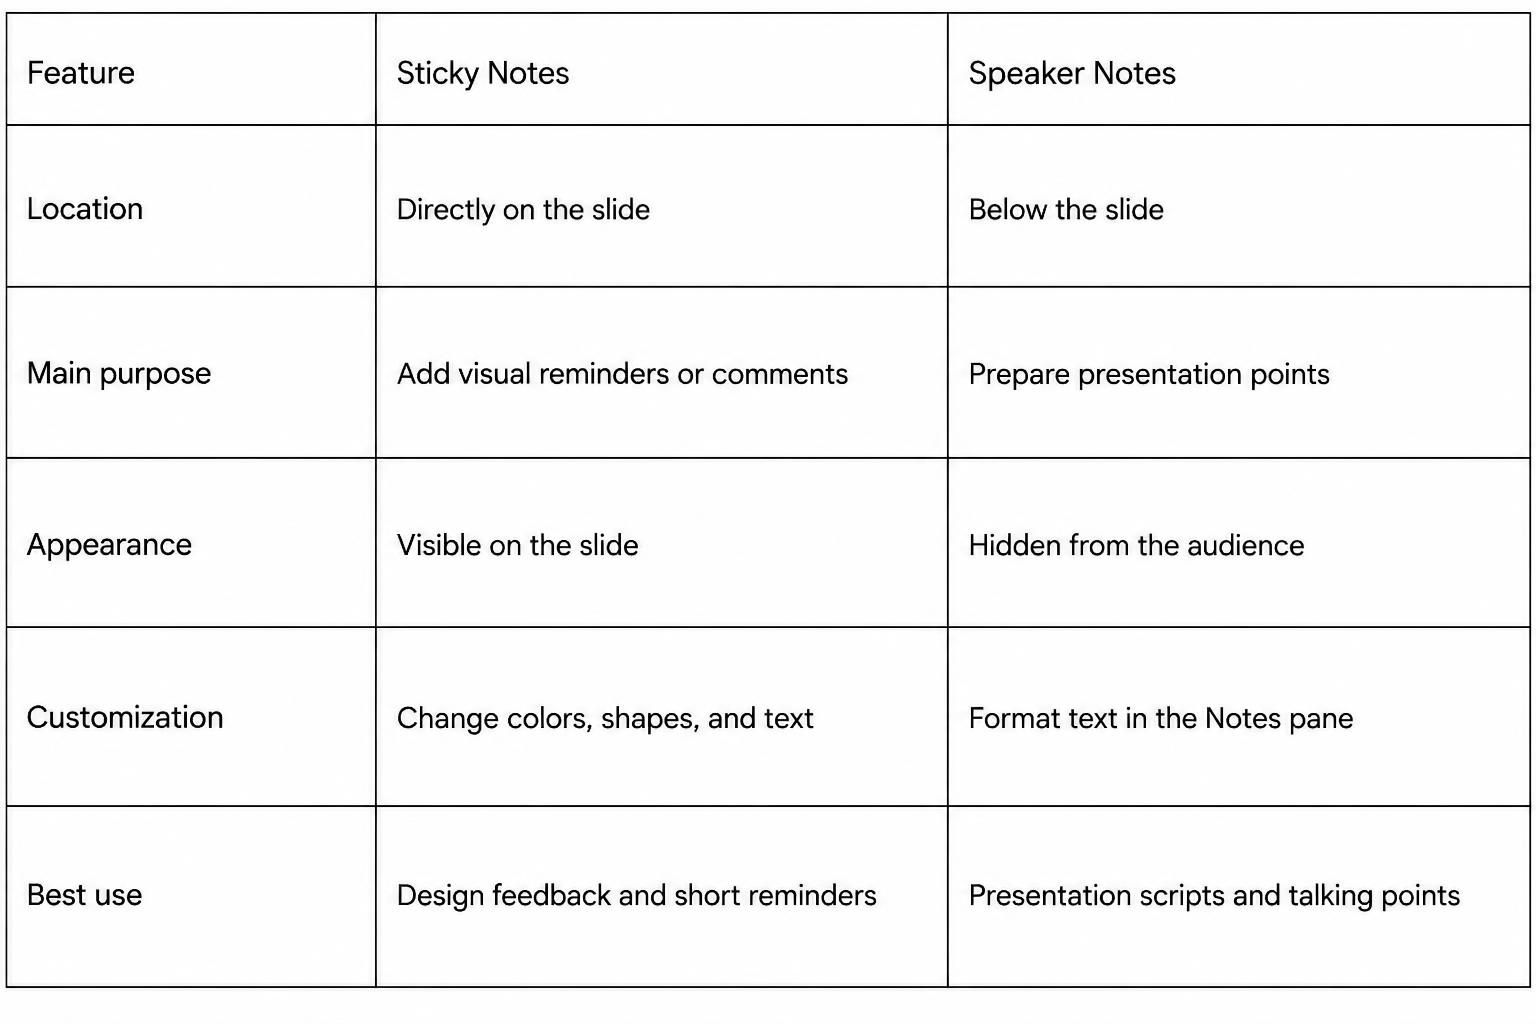
Choose sticky notes to mark ideas or share feedback on a slide. Use speaker notes to prepare your speech. Both can help you manage extra information without filling your slides with too much text.
How to Create Custom Sticky Notes in PowerPoint
PowerPoint lets you create sticky notes with simple shapes and text. You can choose your own colors, change the font, and add shadows. This gives you more control over the look of each note. Follow these steps to make custom sticky notes for your slides.
Step 1: Insert a Rectangle Shape
Start by opening your PowerPoint slide. Go to the Insert tab and click Shapes. Select the rectangle shape from the list. Click and drag on the slide to draw your sticky note. You can change its size later. A square or small rectangle works well for most notes.
Step 2: Choose a Sticky Note Color
Select the rectangle. Open the Shape Format tab and click Shape Fill. Pick a color from the palette. Yellow is a common choice for sticky notes. You can also use pink, blue, green, or any color that fits your slide design.
Step 3: Add Text to Your Sticky Note
Click inside the shape and start typing. Enter a short note, task, reminder, or key point. Keep the text brief. A sticky note should share one clear idea. Long text can make the note look crowded.
Step 4: Customize the Font and Text Alignment
Select the text inside your sticky note. Use the Home tab to change the font, size, and color. You can also make the text bold or italic. Use the alignment tools to place the text on the left, center, or right. Center alignment works well for short notes.
Step 5: Add Borders and Shadow Effects
Select the sticky note shape. Go to Shape Format and click Shape Outline. Choose a border color and adjust its width. Next, open Shape Effects and select Shadow. Pick a shadow style that adds depth to the note. Keep the effect light so the text stays easy to read.
Step 6: Adjust the Size and Position
Select your sticky note and drag its corner handles to adjust the size. Use the side handles to change its width or height. Drag the shape to place it on the slide. Keep enough space around each note. Use the alignment guides to line up multiple notes. This helps create a neat layout. You can also copy and paste the finished sticky note to make more notes with the same style. Change the text and color to suit each one.
How to Customize Sticky Notes in PowerPoint
PowerPoint gives you several ways to customize sticky notes. You can change their colors, adjust their shapes, and add small design details. These changes help you organize ideas and make each note easy to read. You can also use shadows, transparency, and icons to give your notes a different look.
Change Sticky Note Colors
Color helps you group sticky notes by topic or purpose. You can use yellow for general ideas, green for completed tasks, and pink for questions.
To change a sticky note's color:
- Select the sticky note on your slide.
- Go to the Shape Format tab.
- Click Shape Fill.
- Choose a color from the theme or standard color options.
- Select More Fill Colors to pick a custom color.
You can also use different colors for each note. This makes it easier to spot key points during a presentation.
Create Different Sticky Note Shapes
Sticky notes do not have to look like plain squares. PowerPoint lets you use different shapes to match your slide design. You can use rectangles, rounded rectangles, or other shapes for your notes.
Follow these steps:
- Go to the Insert tab.
- Click Shapes.
- Choose a shape from the list.
- Draw the shape on your slide.
- Add text inside the shape.
- Adjust its size and position.
A rounded rectangle can give your note a softer look. A square shape works well for a simple note layout. Use the same shape style across related notes to keep your slide neat.
Add a Folded Corner Effect
A folded corner can make a sticky note look more like a paper note. You can create this effect with a small triangle placed over one corner of the main shape.
Here is how to make it:
- Insert a square or rectangle for your sticky note.
- Go to Insert > Shapes.
- Select a small triangle.
- Place it over one corner of the sticky note.
- Rotate the triangle to match the corner.
- Change its fill color to a slightly darker or lighter shade.
- Remove the outline if needed.
Adjust the triangle's size and position until it looks like a folded paper corner. Group the triangle and the main shape to keep them together.
Adjust Transparency and Shadow
Transparency and shadow can give your sticky notes more depth. They can also help notes stand out from the slide background.
To adjust transparency:
- Select the sticky note.
- Open the Shape Format tab.
- Click Shape Fill.
- Select More Fill Colors.
- Adjust the transparency level in the color settings.
A low transparency value keeps the note more solid. A higher value makes the note more see-through.
To add a shadow:
- Select the sticky note.
- Open the Shape Format tab.
- Click Shape Effects.
- Select Shadow.
- Choose a shadow style from the options.
Keep the shadow light. A strong shadow can make the slide look crowded.
Add Icons and Other Design Elements
Small icons can help explain the purpose of each sticky note. For example, you can use a checkmark for completed tasks, a lightbulb for ideas, or an exclamation mark for important points.
Follow these steps to add icons:
- Go to the Insert tab.
- Click Icons.
- Search for an icon that matches your note.
- Select the icon and click Insert.
- Resize it and place it inside or near the sticky note.
- Change its color to match the note.
You can also add small lines, arrows, or circles to highlight key details. Keep these elements simple. Too many design details can take attention away from the text.
How to Duplicate, Arrange, and Group Sticky Notes
A slide with several sticky notes needs a clean layout. PowerPoint has tools to help you copy, move, align, and group notes. These tools make it easier to keep your notes in order. You can also use them to create a neat layout without editing each note from scratch.
Copy and Paste Sticky Notes
Copying a sticky note saves time. You can reuse the same design without making a new one.
- Select the sticky note you want to copy.
- Press Ctrl + C on Windows or Command + C on Mac.
- Press Ctrl + V or Command + V to paste the copy.
- Drag the new note to your preferred spot.
- Edit the text, color, or size as needed.
You can repeat these steps to add more notes. This is useful for creating a set of notes with the same style.
Align and Distribute Multiple Notes
PowerPoint has alignment tools to keep sticky notes in line. They help you create even rows and columns.
- Hold Ctrl on Windows or Command on Mac.
- Select all the sticky notes you want to arrange.
- Open the Shape Format tab.
- Select Align from the Arrange group.
- Choose an option such as Align Left, Align Center, or Align Top.
- Use Distribute Horizontally or Distribute Vertically to add equal space between notes.
These tools help keep your notes at the same level. They also make the space between notes look even.
Rotate Sticky Notes
A small rotation can make sticky notes look more like real paper notes. PowerPoint lets you turn each note to a different angle.
- Select a sticky note.
- Find the circular rotation handle above the shape.
- Drag the handle left or right.
- Stop at your preferred angle.
You can also open Shape Format and use the Rotate option for more control. Keep the angles slight so the text stays easy to read.
Group Text and Shapes Together
A sticky note may have a shape and a separate text box. Grouping them keeps both parts together. You can then move, resize, or rotate them as one object.
- Hold Ctrl on Windows or Command on Mac.
- Select the sticky note shape and its text box.
- Open the Shape Format tab.
- Select Group from the Arrange group.
- Choose Group from the menu.
Now, both parts work as one object. You can move or resize the sticky note without shifting the text out of place.
How to Create Reusable Sticky Notes in PowerPoint
Creating sticky notes from scratch for every slide can take extra time. PowerPoint lets you save and reuse your custom designs. You can keep the same colors, shapes, and text styles across your slides. This also helps your presentation look neat and consistent.
Save Custom Sticky Notes for Future Use
You can save a custom sticky note as a separate PowerPoint file. This gives you a ready-made design for future presentations. Start by creating your sticky note. Add your preferred shape, fill color, text, and font style. Adjust its size and position to match your needs.
Once the design is ready, select the sticky note and copy it. Open a new PowerPoint file and paste it onto a blank slide. Save the file with a clear name, such as "Custom Sticky Notes." You can open this file later and copy the sticky note into any presentation. This saves time and keeps your preferred design ready for use.
Duplicate Sticky Note Designs Across Slides
Duplicating sticky notes is a simple way to reuse the same design on multiple slides. You do not need to create each note again. Select the sticky note you want to copy. Press Ctrl + D on Windows to create a duplicate. You can also right-click the note and select Duplicate.
Move the copied note to the desired place on the slide. Change its text while keeping the same shape, color, and font style. You can also copy the note and paste it onto another slide. This helps you maintain the same design across your presentation.
Use Slide Master for Consistent Designs
Slide Master helps you keep a consistent sticky note design across your presentation. It is useful for presentations that use the same note style on many slides. Open the View tab and select Slide Master. Choose the layout where you want to add your sticky note. Insert a shape, set its fill color, and add your preferred text style.
Adjust the size and position of the note. Close Slide Master View after making your changes. The sticky note design will appear on slides that use that layout. You can edit the layout later to update the design across those slides. This makes it easier to keep your sticky notes consistent without editing each slide one by one.
Creative Ways to Use Sticky Notes in PowerPoint Presentations
Sticky notes can do more than hold short messages. They can help you share ideas, organize tasks, and keep your audience involved. Their small size makes them easy to place next to text, images, charts, or other slide elements.
Here are five useful ways to use custom sticky notes in your PowerPoint slides.
Brainstorming and Idea Mapping
Sticky notes are great for brainstorming sessions. You can use them to collect ideas and group related thoughts on a single slide. Give each idea its own note. Use different colors to separate topics or groups.
For example, a marketing team can use yellow notes for campaign ideas, blue notes for target audiences, and green notes for content plans. This makes the ideas easy to read and sort.
Project Planning and Task Tracking
Project planning often involves many tasks and deadlines. Sticky notes can help you show each task in a clear way. Add the task name, owner, and due date to each note.
You can also use different colors to show task status. For example, use green for completed tasks, yellow for ongoing tasks, and red for pending tasks. Place the notes in columns to create a simple project tracker.
Meeting Notes and Action Items
Sticky notes can help you record key points during a meeting. Add short notes for each topic, decision, or task. Keep the text brief so everyone can read it from the screen.
You can also create a separate note for each action item. Include the name of the person responsible and the due date. This gives the team a clear list of tasks after the meeting.
Feedback and Team Collaboration
Sticky notes make it easy to collect feedback from team members. Add notes beside the content that needs review. Each person can use a different color to share their comments.
For example, use blue notes for suggestions, yellow notes for questions, and pink notes for changes. This helps the team review ideas on the same slide. It also keeps feedback in one place.
Classroom Activities and Training
Teachers and trainers can use sticky notes to make lessons more interactive. Add questions, short tasks, or key points to your slides. Use separate notes for each activity.
For example, place a question on one sticky note and ask students to share their answers. You can also use sticky notes for group tasks, quick quizzes, and lesson reviews. This helps students take part in the session and keeps the lesson organized.
Best Practices for Designing Sticky Notes in PowerPoint
Good sticky notes should be easy to read and understand. A clean design helps your audience focus on the main message. Keep these tips in mind while creating sticky notes in PowerPoint.
• Keep the text short: Use a few words or short sentences. Focus on one idea per sticky note.
• Use clear colors: Pick colors that make the text easy to read. Use dark text on light backgrounds.
• Choose readable fonts: Use simple fonts with a suitable size. Make sure the text is clear from a distance.
• Keep the design simple: Use a clean layout. Avoid extra shapes, shadows, and other effects that do not add value.
• Follow a color system: Use the same color for similar types of notes. For example, use yellow for ideas and green for completed tasks.
• Leave enough space: Add space between sticky notes. This keeps the slide neat and easy to scan.
• Keep the style consistent: Use similar shapes, fonts, and sizes across your slides. This creates a uniform look.
These simple steps can help you create sticky notes that support your message. A clear layout also makes it easier for your audience to follow each point.
Common Sticky Note Design Mistakes to Avoid
Sticky notes can make your slides more useful. Poor design choices can have the opposite effect. Too much text, weak color choices, and crowded layouts can make your notes hard to read.
Here are some common mistakes to avoid.
Using Too Much Text
A sticky note has limited space. Adding long paragraphs can make it hard to read. Your audience may also lose track of the main point. Keep each note focused on one idea. Use short phrases or simple sentences. Add only the details your audience needs. Move extra information to another slide or the speaker notes.
Choosing Hard-to-Read Colors
Some color combinations make text hard to read. Light yellow text on a white background is one example. Dark text on a dark background is another. Choose colors with a clear difference between the text and background. Test your color choices in Slide Show mode. This helps you check how the notes look on a large screen.
Adding Too Many Effects
Shadows, glow, and 3D effects can make sticky notes look busy. Too many effects can also take attention away from the text. Use effects only when they serve a clear purpose. A simple shadow can help a note stand out from the slide. Keep other effects to a minimum.
Using Inconsistent Fonts and Sizes
Different fonts and text sizes can make your sticky notes look uneven. Your slides may also feel less organized. Choose one font for all your notes. Set a standard text size and use it across the slides. You can use a larger size for short titles. Keep the body text consistent.
Overcrowding Slides with Sticky Notes
Adding too many sticky notes to one slide can make the layout hard to follow. Notes may overlap or leave little space between them. Use only the notes that support your main message. Split large groups of notes across multiple slides. Arrange them in clear rows or groups. Leave enough space around each note so the text stays easy to read.
Final Notes
Custom sticky notes can make your PowerPoint slides more useful and organized. You can create them with shapes, colors, text, borders, and shadows. You can also change their size, position, and style to match your slides.
PowerPoint gives you several ways to manage your notes. Copy, align, rotate, and group them to keep your layout neat. Save your favorite designs for future presentations or use Slide Master to keep the same style across multiple slides. Keep your notes short and easy to read. Use clear colors, simple fonts, and enough space between each note. A clean design helps your audience focus on your main message.
FAQs
1. How do I create a sticky note in PowerPoint?
Go to Insert > Shapes and select a rectangle. Draw it on your slide, choose a fill color, and add your text. You can also change the font, size, and position.
2. Can I change the color of sticky notes in PowerPoint?
Yes. Select the sticky note and open the Shape Format tab. Click Shape Fill and choose a color. You can also pick a custom color from More Fill Colors.
3. How do I add a shadow to a sticky note in PowerPoint?
Select the sticky note shape. Go to Shape Format > Shape Effects > Shadow. Choose a shadow style from the available options.
4. Can I create sticky notes with different shapes in PowerPoint?
Yes. PowerPoint lets you use squares, rectangles, rounded rectangles, and other shapes. Go to Insert > Shapes and select the shape you want.
5. How do I duplicate a sticky note in PowerPoint?
Select the sticky note and press Ctrl + D on Windows. You can also right-click the note and select Duplicate. Edit the copied note as needed.
6. How do I keep multiple sticky notes aligned in PowerPoint?
Select the notes you want to arrange. Open Shape Format > Align and choose an alignment option. Use Distribute Horizontally or Distribute Vertically to create equal spacing.
7. Can I reuse custom sticky notes in other PowerPoint presentations?
Yes. Copy your sticky note into a separate PowerPoint file and save it. You can open that file later and copy the design into other presentations.
8. What is the difference between sticky notes and speaker notes in PowerPoint?
Sticky notes appear directly on your slides. They are useful for short messages, reminders, and design feedback. Speaker notes appear below the slide in the Notes pane. They help you prepare talking points and presentation scripts.
9. Can I use Slide Master to create reusable sticky notes?
Yes. Open View > Slide Master and add your sticky note to a slide layout. The design will appear on slides that use that layout.



You may also be interested in ...

How To Create An Eye-Catching Portfolio
If you’re looking to create an eye-catching portfolio, this post will come in handy. In this article, you can find the easies...
23 Jun, 2024

How To Easily Create An Infographic
Infographics are the perfect way to make a presentation that will impact an audience, but their design and composition might...
08 Jun, 2024

PowerPoint Template Tips & Tricks You Ne...
PowerPoint seems to be an unknown world for many people, especially those who have been assigned to create a presentation out...
08 Jun, 2024