How to Create a Loop Animation in PowerPoint
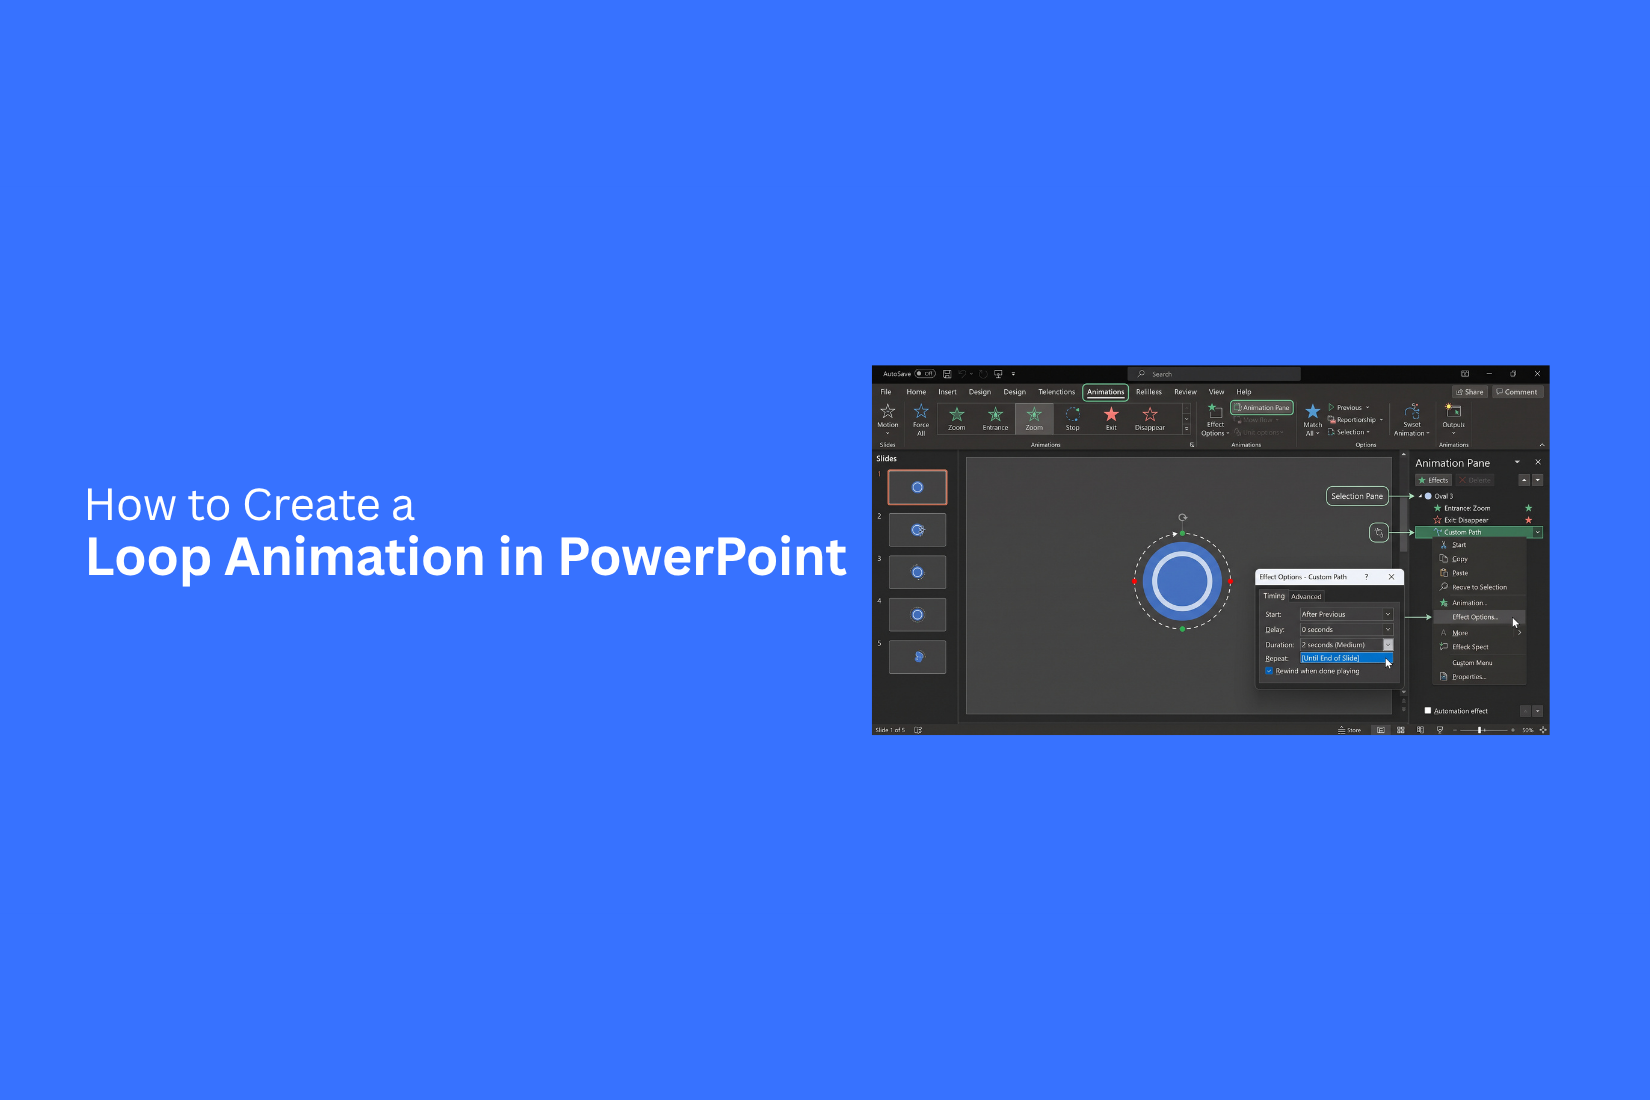
PowerPoint animations can add motion to a slide, but an effect that plays only once may not fit every presentation. You may need an object to move, spin, or change more than once without starting it again by hand. This can be useful for demos, training slides, and displays that run on their own.
A loop animation solves this issue by making an animation repeat for a set time or until you stop it. PowerPoint includes timing and repeat settings that let you control how the effect plays.
This guide explains how to create a loop animation in PowerPoint. You will learn how to set the timing, repeat an effect, loop motion paths, run multiple animations together, and stop a loop.
What Is a Loop Animation in PowerPoint?
A loop animation in PowerPoint is an animation that repeats again and again without stopping. It can make an object move, spin, fade, or change in a repeated pattern. For example, a circle can keep spinning, an arrow can move across the slide, or an icon can appear and disappear. The animation repeats for as long as you set it to run.
PowerPoint lets you control how an animation repeats. You can set it to play a certain number of times or continue until the slide changes. This makes loop animations useful for title slides, background effects, waiting screens, product displays, and other visual content. A loop animation works best with simple movements. A short animation with a clear pattern can keep a slide active without distracting from the main content.
Why Use Loop Animations in PowerPoint?
Loop animations can make a PowerPoint slide more active and engaging. The animation repeats on its own, so you do not need to restart it each time.
Here are a few reasons to use loop animations in your slides:
• Keep attention on key content: A repeating animation can draw the eye to an important part of a slide.
• Show repeated actions: Loop animations work well for steps, cycles, processes, and repeated movements.
• Make slides more engaging: Simple motion can add life to a slide without adding extra text.
• Create visual effects: Repeating movement can make objects, icons, shapes, or images more interesting.
• Support presentations without extra clicks: A loop can keep running during your explanation while you focus on speaking.
• Make content easier to follow: Motion can help show how parts of a process connect or repeat.
A good loop animation should support the message of the slide. Keep the movement simple and use it only where it helps the audience follow the content.
How to Create a Loop Animation in PowerPoint
A loop animation makes an object repeat its movement during a slide show. This can work well for icons, shapes, text, arrows, and other slide elements. PowerPoint gives you control over the animation effect, speed, start time, and repeat settings. The process is simple. Add an object, apply an animation, adjust its timing, and set it to repeat. The steps below show how to set up the animation from start to finish.
Step 1: Add an Object to Your Slide
Start by adding the object you want to animate. You can use a shape, picture, icon, text box, or another item on your slide.
- Open your PowerPoint presentation.
- Select the slide where you want the animation.
- Go to the Insert tab.
- Add a shape, picture, icon, or text box.
- Move the object to the position where you want the animation to start.
- Resize the object if needed.
Choose an object that is easy to see during the slide show. A simple shape or icon is a good choice for a first test. The starting position also matters. Place the object where you want the animation to begin. This gives you a clear reference as you adjust the effect.
Step 2: Apply an Animation
Once the object is ready, add an animation effect.
- Click the object on your slide.
- Open the Animations tab.
- Browse the available animation effects.
- Select an effect that matches the movement you want.
- Use Effect Options to adjust the effect if the option is available.
PowerPoint has many animation effects. Some effects change how an object appears. Others move the object or change its size. For a loop, choose an effect that looks natural after it repeats. A simple movement can be easier to follow than a complex effect. You can also change the animation later. Start with one effect and use the preview option to see how it looks before adjusting other settings.
Step 3: Open the Animation Pane
The Animation Pane gives you a clear view of the animations on your slide. It also makes it easier to change the settings for each effect.
- Select the animated object.
- Go to the Animations tab.
- Click Animation Pane.
- Look at the panel that appears on the side of the PowerPoint window.
- Find the animation you just added.
The animation appears as an item in the pane. Select it to access more controls. The pane is useful if your slide has more than one animated object. You can see each animation in one place and adjust the settings without searching through the slide. For a basic loop, focus on the animation you want to repeat. This helps keep the setup simple and makes timing changes easier.
Step 4: Set the Animation Timing
Timing controls the speed and start point of your animation. The right settings can make the repeated movement easier to watch.
- Select the animation in the Animation Pane.
- Click the arrow beside the animation.
- Choose Timing.
- Find the Start setting.
- Set the Duration.
- Set a Delay if you want a pause before the animation starts.
- Click OK to save the changes.
The Duration controls how long the animation takes to play. A short duration creates quicker movement. A longer duration creates slower movement. The Start setting controls how the animation begins. You can set it to start after a click or based on another animation. A Delay adds extra time before the effect starts. A small delay can help separate the start of the animation from other slide actions. Try the timing settings with the preview. Small changes can make a noticeable difference in how the loop feels.
Step 5: Set the Animation to Repeat
The repeat setting tells PowerPoint how many times the animation should play. This is the key setting for creating a loop.
- Select the animation in the Animation Pane.
- Open the animation's Timing settings.
- Find the Repeat option.
- Choose the number of repeats you need.
- Select Until End of Slide for a continuous loop.
- Click OK.
You can choose a specific number of repeats if the animation only needs to play a few times. For a slide that stays on screen for a longer period, Until End of Slide can keep the animation running. The repeat setting works with the animation timing. Check both settings together so the movement fits the slide. For example, a short animation with a long slide can repeat many times. A longer animation may repeat fewer times during the same slide.
Step 6: Preview the Loop Animation
The final step is to preview the animation. This helps you check the movement, speed, and repeat behavior before using the slide.
- Go to the Animations tab.
- Click Preview.
- Watch the object as the animation plays.
- Check how the animation starts.
- Watch how the animation repeats.
- Check the speed of the movement.
- Adjust the settings if the loop does not look right.
Pay attention to the point where the animation starts again. A good loop should feel smooth from one cycle to the next. The preview also helps you spot timing issues. The object may move too quickly, pause too long, or repeat more times than needed.
Make small changes to the Duration, Delay, and Repeat settings. Preview the animation after each change. This makes it easier to find settings that work well for your slide.
How to Make a PowerPoint Animation Loop Continuously
PowerPoint can play an animation again and again during a presentation. This works well for moving icons, shapes, arrows, or other slide elements.
Follow these steps to create a continuous animation loop:
- Select the object: Click the text, shape, image, or other object you want to animate.
- Add an animation: Open the Animations tab. Choose an animation effect from the available options.
- Open the Animation Pane: Go to Animations > Animation Pane. The pane shows the animation added to your slide.
- Open the timing settings
- Right-click the animation in the Animation Pane. Select Timing.
- Set the repeat option: Find the Repeat setting in the Timing window. Choose how many times you want the animation to play. Select Until End of Slide to keep the animation running for the full slide.
- Set the start option: Choose With Previous for an animation that starts with another animation. Choose After Previous for an animation that starts after the previous effect ends.
- Set the duration: Adjust the Duration value to control how long each animation cycle takes. A shorter duration creates quicker movement. A longer duration creates slower movement.
- Preview the animation: Click Preview on the Animations tab. Check the movement and timing. Adjust the settings until the loop plays as needed.
A continuous loop can keep a slide active without repeated clicks. It also helps create simple motion effects that run in the background during a presentation.
How to Create a Looping Motion Path Animation
A motion path lets an object move along a set path on your slide. You can set the path to repeat, so the object keeps moving during the slide.
Step 1: Add an Object to Your Slide
Start with the object you want to move. You can use a shape, icon, picture, or other slide object. Place it at the starting point of the motion.
Step 2: Add a Motion Path
- Select the object.
- Open the Animations tab.
- Select Add Animation.
- Scroll to Motion Paths.
- Pick a path that fits your animation.
- Use More Motion Paths for more path choices.
PowerPoint also lets you draw a custom path. Select Custom Path and draw the route you want the object to follow.
Step 3: Adjust the Motion Path
The path appears on the slide as a dotted line. Drag the endpoint to change the distance of the movement. Use Effect Options to change the direction or other path settings. You can also edit the points of a custom path. For a circular loop, choose a circular motion path if it is available in your version of PowerPoint. A closed path helps the object return to its starting point.
Step 4: Set the Animation to Repeat
Open the Animation Pane and select the motion path animation. Open its Timing options. Find Repeat and choose the repeat setting you need. You can also choose Until End of Slide for an animation that keeps playing for the rest of the slide. PowerPoint also has a Rewind when done playing option that returns the object to its starting position after the animation ends.
Step 5: Adjust the Speed
Set the Duration to control how long one movement takes. A longer duration creates slower movement. A shorter duration creates quicker movement.
Step 6: Preview the Loop
Select Animations > Preview to test the movement. Check the path, speed, and repeat setting. Make small timing changes until the object moves smoothly and returns to the start of the path without a noticeable pause.
How to Make Multiple Animations Loop Together
Multiple animations can run in a repeating sequence on the same slide. The key is to give each animation the right timing. Start by adding the animations to your objects. Open the Animation Pane to see all animation effects on the slide. Use the pane to set the order of each effect.
Set the Start option for each animation. Use With Previous for effects that should start at the same time. Use After Previous for effects that should follow another effect. Next, adjust the Duration and Delay settings. Keep the timing close across the animations. This helps the effects stay in sync. To repeat the full sequence, set the repeat option for the animation. Test the slide in Slide Show view. Watch the full cycle and adjust the timing until the animations play as expected.
Tips for Better Timing
• Use the Animation Pane to control the order.
• Keep related animations at similar speeds.
• Use small delays to create space between effects.
• Test the full loop before presenting.
• Keep the number of moving objects low for a cleaner result.
How to Stop a Loop Animation
A loop animation can be stopped by changing its repeat setting. Select the animated object and open the Animation Pane. Find the animation effect you want to change. Open its timing settings and look for the Repeat option. Remove the repeat setting or change it to a single play. You can also remove the animation from the object. Select the object, open the Animations tab, and choose None. Run the slide in Slide Show view to check the result. The animation should now play only for the number of times you selected.
Common Problems With PowerPoint Loop Animations
Loop animations can sometimes behave differently than expected. Most issues come from timing, animation order, or repeat settings.
Animations Do Not Loop
Check the repeat setting for the animation. A repeat option must be active for the effect to run again.
Animations Are Out of Sync
Open the Animation Pane and review the timing for each effect. Check the Start, Duration, and Delay settings. Small timing differences can change the flow of the loop.
One Animation Stops Early
Check the duration of that animation. A short duration may cause the effect to end before the other animations finish.
Animations Start at the Wrong Time
Review the Start setting for each effect. With Previous and After Previous, create different timing patterns. Choose the setting that matches the order you want.
The Loop Looks Uneven
Review the full animation cycle in Slide Show view. Adjust the duration and delay settings so each part of the sequence has enough time to play.
The Animation Does Not Play During the Presentation
Run the slide in Slide Show view and check the animation settings. Also check the Animation Pane to make sure the effect is still applied to the correct object.
Tips for Better Loop Animations
A good loop animation should feel smooth and easy to follow. Keep the movement simple so it does not distract from the main message.
• Keep the motion simple: Use a small number of animation effects. Too much movement can make a slide hard to read.
• Use the same timing: Keep similar animations at a similar speed. This creates a steady visual rhythm.
• Match the animation to the content: Use motion that supports the topic. A moving arrow can show a process, while a rotating shape can show a cycle.
• Keep text readable: Avoid moving text too quickly. Give viewers enough time to read each part.
• Use a short loop: A short animation can repeat without making the slide feel slow.
• Preview the slide: Play the animation several times. Check the timing, movement, and position of each object.
• Keep the slide clean: Leave enough space around moving objects. A clear layout makes the animation easier to follow.
Where to Use Loop Animations in Presentations
Loop animations can work well on slides that stay on screen for a while. They can add motion without needing the presenter to trigger each effect.
Title Slides: A simple moving shape or graphic can add motion to a title slide. Keep the movement slow and subtle so the title stays easy to read.
Process Slides: Looping arrows or shapes can show a process that repeats. This works well for workflows, production cycles, and other repeated steps.
Data Slides: A small looping graphic can draw attention to a key number or chart. Keep the animation limited so the data remains the main focus.
Section Slides: A loop can add movement to a section divider. A rotating icon or moving shape can help create a clear break between topics.
Waiting Slides
Loop animations can keep a slide active during breaks, questions, or short pauses. They can also work on slides shown before a presentation starts.
PowerPoint Loop Animation vs. GIF
PowerPoint loop animations and GIFs can both create repeated motion, but they work in different ways.
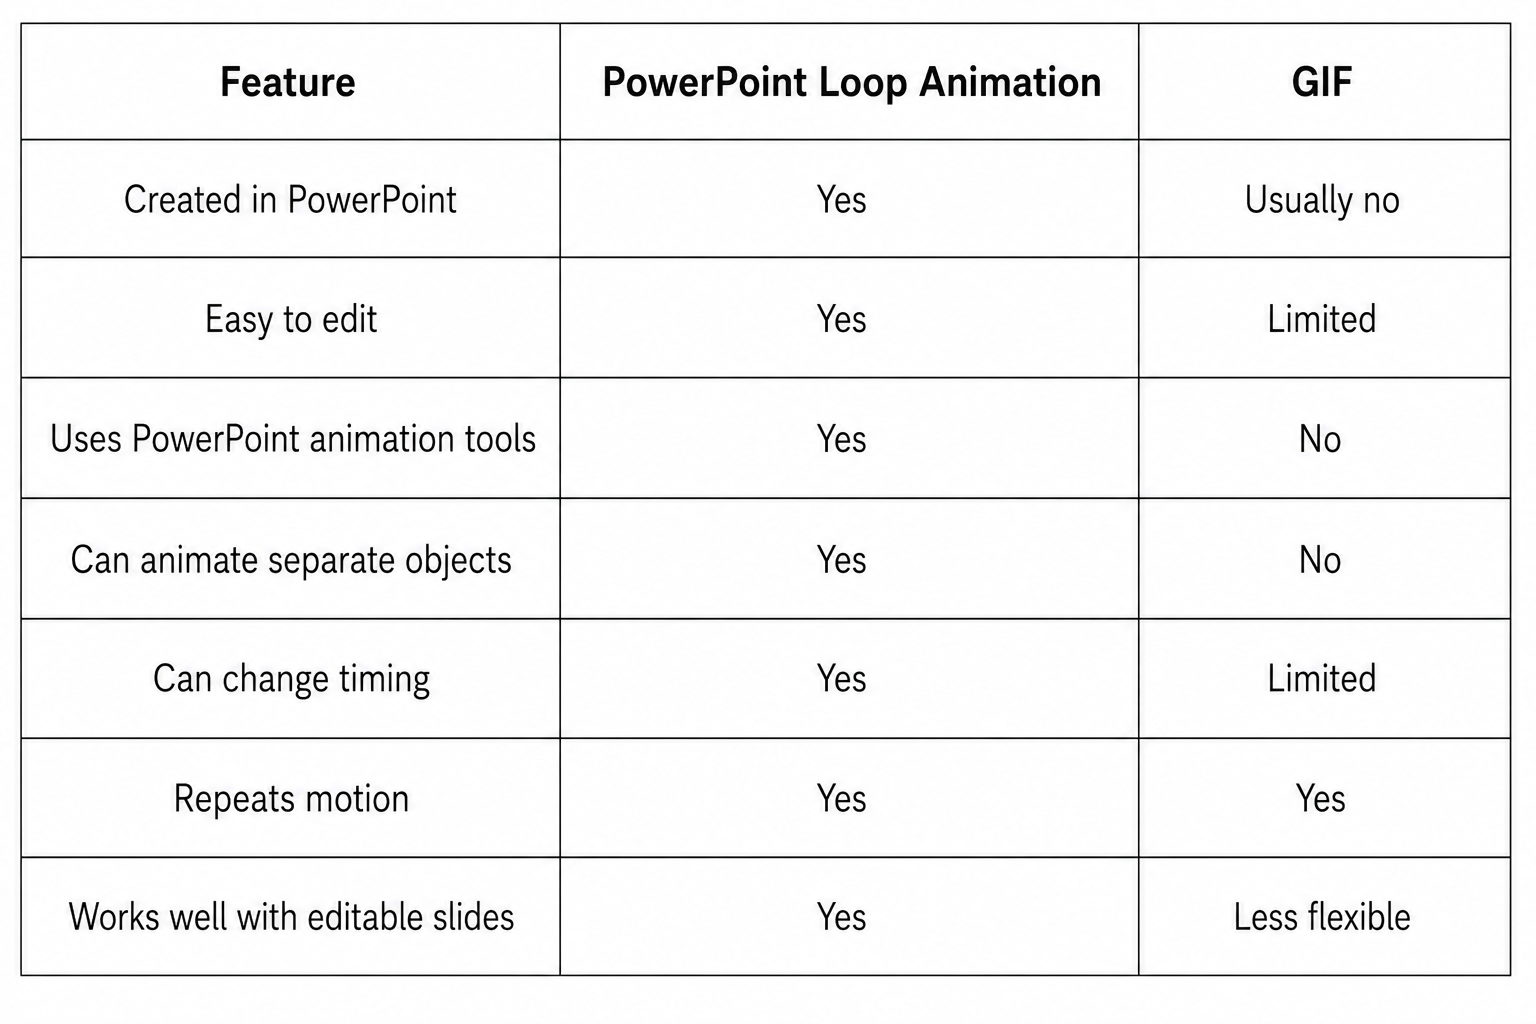
A PowerPoint loop animation gives you more control over individual objects. You can change the effect, timing, direction, and order of the animation. A GIF works more like a ready-made video clip. It is useful for short visual effects that do not need much editing inside PowerPoint. For editable presentations, PowerPoint animation is often the better choice. A GIF can work well for a finished visual that you want to repeat without changing its parts.
Final Notes
Loop animations can add simple motion to a PowerPoint slide without extra clicks. You can repeat an effect for a set number of times or keep it running until the slide ends. Start with a simple object and animation. Then adjust the Start, Duration, Delay, and Repeat settings in the Animation Pane. Motion paths can add movement across the slide, while multiple animations can create a repeating sequence.
Always preview the slide before presenting. Check the speed, timing, object position, and repeat behavior. Keep the motion simple so the animation supports the slide instead of taking attention away from the main content. With the right timing and repeat settings, you can create smooth loop animations for process slides, title slides, waiting screens, data slides, and other presentation content.
FAQs
Can I make an animation repeat in PowerPoint?
Yes. Select the animation, open its Timing settings, and use the Repeat option. You can choose a set number of repeats or select Until End of Slide.
How do I make a PowerPoint animation loop continuously?
Select the animated object and open Animations > Animation Pane. Open the animation's Timing settings. Set Repeat to Until End of Slide. Then preview the slide to check the loop.
Can I loop a motion path in PowerPoint?
Yes. Add a motion path to an object, then open its Timing settings. Use the Repeat option to make the motion path play again. A closed path can help the object return to its starting point.
Can multiple animations loop together in PowerPoint?
Yes. Use the Animation Pane to control the order and timing of each effect. Set With Previous or After Previous based on how you want the animations to run. Adjust the duration and delay so the effects stay in sync.
How do I stop a looping animation in PowerPoint?
Open the animation's Timing settings and remove the repeat setting or change it to a single play. You can also select the object, go to the Animations tab, and choose None.
Why is my PowerPoint animation not looping?
Check the Repeat setting first. Then review the Start, Duration, and Delay settings in the Animation Pane. Preview the slide in Slide Show view to check how the animation behaves.
Can I control the speed of a loop animation?
Yes. Use the Duration setting in the animation's Timing options. A shorter duration makes the animation move faster. A longer duration makes it move slower.
Can I use loop animations on a PowerPoint title slide?
Yes. A simple moving shape, icon, or graphic can add motion to a title slide. Keep the movement slow enough so the title remains easy to read.
Is a PowerPoint loop animation better than a GIF?
It depends on your needs. PowerPoint animations give you more control over individual objects, effects, and timing. A GIF works well as a ready-made visual that repeats without needing separate objects inside PowerPoint.
Do loop animations work during Slide Show mode?
Yes. Loop animations can continue playing during Slide Show mode based on their timing and repeat settings. Always test the slide in Slide Show view before presenting.


You may also be interested in ...

How To Create An Eye-Catching Portfolio
If you’re looking to create an eye-catching portfolio, this post will come in handy. In this article, you can find the easies...
23 Jun, 2024

How To Easily Create An Infographic
Infographics are the perfect way to make a presentation that will impact an audience, but their design and composition might...
08 Jun, 2024

PowerPoint Template Tips & Tricks You Ne...
PowerPoint seems to be an unknown world for many people, especially those who have been assigned to create a presentation out...
08 Jun, 2024