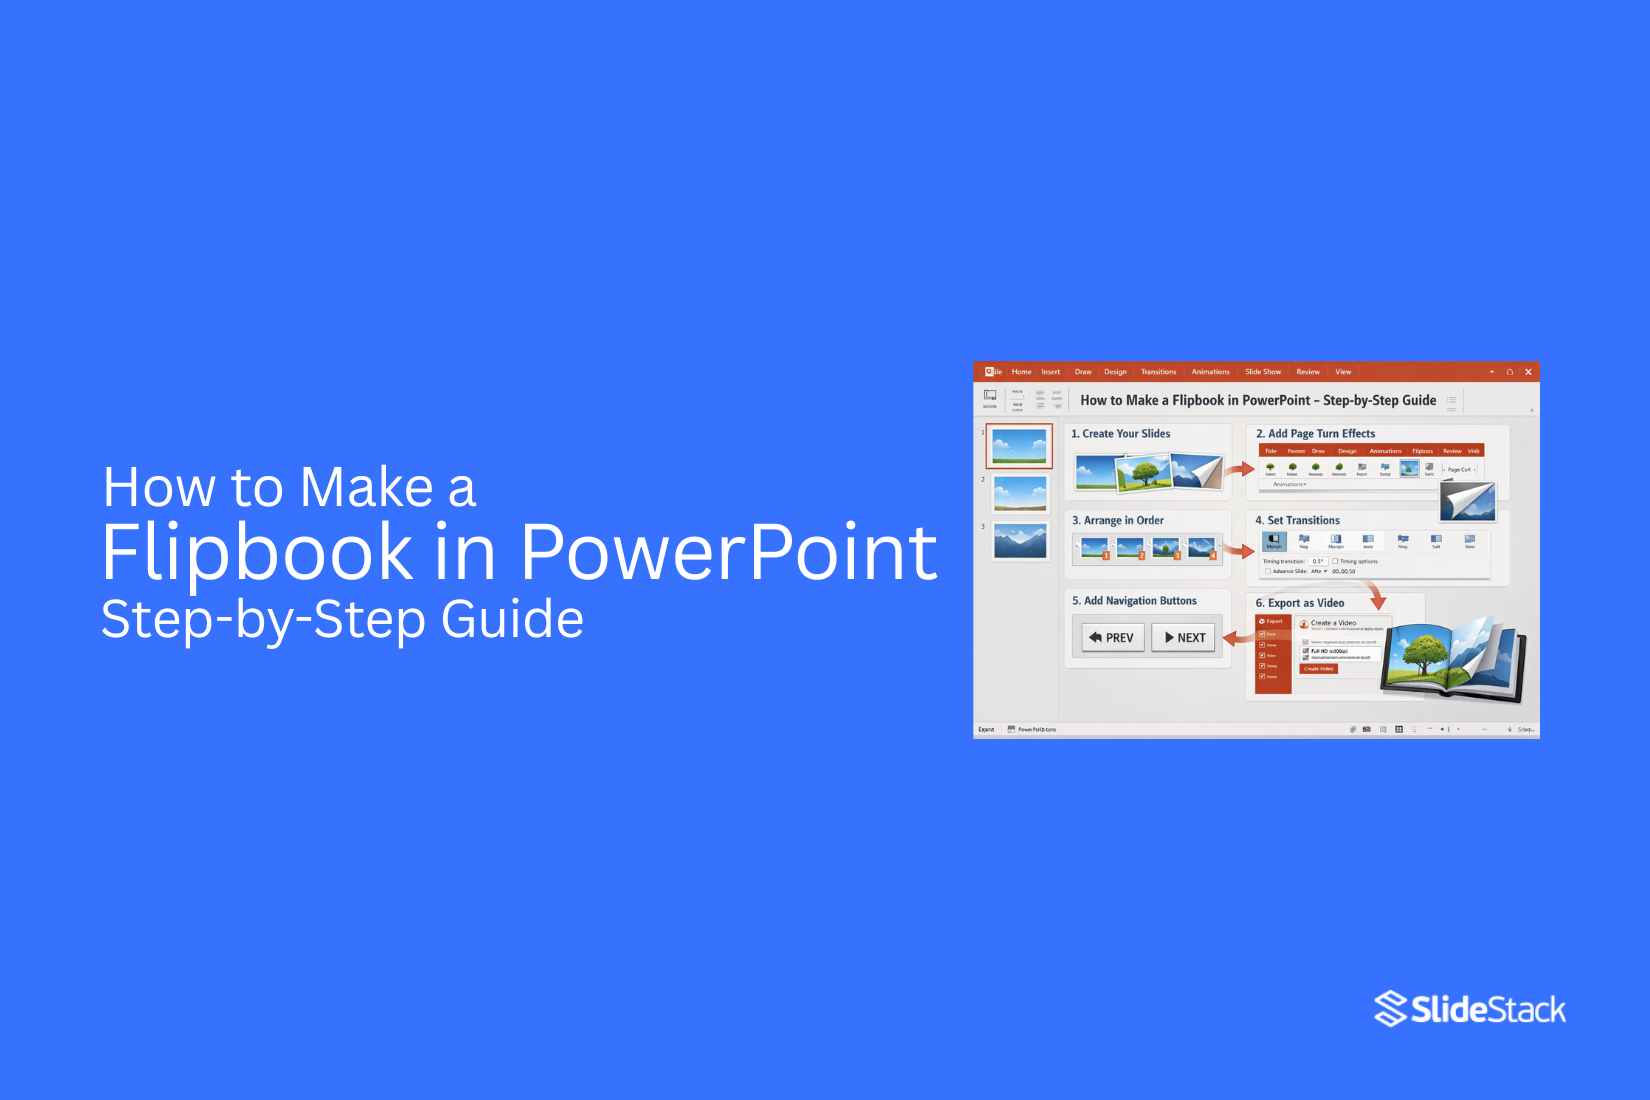
How to Make a Flipbook in PowerPoint – Step-by-Step Guide
A flipbook is a sequence of pages where each one displays a slightly different image or layout, creating the impression of motion or progression as you move through them. The concept predates digital media by more than a century. Still, the digital version serves the same purpose: presenting content in a page-by-page format that feels more like reading a publication than scrolling through a static file.
PowerPoint replicates this effect using built-in transitions like Flip, Peel Off, and Morph. These tools help create smooth page changes between slides. The method works for catalogs, reports, photo albums, and training materials. Everything stays inside a familiar tool without extra software or subscriptions.
What Is a Flipbook in PowerPoint?
A flipbook in PowerPoint is a set of slides that show small changes from one slide to the next. These changes create the feeling of movement. It looks like pages turning in a book.
Each slide holds a slightly different image or layout. As you move through the slides, the content appears to move or animate. This gives a simple motion effect without using video.
PowerPoint can create this effect using slide transitions. The Flip transition is often used. It helps one slide change into the next in a smooth way. This makes the presentation feel like a moving story instead of still pages.
Why Create a Flipbook in PowerPoint?
Before jumping into the "how," let's quickly discuss the "why." While a standard presentation works, a flipbook brings clear benefits:
Increased Engagement: The page turn keeps attention. It feels more active than clicking slides. People stay with the content longer.
Novelty and Professional Look: A flipbook stands out. It gives a clean and polished look. It shows care in how your content is presented.
Improved Story Flow: The book's style keeps ideas in order. Each page connects in a clear path. Readers follow the message step by step without confusion.
Versatility: It works for many uses. You can use it for reports, catalogs, training material, and portfolios. It fits both work and personal projects.
Step-by-Step Guide to Making a Flipbook in PowerPoint
A flipbook in PowerPoint relies on a sequence of slides that change slightly from one page to the next. Each slide acts like a frame. Small changes between slides create movement.
Step 1 – Create a New Presentation
Start with a clean structure. This gives every slide a consistent base to work from. A new presentation sets the foundation for your flipbook. It removes extra elements that can disrupt the flow between pages. A blank setup also makes it easier to control layout and timing later.
Open PowerPoint on your device. Select a blank presentation. This gives you an empty slide to begin your work. Set the slide size to widescreen format for a stable viewing area. This keeps all frames aligned across the flipbook. Use a uniform layout so each slide matches in shape and spacing.
Step 2: Apply the Flipbook Animation
This step turns a normal slide set into a page-turning style sequence. You use the Transitions tab in PowerPoint to control how one slide moves into the next. The goal is to make each slide feel like part of a moving book.
The Flip transition sits under the transition effects list and creates a rotating motion between slides. The slide turns in a smooth 3D movement. This works well for clean layouts and structured content. It keeps movement simple and easy to follow.
Page Curl appears in some PowerPoint versions in the same effects area. It lifts one corner of the slide and rolls it forward. The motion feels closer to a real paper page. It suits content that follows a story flow or reading style layout.
Peel Off adds a different style. It pulls the slide away from a corner and reveals the next one underneath. The movement feels more physical and layered. This works well for visual slides such as product pages, image sets, or design portfolios. Flip feels more formal and stable. Page Curl feels softer and more natural. Peel Off feels more dynamic and expressive.
After choosing a transition, move to the Timing section in the Transitions tab. Select Apply To All to keep the same motion across every slide. This creates a steady rhythm from start to finish. Mixed transitions break the flow and reduce the flipbook effect.
Duration controls how long the movement takes. A short duration creates quick page turns. A longer duration slows the motion and adds more weight to each slide change. Balance matters here. Too fast feels rushed. Too slow feels heavy.
Morph adds another level of movement. It shifts objects between slides instead of replacing the whole slide. Text, shapes, and images move smoothly into new positions. This supports clean visual storytelling across a sequence of slides. It takes more setup, but the motion feels more refined.
Slide timing controls how the presentation moves without clicks. Turning on automatic advance moves slides after set intervals. This keeps the flipbook running on its own. It works well for displays that run without manual control.
Step 3 – Duplicate Slides
Start by copying your main slide. Each copy becomes a new frame in your flipbook. Right-click the slide thumbnail. Select duplicate. Repeat this for each frame you need. The number of duplicates depends on how smooth you want the motion to look.
Each slide holds a slightly changed version of the same scene. This structure creates movement when played in sequence.
Step 4 – Adjust Objects Frame by Frame
Now shift elements across each slide. Select objects like shapes, text, or images. Move them slightly on each duplicated slide. Keep changes small and consistent. This creates motion that feels continuous during playback.
Work in order from the first slide to the last. Each adjustment should follow the previous position. Gaps in movement will break the flow. Zoom in if needed for precision. Alignment tools help keep positioning stable.
Step 5 – Apply Slide Transitions
Transitions control how each slide moves into the next. Open the Transitions tab. Select a simple effect like Fade or Morph. Apply the same transition across all slides.
Consistency matters here. Different transitions across slides can interrupt the flipbook effect. Smooth transitions keep the movement natural. Preview a few slides to check the flow. Adjust only if movement feels uneven.
Step 6 – Add Automatic Timing
Timing controls how fast each page changes. Go to the Transitions tab. Locate the Advance Slide section. Turn off “On Mouse Click.” Set a time delay instead. Choose a short and consistent duration. This keeps the flipbook steady during playback. Too much delay slows the motion. Too little makes it hard to follow.
Use Rehearse Timings if you want PowerPoint to record the pacing automatically. This helps keep the sequence uniform without manual clicking.
Step 3: Export or Present Your Flipbook
Once the animation is ready, you have two main ways to deliver it. One option is video export. The other option is live slideshow playback. Each one fits a different use case and delivery style.
The first option is to export the flipbook as an MP4 video. Go to File > Export > Create a Video. Select a resolution such as 1080p for most uses. Then start the export process. PowerPoint will render all pages and transitions into a single video file. The final MP4 keeps all motion and effects in the exact order from the slide deck. This format works well for email sharing, websites, and video platforms like YouTube or Vimeo. It also removes the need for PowerPoint during viewing.
The second option is a live slideshow presentation. Open Slide Show > Set Up Slide Show > Browsed at a kiosk (full screen). This setup runs the flipbook in full-screen mode. It can loop based on the timing set in the Transitions panel. This option works well for displays, kiosks, and live presentations. It also works well during screen-sharing sessions where control stays with the presenter.
There is also a third option, GIF export. This creates a looping animation from the slides. It is built from exported frames combined into one file. The format plays automatically and repeats on a loop. It works for quick previews and simple sharing.
GIF output has clear limits. Colors are reduced. File size can grow quickly. The detail quality drops compared to the video. MP4 remains the stronger choice for most professional use cases because it keeps better quality and smoother playback.
Use Cases for a PowerPoint Flipbook
A PowerPoint flipbook works best where content needs structure and flow. It helps you present information in a clean, page-by-page format. Each page feels intentional. Each section gets space to stand on its own. That makes it useful in many professional settings where clarity matters more than speed.
Sales teams often use flipbooks for product catalogs. Each slide can focus on one product. Images sit clearly on the page. Key details stay easy to scan. Pricing, features, and comparisons feel organized instead of crowded. A client moves through the catalog like reading a curated brochure. This improves focus during pitches and product walkthroughs.
Human resources teams also gain value from this format. Onboarding guides become easier to follow. New employees move through policies step by step. Benefits, expectations, and training schedules sit in separate sections. Nothing feels rushed or overloaded. The experience feels closer to reading a handbook than flipping through a slide deck. That structure helps new hires stay oriented.
Operations and training teams use flipbooks for process documentation. Each step in a workflow gets its own page. Safety procedures, equipment instructions, and task sequences become easier to understand. Teams can revisit specific pages without confusion. This reduces mistakes during execution. It also supports consistency across departments.
Marketing teams use flipbooks for campaign storytelling. Each page can show a stage of the message. The audience moves through the story in order. This supports product launches, brand presentations, and client proposals. The controlled flow helps maintain attention across the full message instead of losing it midway.
Across all these uses, the value stays the same. A PowerPoint flipbook turns information into a structured reading experience. It replaces clutter with clarity. It guides attention one page at a time.
PowerPoint vs. Adobe InDesign for Flipbooks
PowerPoint and Adobe InDesign both help you build flipbooks. They do it in different ways. One focuses on speed and simplicity. The other focuses on precision and design control. The right choice depends on your goal, your skill level, and how polished you want the final result to look.
PowerPoint works like a presentation tool. It is built for slides and quick visual storytelling. InDesign is a professional layout tool. It is built for detailed page design and print-ready documents. Both can produce flipbooks, but the workflow and output feel very different.
PowerPoint for Flipbooks
PowerPoint is easy to start with. Most users already know the basics. You create one page per slide. Then you use transitions like “Flip” or “Fade” to create page movement.
The main strength is speed. You can build a full flipbook quickly. You can also update content without much effort. This makes it useful for marketing decks, simple catalogs, or internal presentations.
The limitation is design control. Fine typography control is limited. Layout precision is also limited. Advanced page styling can feel restrictive. The final result looks more like a presentation than a print publication.
Export options are also basic. You can save as a PDF or video. However, interactivity is limited compared to professional design tools.
Adobe InDesign for Flipbooks
Adobe InDesign is built for professional publishing. You design each page with high precision. You control spacing, typography, grids, and alignment in detail.
This tool is strong for long documents. It works well for magazines, catalogs, and branded flipbooks. You can create consistent layouts across many pages. You also get better control over visual hierarchy.
InDesign supports export to interactive PDFs. These can be used as digital flipbooks with page transitions. The output is cleaner and more polished. It feels closer to a real publication.
The limitation is complexity. It takes more time to learn. The setup process is slower. Small updates also take longer compared to PowerPoint.
PowerPoint vs. InDesign Comparison
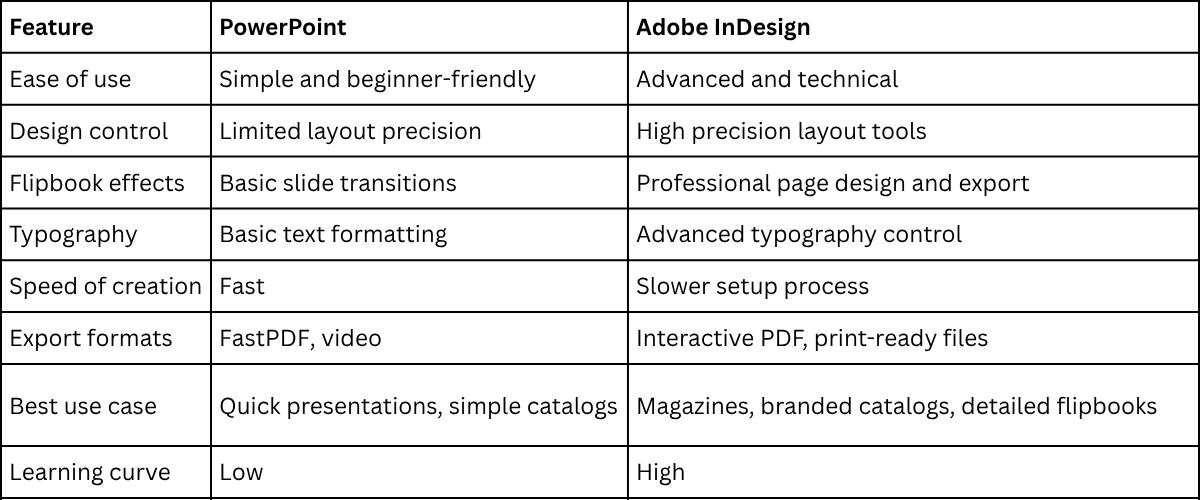
PowerPoint works best when speed matters more than precision. InDesign works best when design quality and structure matter more than speed.
PowerPoint vs. Online Flipbook Platforms
Most layout tools are not built for interactive flipbooks. They focus on static design and print export. This creates a gap. The design looks complete, but the reading experience stays flat. That gap is where flipbook tools become useful.
Online flipbook platforms handle this problem directly. Tools like Flipsnack, Issuu, FlippingBook, and FlipHTML5 turn PDF files into page-turning experiences. They add animation, zoom, and navigation controls. They also host content online, so sharing becomes simple. The main goal is delivery, not creation. These platforms take finished documents and make them interactive for web viewing.
PowerPoint works in a different way. It is not a publishing system. It is a content creation space. You build slides, structure ideas, and control visuals step by step. PowerPoint is strong for planning layouts and designing each page of a flipbook. Exporting to PDF is often the final step. After that, the file usually moves to another tool for publishing and interaction.
A common workflow uses both. PowerPoint handles design and structure. Online flipbook platforms handle presentation and distribution. This split gives more control over both design quality and user experience. A marketing team can design a catalog in PowerPoint, export it, and then upload it to Flipsnack or Issuu for sharing. This keeps creation simple while still achieving an interactive result.
Newer workflows are starting to change this model. AI-assisted tools can now help generate layouts, convert content into structured slides, or automate design variations. Some code-based systems also create flipbooks using HTML, CSS, and JavaScript. These approaches give more flexibility, especially for teams that want custom branding or embedded interactivity. They also reduce dependence on fixed templates.
One example of a modern tool in this space is Slidestack PDF Presenter. It focuses on turning presentation files into interactive viewing experiences with minimal setup. It sits between traditional slide design tools and full publishing platforms. This kind of tool shows how the line between creation and distribution is starting to blur, as workflows become more connected and automated.
Tips for Creating Smooth Flipbook Animations
Keep each slide with very small changes. Small movement between slides helps the motion feel steady and natural. Large jumps make the animation look rough. Keep timing the same across all slides. Equal delay builds a steady flow. Uneven timing can break the motion and feel messy. Place objects in the same position on every slide. Align everything with care. Even a slight shift can stand out in the final animation.
Remove extra items from slides. Simple layouts work better. Too many objects can distract from the movement. Use light transitions between slides. Simple effects keep attention on the animation itself rather than the slide change. Check the full sequence often. Watching the slides in order helps catch mistakes early and keeps the motion consistent.
Creative Flipbook Ideas for Presentations
A flipbook in PowerPoint can do more than show slides. It can tell a story in motion. It can also make ideas feel alive and easy to follow. Some people use flipbooks to show how a product works. Each slide moves step by step. The viewer sees the change in a clear way. This makes complex ideas simple. Storytelling is another strong use. A flipbook can show a short story with moving scenes. Each slide adds a new part. The flow feels smooth and natural.
Teachers can use flipbooks for lessons. Each slide can break down a topic. Students can follow one idea at a time. Learning becomes easier and more fun. Marketers also use flipbooks for ads. A product can be shown from start to finish. Each slide highlights a key benefit. The message stays clear and focused. A portfolio can also take this form. Designers and creators can show their work step by step. Each slide feels like a page in a visual book. Even event invites can become flipbooks. Each slide can reveal details one by one. The invite feels more engaging and personal.
Common Problems and Fixes
Pages may not flip in a smooth way. This often happens when slide timing is not set correctly. Check the transition timing on each slide. Set each slide to the same short duration. Images may look blurry or stretched. This usually comes from low-quality pictures or wrong scaling. Use clear images. Keep the same size ratio for all visuals. Slides may jump instead of flipping. This can happen if different transitions are used. Use one transition style for all slides. Keep it consistent from start to end.
Text may shift between slides. This breaks the flip effect. Keep text boxes in the same position on every slide. Copy and paste the layout to keep alignment steady. Audio may not match the flip speed. This happens if timing is not synced. Adjust slide duration to match the audio track. Test the full sequence before final use. File size may become too large. This can slow performance. Remove unused images and compress pictures inside PowerPoint. Save a clean version for sharing.
Exporting Your PowerPoint Flipbook
Your flipbook is ready inside PowerPoint. The next step moves it into a shareable file. Open the PowerPoint file that holds your flipbook slides. Check that every slide shows the final animation flow. Go to the File menu. Find the option that leads to saving or output options. Select Export. Some versions may show Save As instead.
Pick the format you need. Video works well for motion. PDF works well for static pages. Set the quality settings based on your use. Higher quality keeps the visuals clearer. Choose a folder on your device. Save the file there so it is easy to find later. Open the exported file. Review it from start to finish. This checks that the flipbook moves correctly outside PowerPoint.
Best PowerPoint Templates for Flipbook Designs
PowerPoint templates set the base for a flipbook. A good template makes each page clear and easy to follow. It also helps keep the design consistent from start to end. Some templates work better than others for flipbook-style projects. Simple layouts with clean slides are the best choice. They give space for images, text, and animation effects. Minimal slide templates are a strong option. They use plain backgrounds and simple grids. This helps each frame look like part of a smooth sequence.
Magazine-style templates also work well. They have structured layouts that fit images and short text blocks. This style helps when each page needs a strong visual focus. Story-based templates are useful too. They are made for step-by-step content. Each slide flows into the next in a clear order. This fits the flipbook animation needs. Avoid heavy designs with too many shapes or effects. These can slow down the flow and make transitions feel messy. A simple design always works better for flipbooks in PowerPoint.
Alternatives to PowerPoint for Flipbook Creation
Not every flipbook has to be built in PowerPoint. Other tools can help you create pages faster and with different styles. Some focus on design freedom. Others focus on easy sharing or realistic page-turn effects. These options give more ways to build a digital flipbook based on your needs.
Canva
Canva offers simple design tools for page-based layouts. Users can create slides and treat each slide as a flipbook page. It has drag-and-drop editing. This makes page building quick and clear. Templates help with layout ideas. Text, images, and shapes can be added to each page. Animations can also be applied for smooth page movement.
Google Slides
Google Slides works in a browser. Each slide can act like a page in a flipbook. Content stays organized in a simple slide format. Editing is easy with basic tools for text and images. Sharing is direct through a link. This helps with teamwork and quick updates.
Adobe Express
Adobe Express gives design tools for visual projects. It supports page-style content that works well for flipbooks. Users can build clean layouts with strong visuals. It includes ready-made templates. Images and text can be arranged in a structured way. Simple motion features add movement between pages.
Online Flipbook Tools
Online flipbook tools turn pages into a book-style viewer. Users upload files or pages, and the tool builds the flip effect. The result looks like a digital booklet. These tools often include page-turning animation. Some also support sharing links for viewing. This makes the final result feel like a real flipbook experience.
Final notes
A flipbook in PowerPoint uses a series of slides. Each slide shows a small change. This creates motion when played in order. Transitions control how pages move. Flip, Fade, and Morph are common choices. One style should stay the same across all slides. Slide timing controls speed. Equal timing keeps motion steady. Uneven timing breaks the flow. Duplicate slides are used to build frames. Each copy is changed a little. Small edits between slides create smooth movement.
Clear design works best. Simple layouts keep focus on motion. Too many objects make the pages feel messy. Export options include MP4, PDF, and GIF. MP4 keeps the best quality for motion. GIF works for simple looping. PDF works for static viewing. Problems often come from timing, image quality, or alignment. Fixing these keeps the flip effect smooth. PowerPoint is quick for building flipbooks. Other tools, like InDesign or online platforms, give more design control or sharing options.
FAQs
What is a flipbook in PowerPoint?
A flipbook in PowerPoint is a set of slides that show small changes from one slide to the next. When played in order, it creates the feeling of page turning or motion.
Do I need advanced skills to make a flipbook in PowerPoint
No. Basic PowerPoint skills are enough. You mainly work with slides, transitions, and simple edits between frames.
Which transition works best for a flipbook effect
Flip and Morph are often used. Flip gives a page-turn feel. Morph gives smoother movement between objects.
Can I use images and text together in a flipbook?
Yes. You can combine images, text, and shapes. Keep their position consistent across slides for better flow.
Why does my flipbook look jumpy?
This usually happens when timing is not consistent or when objects shift too much between slides. Keeping small changes helps fix this.
Can I add automatic page turning?
Yes. You can set slide timing in the Transitions tab. Turn off mouse clicks and set a time delay for each slide.
What is the best export format for a flipbook?
MP4 is the best option for smooth playback. It keeps transitions and works on most devices.
Can I share a PowerPoint flipbook online?
Yes. You can upload the MP4 video or use PDF export. You can also use online flipbook platforms for interactive viewing.
Is PowerPoint better than design tools for flipbooks
PowerPoint is faster and easier. Design tools like InDesign give more control over layout and detail.
Does PowerPoint have a flipbook template?
PowerPoint does not include a built-in flipbook template. You can create one by using blank slides, consistent layouts, and transitions like Flip or Morph.
Which PowerPoint transition best replicates a physical page turn
The Flip transition is the closest match to a real page turn. Page Curl also works if it is available in your version of PowerPoint.
Can I print a flipbook made in PowerPoint
Yes. You can print the slides as pages. Each slide becomes a printed page. However, the motion effect only works in digital format.
How do I turn an existing PowerPoint presentation into a flipbook
You duplicate your existing slides, then make small changes between copies. After that, apply the same transition and set timing so slides move like pages.


You may also be interested in ...

How To Create An Eye-Catching Portfolio
If you’re looking to create an eye-catching portfolio, this post will come in handy. In this article, you can find the easies...
23 Jun, 2024

How To Easily Create An Infographic
Infographics are the perfect way to make a presentation that will impact an audience, but their design and composition might...
08 Jun, 2024

PowerPoint Template Tips & Tricks You Ne...
PowerPoint seems to be an unknown world for many people, especially those who have been assigned to create a presentation out...
08 Jun, 2024