How to Add Google Slides Transitions Easily

Creating a smooth presentation in Google Slides can be frustrating when your slides jump from one to the next without flow. Many users struggle to make transitions work correctly, leaving their slides feeling abrupt and unprofessional. This can make your audience lose focus or miss key points.
Fortunately, adding transitions doesn’t have to be complicated. With a few simple steps, you can make each slide flow naturally into the next. From picking the right style to adjusting the speed, these tweaks can instantly make your presentation more engaging. Follow this guide, and you’ll turn basic slides into polished, seamless presentations that capture attention and keep your audience focused.
What are Google Slides Transitions?
Google Slides transitions are visual effects applied when moving from one slide to the next in a presentation. They create a smooth shift between slides, making the flow easier to follow.
Transitions help guide the audience’s attention and maintain engagement by adding subtle motion between slides. They can emphasize key points or separate sections without distracting from the main content.
Google Slides offers several types of transitions, such as fade, slide, flip, cube, and gallery. Each effect changes the way slides appear, influencing how viewers perceive the presentation. Using transitions consistently can make a presentation feel more professional and organized.
Why Transitions Matter in Presentations
Transitions guide how ideas connect on slides. They help the audience follow the message without confusion.
A presentation can have strong content, but still feel hard to follow. That usually happens when ideas feel separate. One point ends, and the next starts without a clear link.
Good transitions solve this problem. They create a smooth path between ideas. The audience stays focused because each slide feels connected to the next one.
Clear flow also helps memory. People remember information better when ideas move in a natural order. A connected structure supports better understanding from start to finish.
Difference between Transitions and Animations in Google Slides
Transitions and animations often get mixed up. A comparison table makes it easier to see how they are different.
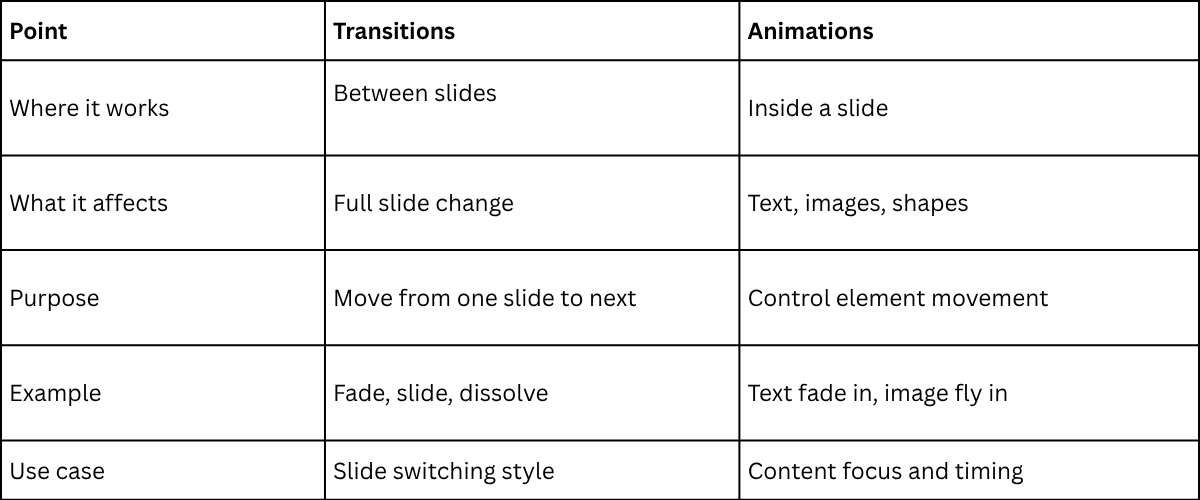 Transitions help the presentation move forward in a smooth way. Animations guide attention inside the slide step by step. Both work together, but they serve different roles..
Types of Slide Transitions
Slide transitions help move from one slide to the next smoothly. They can make a presentation feel more engaging when used thoughtfully. Most presentation tools allow users to adjust the speed of transitions, making them slower or faster depending on the style of the presentation.
Common Slide Transitions:
• Fade: Slides gradually appear or disappear. This creates a smooth, gentle effect.
• Push: The new slide pushes the current slide off the screen in a chosen direction.
• Wipe: A line moves across the slide, revealing the next one. It can move from top, bottom, left, or right.
• Split: The slide splits into sections that move apart to show the next slide.
• Cover: The new slide covers the current one, either horizontally or vertically.
• Uncover: The current slide moves away to reveal the next slide beneath it.
• Morph (if available): Shapes, text, or objects shift smoothly from one slide to the next, creating a seamless flow.
Practical Tip: Use the same type of transition consistently throughout the presentation. Consistency keeps the slides professional and prevents distraction. Adjust speed to match the pace of the presentation for clarity and flow.
How to Add Transitions on Google Slides
Adding transitions can make your presentation flow smoothly from one slide to the next. Follow these steps to add them easily.
- Open your Google Slides presentation.
- Click on the slide to which you want to add a transition.
- Select Slide from the top menu, then choose Transition.
- A panel will appear on the right side of the screen. Click the drop-down menu to pick a transition style.
- Adjust the speed using the slider to make the transition faster or slower.
- To apply the same transition to all slides, click Apply to all slides.
- Click Play to preview how the transition looks.
Using transitions can help your slides feel more connected and keep your audience engaged.
How to Add Transitions to All Slides?
To add the same transition to every slide, select a slide, choose a transition, and click “Apply to all slides.”
Best Practices for Adding Transitions in Google Slides
Using transitions can make your slides feel smoother and easier to follow. Done well, they keep your audience engaged without drawing attention away from your content. Here are some tips to get the most out of transitions:
Keep it consistent
Use the same type of transition across similar slides. This creates a unified flow and avoids distraction.
Match the pace to your presentation
Adjust the speed so slides change naturally with your speaking rhythm. Too slow can drag; too fast can feel rushed.
Highlight key points
Use a subtle transition to emphasize an important slide. This draws attention without feeling forced.
Use variety wisely
Different slides can use slightly different transitions, but avoid too many styles. A small mix keeps things interesting while staying professional.
Test before presenting
Run through your slides to see how transitions feel in sequence. This helps you spot any that are jarring or unnecessary.
Focus on clarity
The goal is to guide your audience, not impress with flashy effects. Smooth, clean transitions work best for understanding and retention
How to Auto-Play Slide Transitions in Google Slides
Google Slides allows you to set your slides to move automatically. You can do this while presenting live or in a published presentation. Follow these steps to make your slides advance on their own.
During a Presentation
- Open your Google Slides presentation.
- Click File → Publish to the web.
- In the pop-up window, select Auto-advance slides.
- Choose the time interval for each slide (e.g., every 2 seconds, 5 seconds, etc.).
- Click Publish and confirm by clicking OK.
- Return to your slides. They will now move automatically during the live presentation according to the timing you set.
Published Presentation
- Open your presentation in Google Slides.
- Click File → Publish to the web.
- Select the Link tab if it’s not already active.
- Check the box for Start slideshow as soon as the player loads.
- Choose a time interval for slide auto-advance.
- Click Publish and confirm.
- Copy the provided link and share it or open it in a browser. Slides will begin playing automatically.
Caution: Setting slides to auto-play means viewers cannot control the pace. Make sure the timing matches the content and audience needs.
Read also: How to Add Animation to Google Slides: A Step-by-Step Guide
Deleting Transitions in Google Slides
When you add a transition, a new icon appears on the slide to show that it has a special effect. You can remove transitions easily if you no longer want them.
Deleting Single Transitions in Google Slides
- Open your presentation in Google Slides.
- Select the slide that has the transition you want to delete.
- Click the Transition button on the toolbar.
- In the sidebar, find the current transition listed.
- Click the None option to remove that single transition.
Removing All Slide Transitions
- Open your presentation in Google Slides.
- Click Slide on the top menu, then choose Edit transition.
- In the sidebar, go through each slide.
- For every slide, select None to remove its transition.
- Check all slides to make sure no transitions remain.
Read also: How to Animate Text in Google Slides: A Quick Guide
How to Change or Remove Transitions
Transitions control how one slide moves into the next. You can adjust them in a few steps.
Open your Google Slides file. Go to the slide you want to change. Click the “Transitions” tab on the top menu.
A list of transition effects will appear. Click on a new effect to change it. The change happens right away.
To remove a transition, select the slide. Then choose “None” from the transition list. This removes the effect from that slide.
Check the “Apply to All” button if you want the same setting on every slide. This keeps your slides consistent.
Best Practices for Using Transitions
Transitions help readers move from one idea to the next without confusion. They make writing feel smooth and easy to follow.
Start by linking ideas in a natural way. One idea should lead into the next without feeling forced. A simple question can guide the reader forward. A short setup can also work well.
Keep sentence structure simple. Short sentences help readers stay focused. Long or complex sentences can break the flow.
Use different ways to connect ideas. Do not rely on the same transition words again and again. Mix in phrasing, tone shifts, and natural links between thoughts.
Place transitions where they make sense. Do not add them just to fill space. Each one should support clarity.
Read the text out loud. If it sounds choppy, adjust the flow until it feels steady and clear.
Common Mistakes to Avoid
Many people rush into writing without a clear plan. This leads to messy ideas that are hard to follow.
Some skip the outline stage. The content then feels scattered. Readers lose interest quickly.
Another mistake is using long sentences. Long lines make reading harder. Short sentences keep ideas clear.
Some also repeat the same words too often. This makes the writing dull. Simple word choices keep it fresh.
Weak structure is another issue. Ideas jump from one point to another. A clear flow keeps readers on track.
Tips for Professional Presentation Design
Good slide design helps your message stay clear. Simple choices make your presentation easier to follow.
• Keep each slide clean. One idea per slide works best.
• Use the same font style across all slides. This keeps the look steady.
• Limit colors to a small set. Too many colors can distract.
• Add images or icons that support your point. Avoid filling slides with text only.
• Align text and objects in a neat way. Straight layouts look more organized.
• Keep text short. Long paragraphs make slides hard to read.
Conclusion:
Adding transitions in Google Slides can make your presentation easier to follow and more engaging. Simple effects keep slides connected and help your audience stay focused. By choosing the right style, adjusting speed, and using them consistently, your slides will feel smooth and professional. Testing transitions before presenting ensures everything flows naturally. With a few careful steps, your slides can move confidently from one idea to the next.
FAQs:
Why Won’t My Slides Autoplay?
Slides may not autoplay if the presentation is not in "Present" mode or if auto-advance settings are not applied. Check the “Transition” panel and make sure each slide is set to advance automatically after a set time. Some devices or browsers may also block autoplay features.
I Can’t Add or Change Transitions and Animations On My Device!
This usually happens when using a device or browser that doesn’t support full Google Slides features. Try using a desktop browser like Chrome or Firefox. Make sure your presentation is not in view-only mode.
Can I Set Different Auto-Transition Timings for Different Slides?
Yes, you can set each slide to advance after a specific time. Open the “Transition” panel for a slide, choose the timing, and repeat for other slides. Each slide can have its own duration.
Why Can’t I Set the Slides to Autoplay while Editing Them?
Autoplay only works in presentation mode, not while editing. While editing, you can set up auto-advance times, but the slides will start moving only when you enter “Present” mode.
How do I Convert Google Slides to PowerPoint?
Open your presentation, click “File,” then select “Download” and choose “Microsoft PowerPoint (.pptx).” The file will download and can be opened in PowerPoint with most formatting intact.


You may also be interested in ...

How To Create An Eye-Catching Portfolio
If you’re looking to create an eye-catching portfolio, this post will come in handy. In this article, you can find the easies...
23 Jun, 2024

How To Easily Create An Infographic
Infographics are the perfect way to make a presentation that will impact an audience, but their design and composition might...
08 Jun, 2024

PowerPoint Template Tips & Tricks You Ne...
PowerPoint seems to be an unknown world for many people, especially those who have been assigned to create a presentation out...
08 Jun, 2024