How to Quickly Hide a Slide in Google Slides

Managing a Google Slides presentation can feel simple until you need to hide a slide. Many users struggle with keeping certain slides out of view without deleting them, which can lead to confusion or accidental mistakes during a presentation.
This problem becomes more frustrating when time is limited, and you need to adjust your slides on the fly. Skipping or rearranging slides manually wastes valuable minutes and can interrupt the flow of your talk, leaving you anxious and unprepared.
Fortunately, Google Slides offers quick ways to hide slides on both computers and mobile devices. In the following guide, you’ll learn step-by-step methods to hide and unhide slides efficiently, keeping your presentations smooth and organized.
Why Hide Slides in Google Slides?
Hiding slides in Google Slides is like having a secret toolset ready for the right moment. These slides are not gone, they’re tucked away, waiting quietly until you need them. They give you control over your presentation without cluttering the main flow.
One key benefit is flexibility. You can prepare extra content for questions or deep dives. For example, during a meeting, a hidden slide can show detailed data only if someone asks for it, keeping your main presentation clean and focused.
Another benefit is customization. You might have different audiences, like clients or colleagues. Hidden slides let you adjust on the fly without creating separate presentations. You can reveal the slides that match your audience’s needs.
Hidden slides also act as a safety net. If you forget something important, you can quickly display a backup slide. It keeps you prepared and confident, even when the discussion takes an unexpected turn.
Finally, hiding slides helps maintain flow. Instead of skipping sections or rushing through, you keep the audience engaged with only the content they need. Your presentation feels smooth and intentional.
How to Hide A Slide In Google Slides On A Computer?
You can easily hide slides in Google Slides in three main ways:
• Hide A Slide in Google Slides Using Right-Click
• Hiding Slides via the ‘Slide’ Menu Option
• Hide A Slide In Google Slides Using Grid View Mode
Let’s take a closer look at each method.
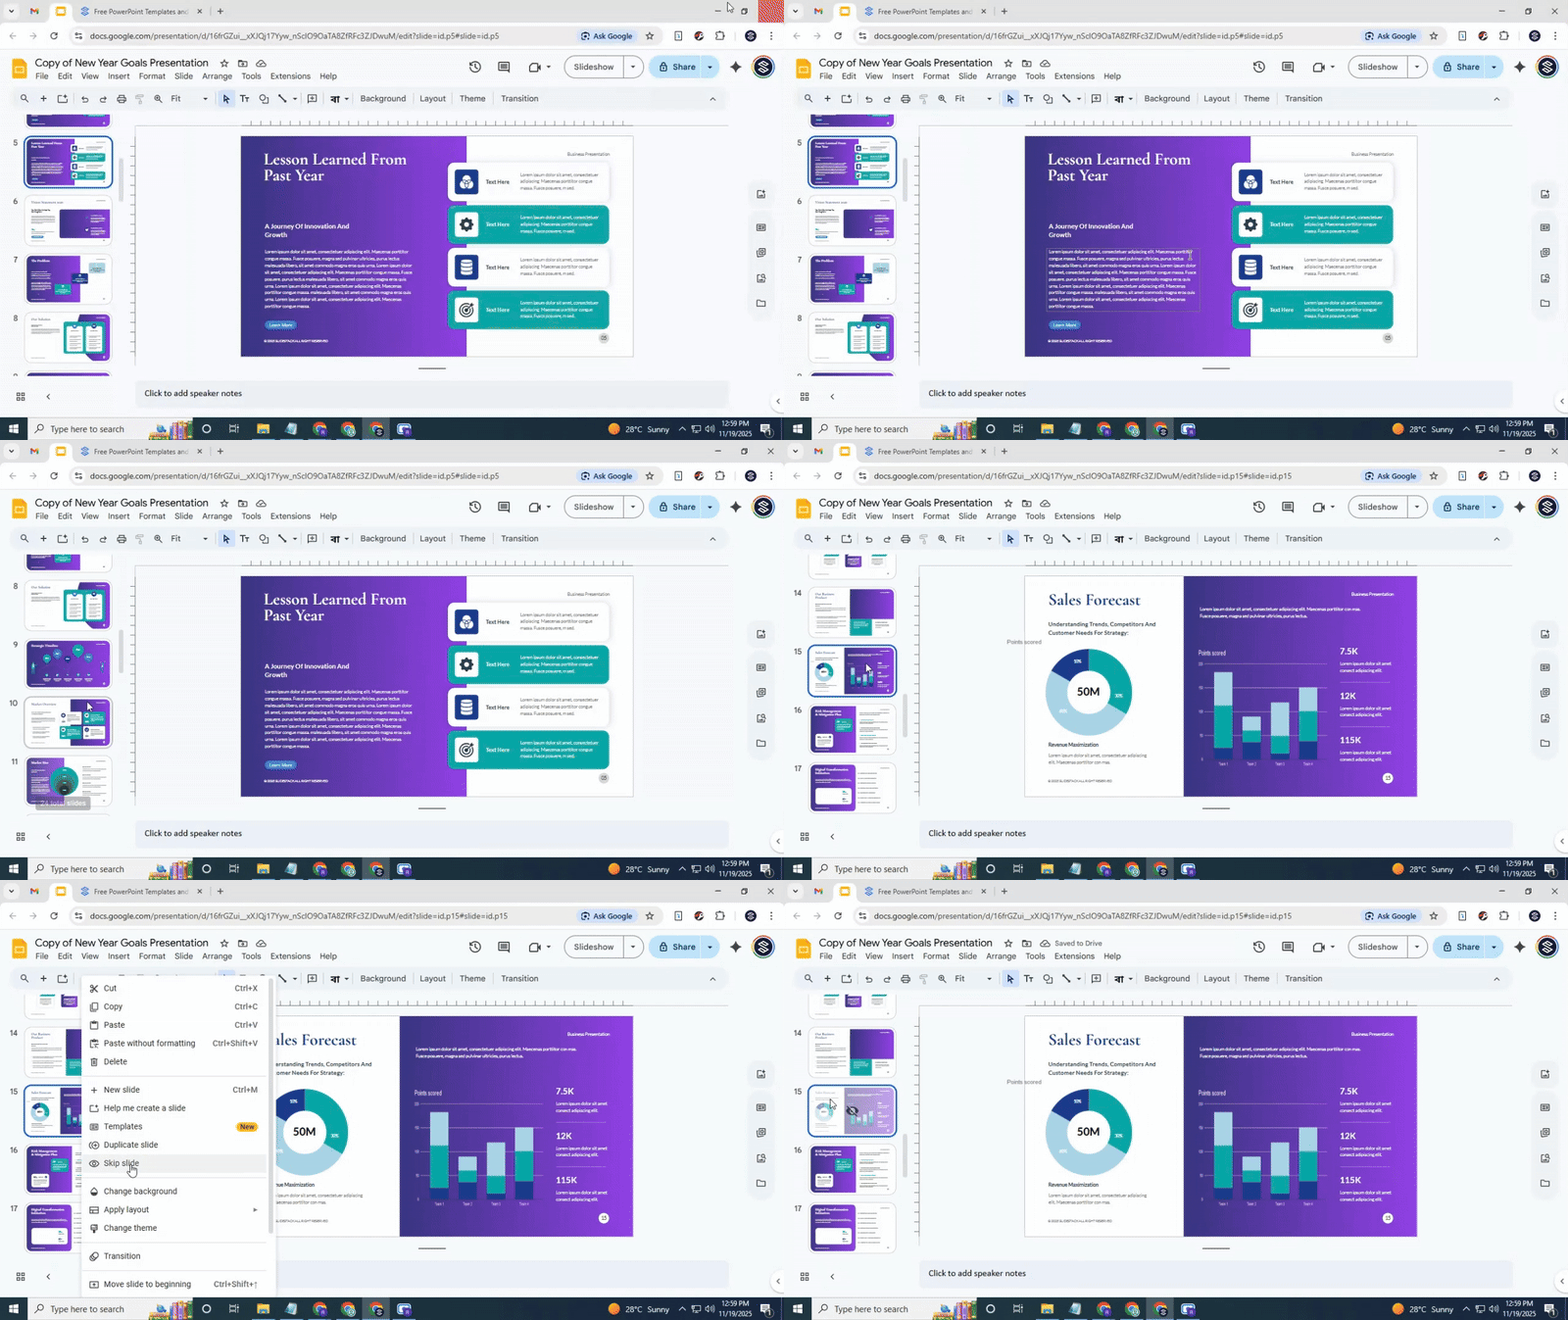
Method 1: Hide a Slide in Google Slides Using Right-Click
Hiding a slide can help you skip content during a presentation without deleting it. Using the right-click menu is one of the quickest ways to do this.

• Open your Google Slides presentation and go to the slide you want to hide.
• Right-click on the slide thumbnail in the left-hand panel.
• Select Hide Slide from the menu.
After hiding, the slide thumbnail will show a small crossed-out eye. This icon signals that the slide won’t appear during the presentation.
Tip: To hide multiple slides at once, hold down the Ctrl key (or Cmd on Mac) and click each slide you want to hide. Then right-click and choose Hide Slide.
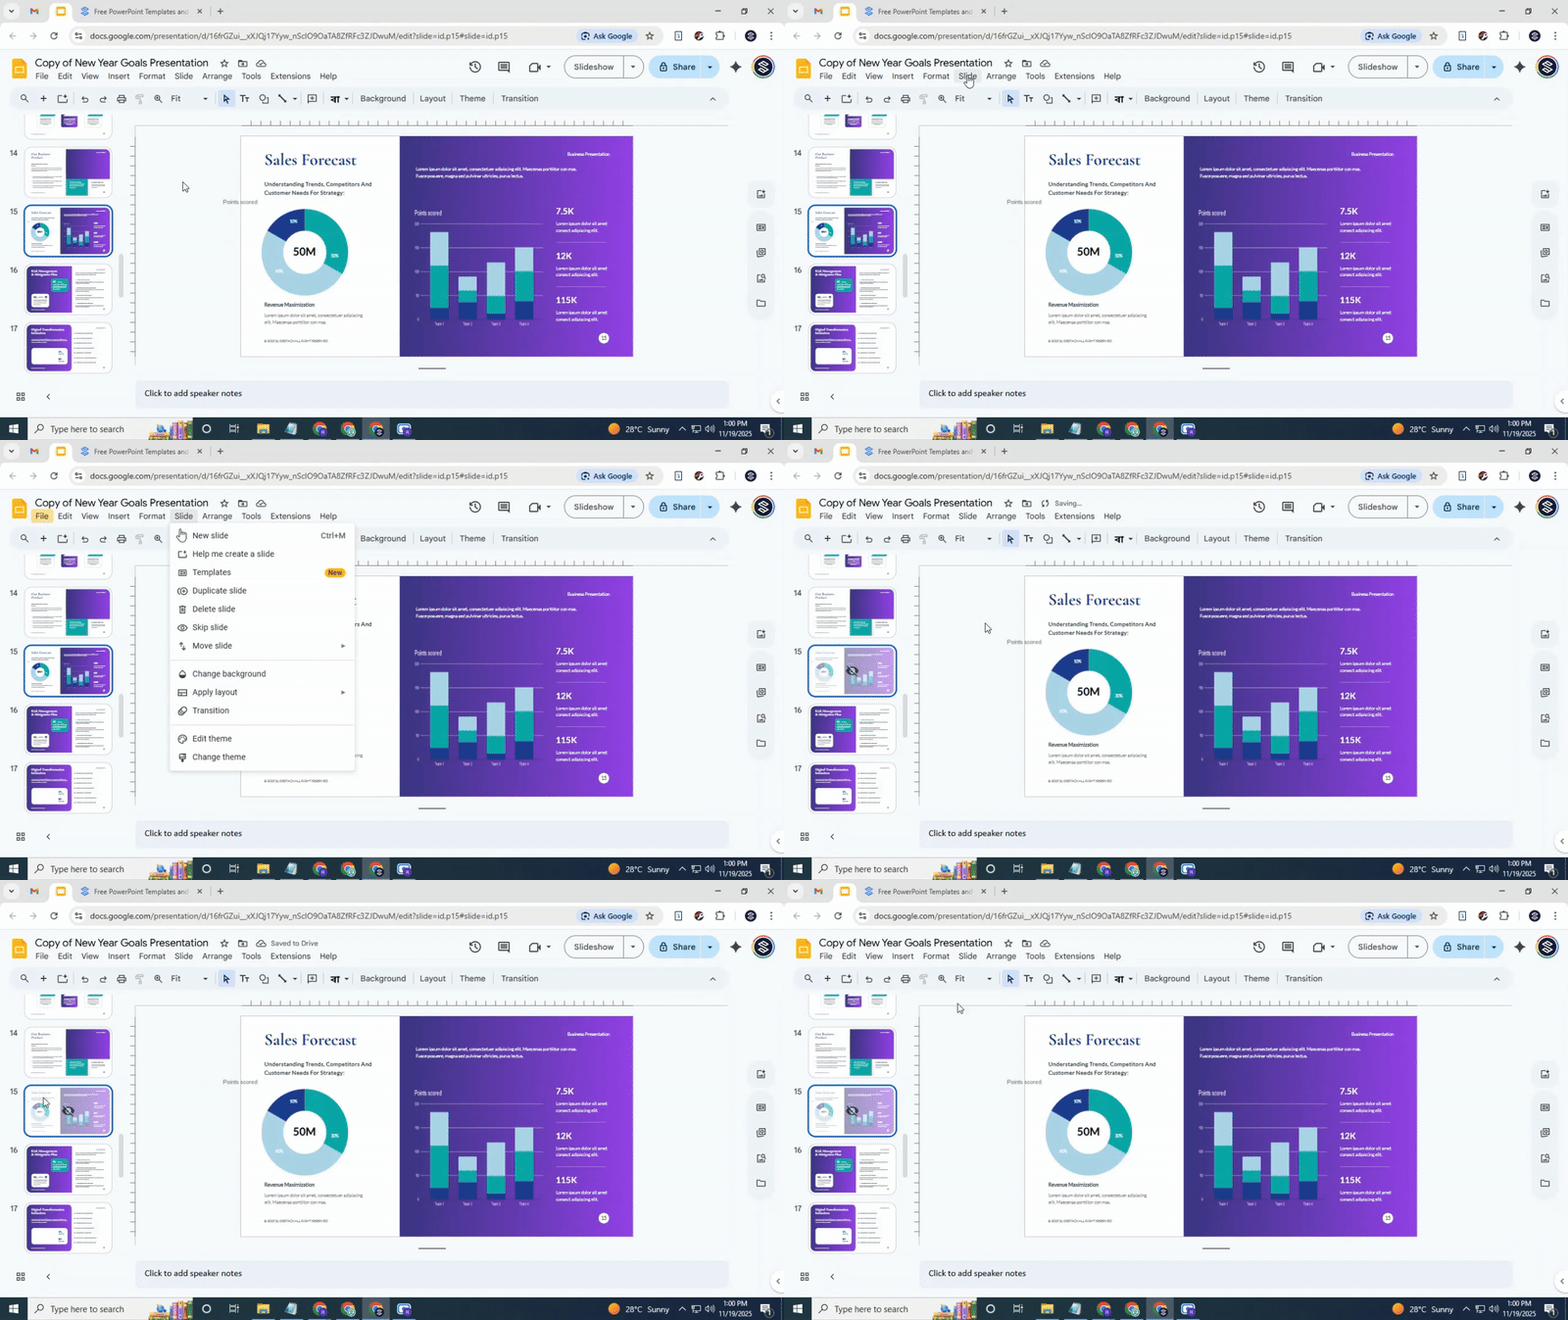
Method 2: Hiding Slides Via the ‘Slide’ Menu
To hide a slide in Google Slides using the 'Slide' menu, follow these simple steps.

Step 1: Open your presentation in Google Slides.
Step 2: Click on the slide you want to hide in the left sidebar.
Step 3: At the top of the screen, click on the “Slide” menu.
Step 4: From the dropdown, select “Skip Slide.” This will hide the slide from your presentation.
Once you do this, a crossed-out eye icon will appear next to the hidden slide, indicating that it is now hidden.
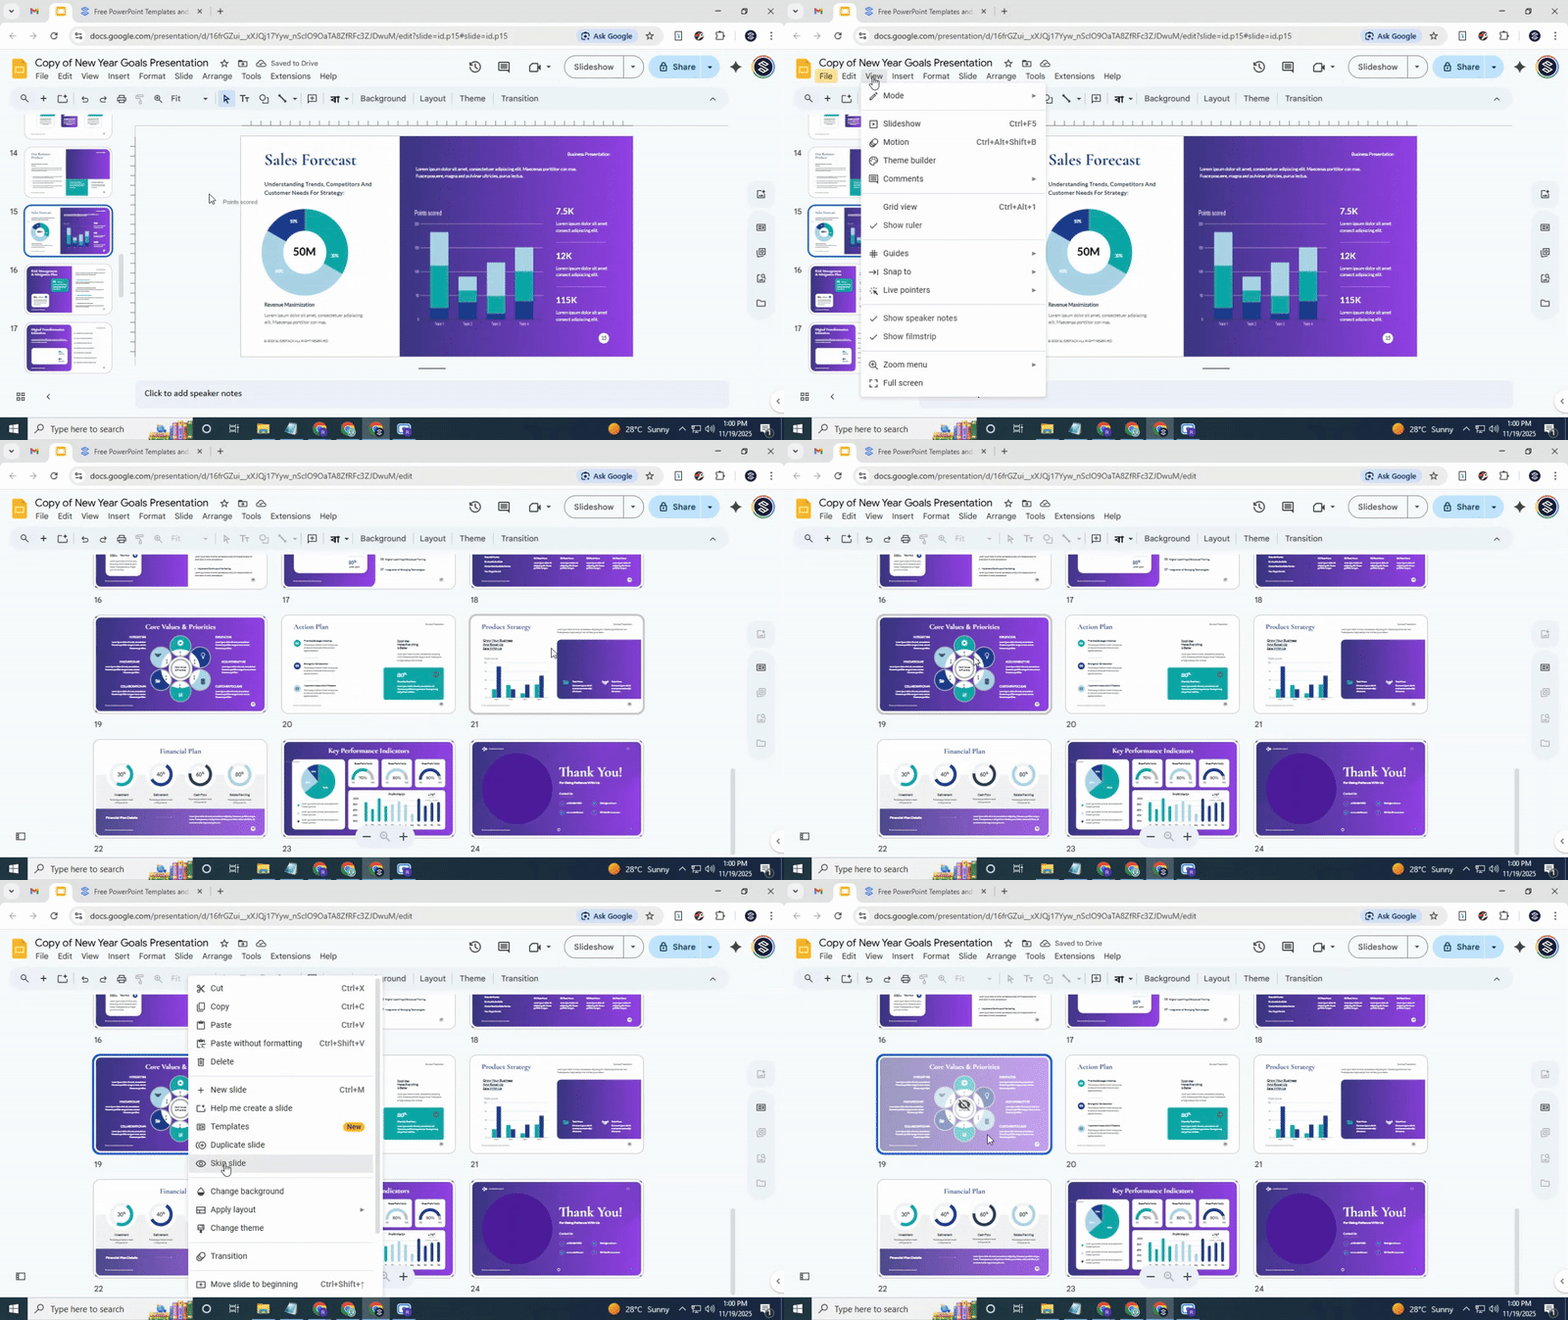
Method 3: Hide a Slide In Google Slides Using Grid View
Grid View gives you a clear overview of all slides. It makes hiding slides easy, especially when you have many. Here’s how to do it step by step.

Step 1: Open your Google Slides presentation.
Step 2: Click the “View” menu and select “Grid View.” All slides will appear as small thumbnails.
Step 3: Find the slide you want to hide. Right-click on it.
Step 4: Choose “Skip Slide” from the menu. The slide will now show a crossed-out eye icon or appear greyed out. This means it is hidden from the slideshow.
Optional Tip: To hide multiple slides at once, hold down the Ctrl key (Cmd on Mac) and click each slide you want to hide. Then right-click one of the selected slides and choose “Skip Slide.”
The visual feedback in Grid View helps you see which slides are hidden. This method also makes it easy to manage many slides at the same time. Next, we will cover how to unhide a slide if you need it back in your presentation.
How to Unhide a Slide in Google Slides on a Computer?
Sometimes slides are hidden in your presentation. You may need to make them visible again. Google Slides offers a simple way to do this. Here is one clear method to unhide a slide.
1. Right-Click Method
Follow these steps to unhide a slide using a right-click:
• Open your presentation in Google Slides.
• Locate the slide that is hidden. You can spot it by the crossed-out eye icon.
• Right-click on the hidden slide.
• Select "Skip Slide" to remove the checkmark. The crossed-out eye will disappear, showing the slide again.
Toolbar Method:
Select the slide you want to unhide.
Go to the “Slide” menu at the top and choose “Show Slide.”
For multiple slides: Use Ctrl/Cmd to select them, then go to the “Slide” menu and choose “Show Slide.”
Grid View Method
The Grid View method lets you hide slides quickly and see all slides at once. This is useful when you want to manage multiple slides together.
Step 1: Open your presentation in Google Slides.
Step 2: Click the “View” menu, then select “Grid view.” All slides will appear in a grid layout.
Step 3: Find the slide or slides you want to unhide.
Step 4: Right-click the selected slide and select “Show Slide”, or use the Slide menu to make it visible again.
Tip: To unhide multiple slides at once, select them in Grid View, right-click, and choose “Show slide.”
How to Print a Presentation in Google Slides with Hidden Slides?
Many people hide slides in Google Slides to keep a clean flow during a talk. Later, they want to print the whole deck. This can cause worry because hidden slides do not show in a normal print preview. The good news is that you can still print them. The steps are simple and easy to follow.
• Open your presentation in Google Slides.
• Look at the slide list on the left side of the screen. Hidden slides have a small crossed-out eye icon.
• Select the slide that has this icon.
• Right-click the slide.
• Pick the option that makes the slide visible again.
• Do this for each hidden slide you want to print.
• Go to File.
• Select Print.
• Wait for the print preview to load.
• Check the page list in the preview to find every slide you made visible.
The preview shows each slide as a page. Slides that were hidden start to look the same as the rest. This gives you a full set of pages to print. You now have every slide in your deck ready for paper or PDF.
How to Hide Slides in Google Slides on Android?
A short way to keep slides out of view while you work in the Google Slides app on Android.
• Open the Google Slides app and open your file.
• Tap the slide you want to hide.
• Tap the three dots in the top right corner.
• Tap Skip slide.
• A small crossed-out eye icon shows that the slide is skipped.
Tap the same option again to show the slide.
Hide Multiple Slides
Select each slide one at a time and mark it as skipped.
Use the crossed-out eye icon to check which slides are hidden.
How to Unhide Slides in Google Slides on Android?
Sometimes a slide gets hidden while you work on a presentation. Maybe you tapped the wrong spot. Maybe you wanted to clean up your view, and now you need that slide again. Whatever the reason, you can bring slides back with a few simple taps.
How to unhide a single slide
1. Open your presentation in the Google Slides app.
2. Tap the slide list on the left side of the screen.
3. Press and hold the slide that looks faded.
4. Tap the three dots that appear.
Choose Show slide. The slide will return to normal.
For unhiding multiple slides:
Open the slide list on the left side. Press and hold the first hidden slide to enter selection mode.
Tap each hidden slide you want to bring back. Tap the three dots in the top corner. Choose Show slides.
Two short taps bring your slides back in place. Your presentation is ready to go again.
How to Hide Slides in Google Slides on iPhone or iPad
You can hide a slide on your device with a few quick taps. This helps you keep a slide out of your presentation without deleting it. Follow these steps.
1. Open the Google Slides app on your iPhone or iPad. Tap the file you want to edit.
2. Tap the slide list icon in the top-left corner. This opens the slide thumbnails on the left side of your screen.
3. Tap the slide you want to hide. The slide will highlight.
4. Tap the three dots in the top-right corner of the slide thumbnail. A small menu appears.
5. Tap the Hide slide. A small crossed-out eye icon appears on the slide thumbnail. This shows the slide will not play during your presentation.
You can tap the same option again to show the slide later
How to Unhide Slides in Google Slides (iPhone/iPad)
If you’ve hidden slides in Google Slides and need to bring them back, don’t worry. It’s a simple process that you can do on your iPhone or iPad. Just follow these easy steps to unhide them in no time.
1. Open the Google Slides app on your iPhone or iPad.
2. Find and open the presentation that has hidden slides.
3. Tap the three dots in the top-right corner of the screen to open the options menu.
4. Select View and then choose Grid View to see all your slides.
5. Scroll through your slides and look for the ones that are grayed out, indicating they're hidden.
6. Tap and hold on the hidden slide, and a menu will pop up.
7. Tap Unhide slide, and it will be visible again in your presentation.
That’s it! Now you can go back to editing or presenting your slides with everything in view.
Final Words
Now that you know how to hide and unhide slides in Google Slides on both desktop and mobile devices, you can confidently manage your presentations. Whether you're working on your computer or using the mobile app, these simple methods ensure you can keep your slides organized and adaptable. Hiding slides allows you to customize your content for different audiences, maintain a smooth flow, and stay prepared for any changes during your presentation. With these tips, you can focus more on delivering your message and less on managing your slides.
FAQs:
1. How do I hide slides in a slide show?
To hide a slide, right-click on the slide in the slide sorter on the left side. Choose "Skip Slide" from the menu. This will hide it during the slideshow.
2. What is the menu for hiding the slides in Google Slides?
In Google Slides, go to the "Slide" menu at the top. Then, select "Skip Slide." The slide will no longer appear in your presentation when you play the slideshow.
3. Can I hide slides with a keyboard shortcut?
Currently, there isn’t a direct keyboard shortcut to hide slides in Google Slides. You’ll need to use the “Slide” menu or right-click to hide a slide.
4. How do I know if a slide is hidden?
A hidden slide in Google Slides will have a crossed-out eye icon next to it. This icon indicates that the slide is set to be skipped in the presentation.
5. How do you hide slides on the Google Slides app?
To hide slides on the Google Slides mobile app, tap on the slide you want to hide. Then, tap the three dots in the top right and select "Skip Slide" from the options.
6. Will hidden slides show up in my presentation?
No, hidden slides will not appear during the presentation. They are only visible in the slide sorter for editing purposes.
7. Can I hide multiple slides on the Google Slides application?
Yes, you can hide multiple slides in Google Slides. Just select each slide, right-click, and choose "Skip Slide" for all of them. This will hide them all at once.
You may also be interested in ...
How To Create An Eye-Catching Portfolio
If you’re looking to create an eye-catching portfolio, this post will come in handy. In this article, you can find the easies...
23 Jun, 2024
How To Easily Create An Infographic
Infographics are the perfect way to make a presentation that will impact an audience, but their design and composition might...
08 Jun, 2024
PowerPoint Template Tips & Tricks You Ne...
PowerPoint seems to be an unknown world for many people, especially those who have been assigned to create a presentation out...
08 Jun, 2024


