How to Mask Images in PowerPoint Quickly and Easily
How to mask images in PowerPoint is often needed when simple pictures do not fit well into slide layouts. Many slides feel messy when images stay in their default rectangular form, making the design look uneven or unfinished. Image masking fixes this by placing images inside shapes like circles, squares, or custom frames to create a cleaner visual style.
This guide explains what image masking is, why it matters, and how to use it in different ways inside PowerPoint, from basic shape cropping to more creative text-based masks.
What Is Image Masking in PowerPoint
Image masking in PowerPoint is a method that places an image inside a shape. It shows only the part of the image that fits within that shape. The rest of the image stays hidden from view.
In PowerPoint, a shape is added first. A picture is then placed into the slide. The masking tool is used to combine the shape and the image. The image takes the form of a shape. Only the visible area inside the shape appears on the slide. The image can still be adjusted inside the shape to change what part is shown.
Cropping and masking work in different ways. Cropping removes the outer parts of an image. The image size becomes smaller. Masking does not remove parts of the image. It hides parts using a shape. The full image stays in place behind the mask. Cropping changes the image boundary. Masking keeps the image intact and controls the visible section through a shape.
Image masking gives more control over layout design. The image can move within the shape. Different parts of the image can be shown without changing the original file. This keeps the image unchanged while adjusting how it appears on the slide.
Why Use PowerPoint Image Masking
PowerPoint image masking helps control how pictures appear inside slides. It lets designers place images inside shapes without losing flexibility. The image stays editable. The layout stays clean. Slides feel more structured and focused.
Visual design balance
Slides often look crowded when images sit in large rectangles. Text and visuals compete for space. The slide loses balance. Image masking fixes this by shaping pictures to fit the design. A circle or soft shape can reduce visual weight. This keeps space around text open and clear. A slide with a team photo inside a circle next to short bullet points looks more even. The eye moves across the slide without distraction.
Profile and portrait usage
Slides that include people often rely on portrait images. Raw photo boxes can feel heavy and uneven. Masking allows portraits to fit inside clean shapes. Circles and rounded frames work well for speaker slides or team introductions. The face becomes the focus without extra background distractions. A company intro slide can place each team member inside equal circular frames. This keeps the layout neat and easy to scan.
Detail highlighting
Some images contain more information than needed. A full picture can pull attention away from the key point. Masking helps isolate only the needed part of an image. A crop inside a custom shape draws attention to one detail. This supports clearer communication on the slide. A product slide can show only the product feature area inside a shape. The rest of the image stays hidden. The message becomes sharper and easier to follow.
Infographic creation
Infographics often mix text, icons, and visuals. Layout control becomes harder as more elements are added. Masking helps align images with graphic shapes. Icons can sit inside circles, arrows, or custom blocks. This keeps the structure consistent across the slide. A data slide can use masked icons next to each metric. The repeated shape style creates a clear visual rhythm.
Template consistency
Presentation templates rely on repeatable design patterns. Random image sizes break that pattern. Masking keeps images consistent across all slides. The same shape can be used throughout the deck. This builds a steady visual flow from start to finish. A training deck can place all images inside identical rounded rectangles. Every slide feels connected through the same design style.
How to Remove Background Before Masking
Sometimes an image needs a clean subject before masking starts. Removing the background first helps keep edges clear and improves how the mask fits later in PowerPoint. Follow these simple steps:
Step 1: Select the image and go to Picture Format → Remove Background.
Step 2: Adjust the marked areas to keep the main subject. Remove unwanted parts of the background. Then click Keep Changes.
This process creates a clean cutout that works better for masking. It also helps shapes and layouts align more neatly on the slide. The final design looks more controlled and easier to edit.
You can continue learning with related steps on image masking in PowerPoint for better control over shapes and visual layout.
Methods to Mask Images in PowerPoint
Image masking in PowerPoint helps control how pictures appear on slides. It removes sharp edges and places images inside clean shapes. This keeps layouts neat and easy to follow. One common way to do this is by using built-in crop tools.
Method 1: Crop Image to Shape in PowerPoint
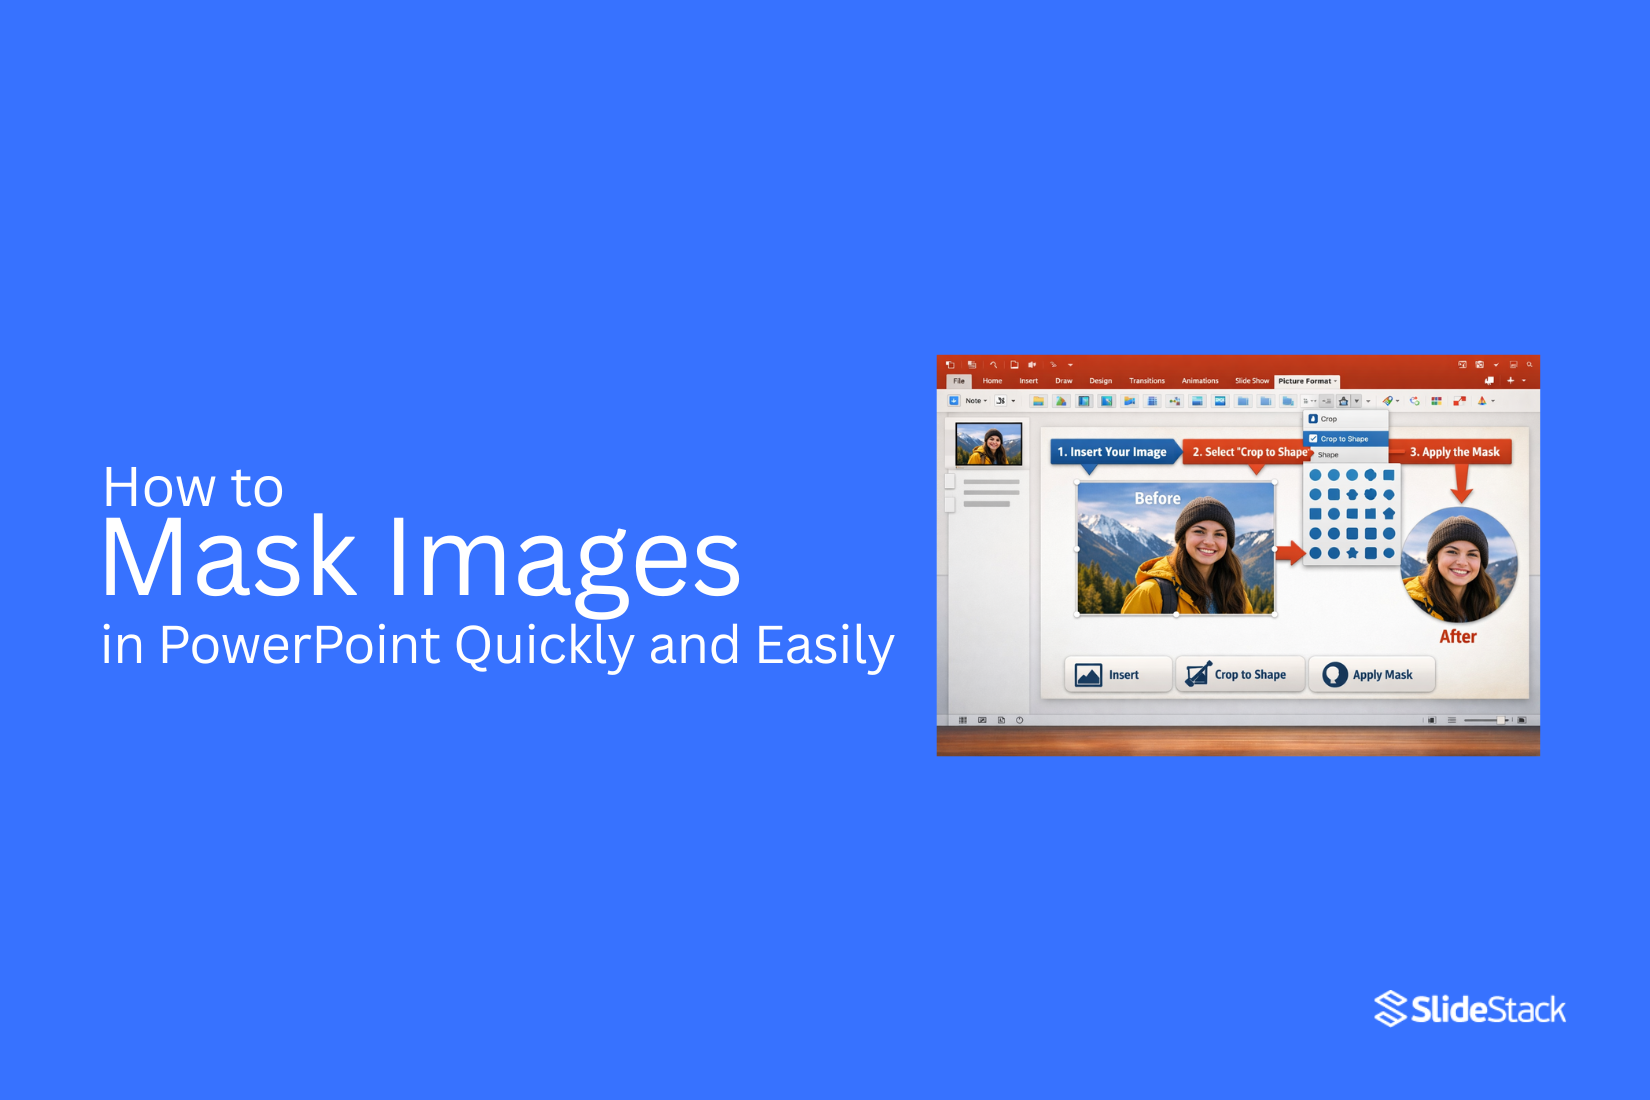
If you need a cleaner layout, you can crop an image to shape PowerPoint using predefined shapes that automatically mask unwanted areas.
Step 1: Insert your image via Insert -> Pictures.
Step 2: Select the image, and go to the Picture Format tab.
Step 3: Select Crop -> Crop to Shape.
Step 4: Choose a shape (e.g., circle, oval, or rounded rectangle), and the image will instantly adopt the shape you selected. To reposition the image inside the shape, click Crop again, drag the image within the masked boundary, and click outside to finalize the layout. The image below shows an example of cropping an image to a rectangular shape with rounded corners. If you want to learn more about cropping techniques, see this detailed guide on how to crop an image in PowerPoint.
Method 2: Make a Circular Picture in PowerPoint
This method turns a normal image into a circular shape. It helps slides look clean and organized. It works well for team slides, speaker photos, and simple design layouts.
Step 1: Insert your picture via Insert -> Pictures. Choose an image from the device and place it on the slide.
Step 2: Select the image. Go to Picture Format. Click Crop, then choose Crop to Shape and select Oval.
Step 3: Go back to Crop. Open Aspect Ratio and set it to 1:1. Adjust the image size so the circle stays even on all sides.
A perfect circle needs equal height and width. Keep the image centered so the edges stay balanced. For similar results in other tools, refer to how to make an image circular in Google Slides.
Method 3: Use a PowerPoint Shape Mask
Now that circular image masking is clear, a shape mask gives more control over how images appear on a slide. A shape works as a frame that holds an image inside it. This method is useful for custom layouts, consistent placeholders, and non-circular designs across slides.
Step 1: Go to Insert -> Shapes and select a shape that fits the layout needs.
Step 2: Draw the shape on the slide and select it.
Step 3: Right-click the shape and choose Format Shape.
Step 4: Go to Fill -> Picture or texture fill.
Step 5: Select Insert -> Pictures and choose an image from a file. The image now fills the shape.
Step 6: Adjust the image inside the shape using offset and alignment settings for better positioning.
Step 7: Refine the look with shape outline, shadow, or simple effects to match the slide design.
Method 4: PowerPoint Mask Image with Text
One of the most creative masking techniques involves placing an image inside text. This works especially well for title slides, section dividers, marketing presentations, and brand storytelling slides. PowerPoint mask image with text uses a simple process where a picture is applied inside text characters to create a strong visual focus. The steps below show how to place an image inside letters in PowerPoint.
Step 1: Insert a large text box using Insert → Text Box.
Step 2: Type your word and select the text. Use bold fonts for clearer results and stronger shape definition.
Step 3: Go to Shape Format → Text Fill → Picture or Texture Fill.
Step 4: Insert your image using Insert → Pictures. The image fills the text characters and creates a clean visual blend between typography and imagery.
Refining Masked Images and Knowing When to Use Them
Masked images often need small adjustments after they are added to a slide. These changes help the image fit better with the rest of the design. A small shift in crop or position can make a slide look more balanced. Start by checking the shape around the image. Some images feel too tight inside the mask. Others may leave empty space that feels off. Adjust the crop so the main subject sits in a strong position inside the shape. Keep the focus clear and easy to see.
Next, look at brightness and contrast. A masked image should not feel too dark or too bright compared to the text on the slide. Small changes here can improve clarity and make the content easier to read. Alignment also matters. Place masked images in line with other elements on the slide. Uneven spacing can distract the viewer. A clean layout helps the message stand out.
Masking works best when used with purpose. It fits well in slides that need a strong visual focus. It also works well in title slides, section breaks, and feature highlights. In slides with lots of data or text, a simple image without a mask may work better. Not every image needs a mask. Some pictures already fit well in a rectangular frame. In those cases, forcing a mask can reduce clarity. Choose based on what supports the message. A well-adjusted masked image supports the story of the slide. It keeps attention where it matters and helps the design feel more structured and clear.
Best Shapes for Image Masking in PowerPoint
Shapes change how an image feels on a slide. The right shape can make a message clearer and easier to follow. Some shapes work better than others for clean slide design. Circles are a common choice. They give a soft and balanced look. They work well for profile photos, team images, and icons. A circle keeps focus on the subject without extra edges pulling attention away.
Rounded rectangles are another strong option. They feel modern and neat. They also fit well in business slides. This shape works for product photos, step guides, and feature highlights. Squares give structure. They help create order in layouts. A square mask fits well in grid designs where images need to line up evenly.
Triangles are less common but useful. They add direction to a slide. They can guide the eye toward a key point or section. They work best when used with care, so the layout stays clean. Custom shapes can add style. A speech bubble shape fits quotes. A star shape fits awards or highlights. These shapes work best when they match the message, not just for decoration. Each shape changes how the viewer reads the slide. Picking the right one helps the image support the message instead of distracting from it.
Tips for Refining Masked Images
Masked images can look simple at first. Small changes make a big difference in the final result.
Start by checking the edges. Clean edges help the image blend better with the slide. If the edges look rough, adjust the mask shape or crop again. Next, focus on balance. Make sure the image does not feel too large or too small for the space. A well-sized image keeps the slide clear and easy to read. Pay attention to contrast. Strong contrast helps the subject stand out. If the image blends too much with the background, adjust brightness or choose a stronger image.
Alignment also matters. Keep the image lined up with text or other elements. Good alignment makes the slide feel organized and smooth. Color tone plays a role, too. Matching tones across the slide creates a consistent look. A slight color adjustment can help the image fit better with the design style. Take a final look at spacing. Empty space around the image gives it room to breathe. It also helps the slide feel clean instead of crowded.
Creative Ways to Use Image Masks in Presentations
Image masks help shape pictures inside slides. They make slides look clean and focused. They also help guide attention to key ideas. Here are simple ways to use them in different types of presentations.
Team Introduction Slides
Team slides feel more organized with image masks. Each person’s photo can sit inside the same shape. This keeps the layout even and easy to scan. Names and roles sit under each image. The slide feels balanced. No photo stands out too much. The focus stays on the team as a whole.
Portfolio Presentation Layouts
Portfolio slides need clarity. Image masks help group work samples in a neat way. Each project image can follow one shape style. This creates a steady flow across slides. The viewer sees consistency from one project to the next. Text can sit beside or under each image. The design stays simple and easy to follow.
Marketing and Product Showcase Slides
Product slides work better with a clear focus. Image masks help remove distractions around the product. Each product image fits inside a clean shape. This helps the product stand out. The slide looks organized and direct. Short labels can sit near each image. This helps the viewer understand each item quickly.
Infographic Presentation Designs
Infographic slides often mix images and data. Image masks help control how visuals appear. Icons and photos can share the same shape style. This keeps the design consistent across the slide. The layout feels structured. The message becomes easier to read. Visuals support the data instead of competing with it.
Common Problems When Masking Images
Distorted Image Shapes
Images can sometimes look stretched or squeezed after they are placed inside a shape in PowerPoint, especially when the shape size does not match the original image ratio, which can make people’s faces look wider than normal or objects look taller than they should, and this often makes the slide feel visually off and less balanced.
Cropped Important Image Areas
Important parts of an image can get cut off during masking because the shape may not fit the full picture, so faces, text, or key details might disappear from view, which can shift attention away from the main subject and make the message on the slide harder to understand at a quick glance.
Low-Quality Images After Cropping
Images can lose quality after they are resized or cropped inside shapes, especially when a small image is stretched to fill a large space, which often leads to blurry edges, reduced sharpness, and a less professional look that can affect how the entire presentation is seen.
Misaligned Shape Fills
Images placed inside shapes may not always sit in the correct position, so parts of the picture can move away from the center or important areas can shift slightly to one side, which creates uneven spacing and makes the slide layout feel less clean and harder to follow visually.
Advanced PowerPoint Image Masking Techniques
Image masking in PowerPoint can go beyond basic shapes. Some methods add depth and motion to slides. These techniques help slides look more structured and clear.
Combining Merge Shapes with Masks
PowerPoint offers Merge Shapes tools. These tools help join or cut shapes. Place an image behind a shape. Then use Intersect or Subtract. This creates custom image frames. It works well for logos, product shots, and headers. Each shape can change how the image appears.
Creating Layered Image Effects
Layering uses multiple images or shapes on top of each other. Start with a base image. Add another image or shape above it. Adjust size and position for balance. Lower the opacity of the top layers for depth. This adds visual structure to slides. It also helps guide attention to key areas.
Using Transparent Shape Masks
Transparent shapes can act like soft filters. Insert a shape over an image. Then adjust the fill transparency. This technique reduces harsh contrast. It helps text stand out on top of images. It also creates a clean background look.
Applying Animated Image Masks
Animation adds movement to masked images. Apply a shape mask first. Then add entrance or motion effects. Use simple movement like a fade or a wipe. Keep timing slow for readability. Animation can guide focus across the slide without distraction.
PowerPoint Templates with Pre-Designed Image Masks
PowerPoint templates with image masks save time. They come with ready shapes for pictures. You do not need to build layouts from scratch. You can drop images into place and move on with your work. These templates help keep slides clean and consistent. They also reduce design mistakes. The structure is already set. You only focus on content and images.
Animated Liquid Mask Templates
Animated liquid mask templates use flowing shapes for images. The picture fits into smooth-moving forms. The motion adds life to slides. It works well for modern topics and creative presentations. These templates are often used in opening slides or section breaks. They help set a visual tone right away. The movement keeps attention on the screen without extra effort.
Portfolio Presentation Templates
Portfolio templates with image masks are built for showcasing work. Each slide holds images in neat frames. The layout keeps focus on visuals. These are common for designers, photographers, and artists. The structure makes work look organized. Each project gets clear space without clutter.
Professional Pitch Deck Templates
Pitch deck templates use image masks for business slides. They keep images aligned and structured. Charts, product shots, and team photos fit cleanly into each slide. These templates support clear messaging. They help ideas look organized for clients or investors. The design stays simple, so the message stands out.
Final Notes
Image masking helps slides look cleaner and easier to read. It changes how images appear without changing the image itself. This gives more control over slide design. Small changes can improve results. A simple shift in crop, shape, or position can fix a messy layout. Even spacing and clear alignment help the slide feel more balanced.
Not every image needs a mask. Some pictures already fit well in a simple rectangle. Using masks only where they add clarity keeps the slides stronger. Shapes matter in design. Circles feel soft. Rounded rectangles feel neat. Squares bring structure. Each shape changes how the viewer reads the slide. Quality also matters. Low-quality images reduce impact. Clean, sharp images work better with masking. Brightness and contrast should match the rest of the slide.
Masked images work best when they support the message. They should not pull attention away from the content. They should guide the viewer toward the main idea. Good slides stay simple. Clear layout. Clean images. Consistent style. These elements keep the presentation easy to follow and more effective.
FAQs
What is image masking in PowerPoint?
Image masking places an image inside a shape. Only the part inside the shape is visible. The rest stays hidden.
Is image masking the same as cropping?
No. Cropping removes parts of an image. Masking hides parts using a shape. The full image still exists behind the mask.
Can I change the image after masking it?
Yes. The image can still move inside the shape. You can adjust what part shows at any time.
Which shapes work best for image masking?
Circles, rounded rectangles, and squares are common choices. Each one gives a different look and feel.
Can I use custom shapes for masking?
Yes. PowerPoint allows custom shapes. You can use them to create unique image styles.
Why does my image look stretched after masking?
This happens when the shape ratio does not match the image ratio. Adjust the crop or resize the shape to fix it.
Can I remove the mask later?
Yes. You can reset the image or change the shape fill to remove the mask.
Does masking reduce image quality?
Masking itself does not reduce quality. Low quality appears when small images are stretched too much.
Can I use text as a mask in PowerPoint?
Yes. You can fill text with an image using Picture or Texture Fill. The image appears inside the letters.
Where is image masking most useful?
It works well in team slides, product slides, title slides, and infographic layouts.


You may also be interested in ...

How To Create An Eye-Catching Portfolio
If you’re looking to create an eye-catching portfolio, this post will come in handy. In this article, you can find the easies...
23 Jun, 2024

How To Easily Create An Infographic
Infographics are the perfect way to make a presentation that will impact an audience, but their design and composition might...
08 Jun, 2024

PowerPoint Template Tips & Tricks You Ne...
PowerPoint seems to be an unknown world for many people, especially those who have been assigned to create a presentation out...
08 Jun, 2024