How to Record Yourself Giving a Presentation in PowerPoint
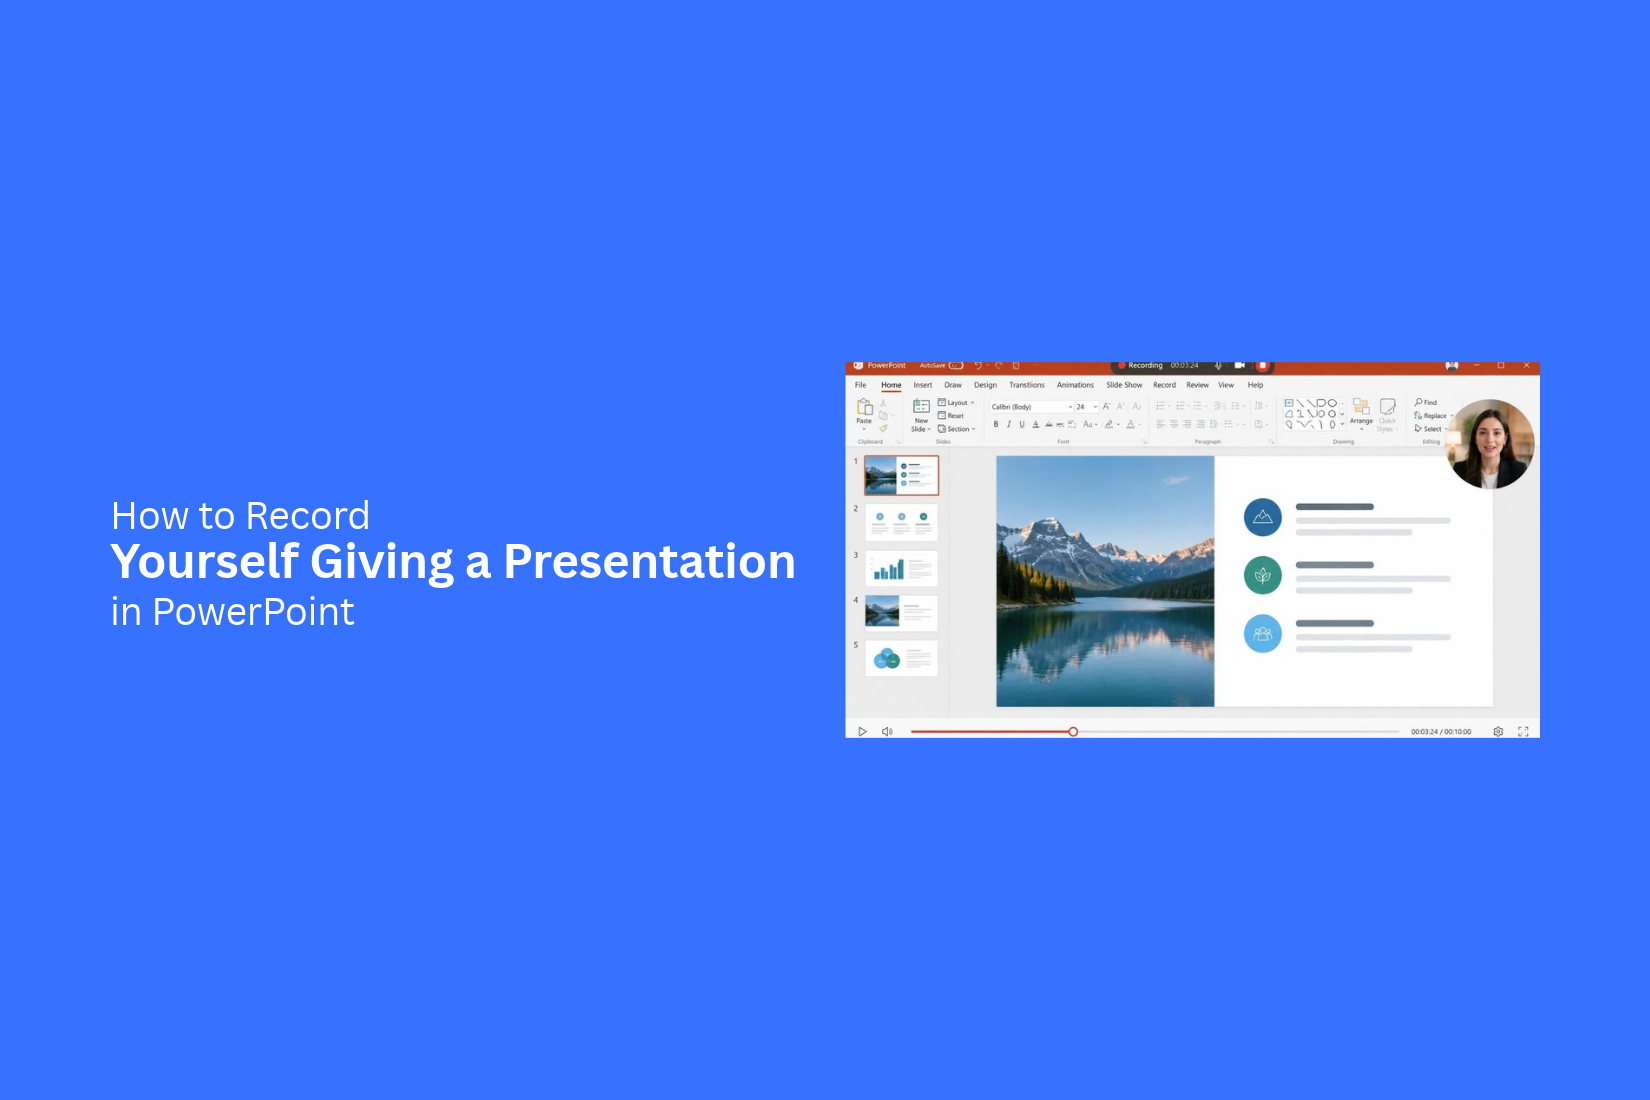
Recording yourself while giving a PowerPoint presentation can be difficult if you don't know which tools or settings to use. You may want to show your face, add voice narration, or record your slides for an online class or business meeting. Poor audio, camera issues, or missing video can also affect the final result.
The good news is that PowerPoint has built-in recording tools to help you create a video of your presentation. You can also use Cameo to add your face to slides or use screen recording software for more control.
In this guide, you'll learn how to record yourself giving a presentation in PowerPoint, add your camera feed, record voice-only slides, fix common problems, and export your recording as an MP4 video.
What Is PowerPoint Presentation Recording?
PowerPoint presentation recording lets you record your voice, video, and slide movements while giving a presentation. You can use your computer's microphone and camera to capture yourself speaking as you move through the slides.
This feature helps you create a video of your presentation without using a separate video editor. Your audience can see your slides and hear your explanation. They can also see you on screen through your webcam. PowerPoint saves the recording with your presentation. You can also export it as a video file. This makes it easy to share your presentation with people who cannot attend a live session.
What You Need Before Recording a PowerPoint Presentation
A good recording starts with a few basic tools and some preparation. Before you record yourself giving a presentation in PowerPoint, make sure you have everything ready.
Here are the main things you need:
1. A computer with PowerPoint: Use a desktop or laptop with PowerPoint installed. Make sure your presentation is ready and all slides are in the correct order.
2. A webcam: A built-in or external webcam lets you show your face during the presentation. Place it at eye level for a clear view.
3. A microphone: Use a built-in microphone or an external one to record your voice. Test the sound before recording to make sure your voice is clear.
4. A quiet place: Choose a room with little background noise. Turn off fans, TVs, and other noisy devices.
5. Good lighting: Make sure your face is easy to see. Sit facing a light source, such as a window or desk lamp. Avoid bright lights behind you.
6. A prepared script or notes: Write down the main points you want to cover. This helps you stay on track and explain each slide clearly.
Once these items are ready, you can start setting up your recording in PowerPoint.
How to Record Yourself Giving a Presentation in PowerPoint
PowerPoint lets you record your presentation with your voice and camera. You can show your face while explaining each slide. This is useful for online classes, business meetings, training videos, and recorded lessons. Follow these steps to record yourself giving a presentation in PowerPoint.
Step 1: Open Your PowerPoint Presentation
Open PowerPoint on your computer. Select the presentation you want to record. Check each slide before you start. Make sure the text, images, and other elements are in the right place. Save your file to keep your latest changes.
Step 2: Go to the Record Tab
Open your presentation and look at the top ribbon. Click the Record tab. PowerPoint will open its recording tools. You can use these tools to record your voice, camera, and slide movements. If you cannot see the Record tab, check the ribbon settings to see if it is hidden.
Step 3: Set Up Your Camera and Microphone
Before recording, check your camera and microphone.
Follow these steps:
- Click the camera option to turn on your webcam.
- Check the microphone option and select your preferred input device.
- Speak a few words to test your microphone.
- Check the camera preview to see how you look on screen.
- Adjust your camera position and lighting.
Place your camera near eye level. Keep your face in the center of the camera view. Make sure your voice is clear and easy to hear.
Step 4: Choose Your Recording Options
PowerPoint offers several recording options. You can adjust them before starting. Depending on your PowerPoint version, you may see options such as:
- Camera: Turn your webcam on or off.
- Microphone: Control voice recording.
- Teleprompter: View your notes while speaking.
- Blur Background: Hide details behind you.
- Camera Preview: Check your camera view before recording.
Choose the settings that match your presentation. You can also turn off your camera and record only your voice.
Step 5: Start Recording Your Presentation
Once your settings are ready, click the Record button. PowerPoint may show a short countdown before recording starts. Use this time to get ready. Start speaking after the countdown ends. Introduce your topic and explain the purpose of your presentation. Speak at a steady pace and use a clear voice.
Step 6: Present Your Slides While Recording
Move through your slides as you speak. Explain each point in a clear and simple way. Use the arrow keys or slide navigation controls to move between slides. You can also use the pen and highlighter tools to mark key details on your slides.
Keep these tips in mind:
- Look at the camera from time to time.
- Avoid reading every word from the slides.
- Pause briefly between key points.
- Keep your voice clear and steady.
- Give each slide enough time for viewers to follow.
Your camera feed, voice, and slide timings can be recorded together. This helps viewers follow your presentation.
Step 7: Stop and Review Your Recording
After presenting all your slides, click the Stop button. Take some time to review your recording. Check the audio, video, and slide timings. Make sure your voice is clear and your camera view looks good. Play the recording from start to finish. Look for any mistakes, long pauses, or parts that need another take. PowerPoint also lets you record a slide again without recording the entire presentation. Once you are happy with the result, save your presentation.
How to Add Your Face to PowerPoint Slides Using Cameo
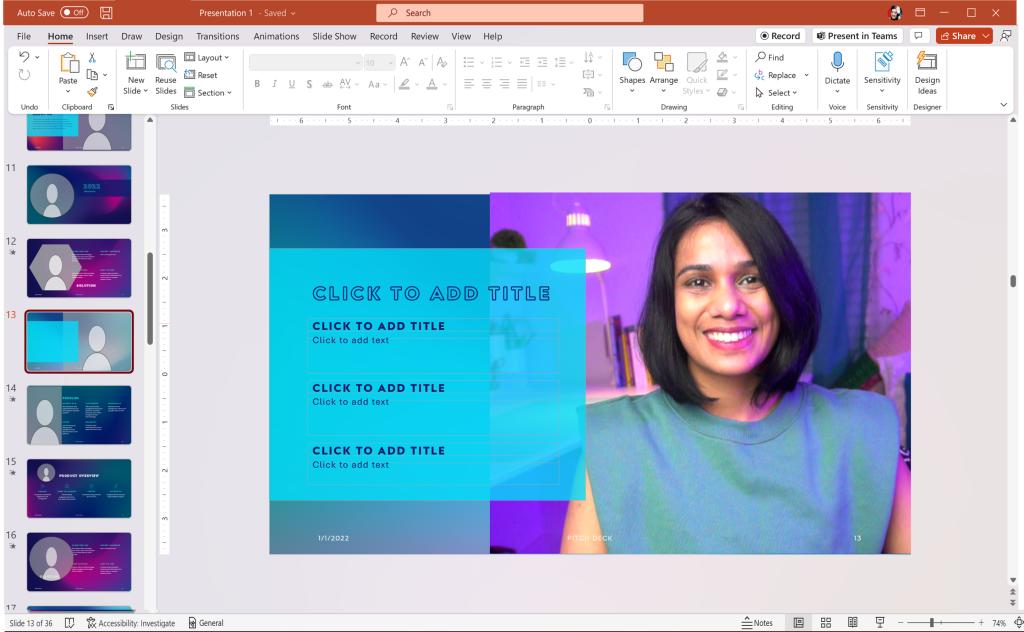
PowerPoint Cameo lets you add a live camera feed to your slides. Your face appears inside a camera frame as you present. This feature helps you connect with your audience while showing your slides. You can place the camera frame on different parts of a slide. You can also change its size, shape, and position to match your layout.
How to Insert Cameo in PowerPoint
Follow these steps to add your camera feed to a PowerPoint slide:
- Open your PowerPoint presentation.
- Select the slide where you want to show your face.
- Go to the Insert tab.
- Find the Cameo option in the Camera section.
- Click Cameo to add a camera frame to your slide.
- PowerPoint will show a live preview from your camera.
- Select the camera frame to adjust its size and position.
You can add Cameo to one slide or several slides. Add it to the slides where you want your face to appear during the presentation.
How to Resize and Reposition the Cameo Frame
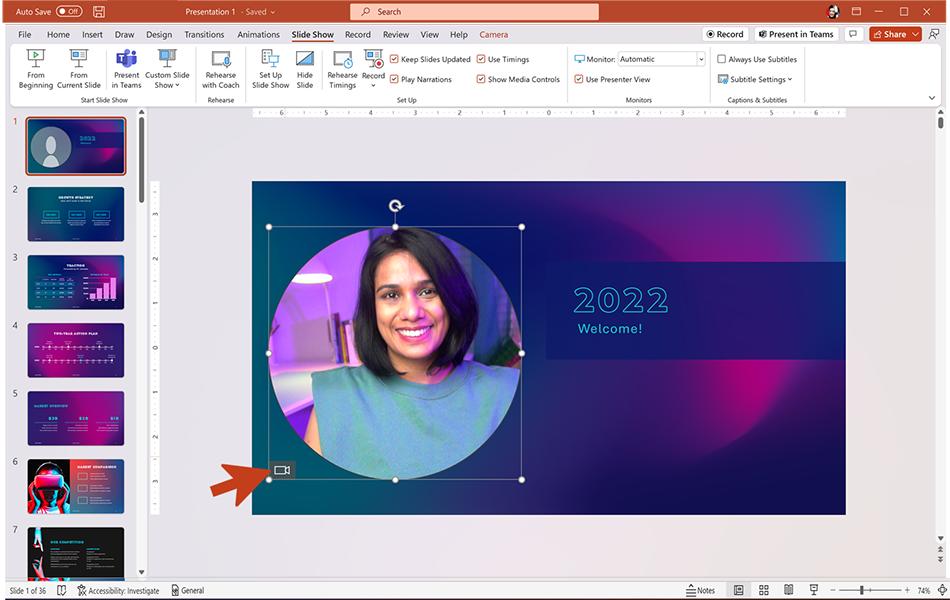
The Cameo frame works like an image or other visual object on your slide. You can resize it and move it to a suitable spot.
Here are the steps:
- Select the Cameo frame on your slide.
- Drag a corner handle inward or outward to make the frame smaller or larger.
- Drag the frame to move it to another part of the slide.
- Use the alignment guides to place it neatly.
- Check that the frame does not cover your text, charts, or other visuals.
Place your camera feed in an area that does not block key slide content. A corner of the slide often works well. Keep enough space around the frame so your face remains easy to see.
How to Customize the Cameo Camera Frame
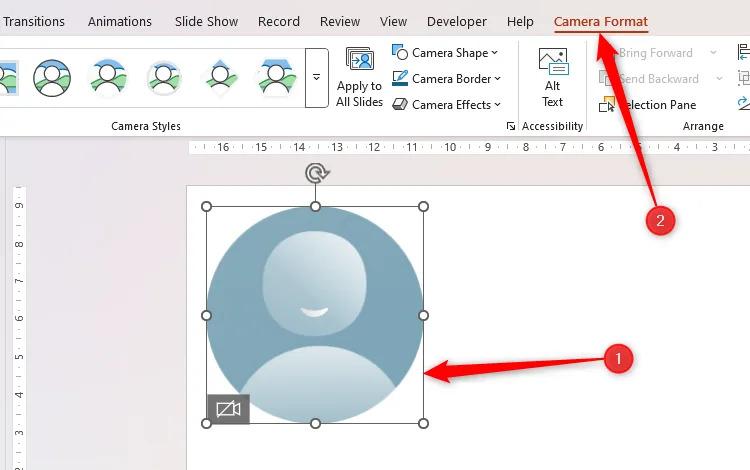
PowerPoint also lets you change the look of your Cameo frame. You can match it with your slide design.
Follow these steps:
- Select the Cameo frame.
- Open the Camera Format tab.
- Choose a shape from the available frame styles.
- Adjust the border or other available style settings.
- Apply a suitable camera shape, such as a circle or rounded rectangle.
- Review the slide to make sure the camera frame fits the layout.
A circular frame works well for a small camera view. A rectangular frame gives you more room to show your face and upper body. Keep the style simple so your camera feed does not take attention away from the main slide content.
How to Record a PowerPoint Presentation With Voice Only
You can record your PowerPoint presentation without showing your face. This option works well for tutorials, lectures, and business presentations. Your audience can see each slide and hear your voice as you explain the content. PowerPoint lets you turn off your camera and use your microphone for narration. Follow these steps to create a voice-only recording.
Turn Off Your Camera
Start by opening your presentation in PowerPoint. Go to the Record tab or select Record from the top menu. Open the recording view to access the camera and microphone settings. Find the camera option and turn it off. This stops PowerPoint from recording your video. Your slides will remain visible during the recording.
Enable Your Microphone
Next, check your microphone settings. Find the microphone icon in the recording view. Turn it on to capture your voice. Select the correct microphone from the available devices. Speak a few words to test the sound. Make sure your voice is clear and easy to hear. Adjust the input level if needed.
Record Your Slide Narration
Your camera is off, and your microphone is ready. Now you can start recording your presentation. Click the Record button to begin. Speak clearly as you explain each slide. Use a steady pace and keep your voice at a comfortable level.
Move through the slides as you speak. PowerPoint records your narration for each slide. You can also pause the recording or start again if you make a mistake.
Review Your Voice Recording
After recording, play back your presentation. Check the audio on each slide. Make sure your voice is clear and the narration matches the slide content. Pay attention to long pauses, background noise, and missing words. Re-record any slide that needs changes. A quick review helps you prepare a clean presentation before sharing it with your audience.
How to Record Yourself Presenting Slides Using Screen Recording Software
Screen recording software lets you record your PowerPoint slides, voice, and webcam at the same time. This is useful for online classes, training videos, and business presentations. You can show your slides while speaking to the camera. Each tool offers different recording and editing options. Here are four tools you can use to record your presentation.
Record a Presentation With OBS Studio
OBS Studio is a free screen recording and streaming tool. It lets you capture your PowerPoint slides, webcam, and microphone. You can also arrange these elements on the screen.
Follow these steps to record your presentation:
- Download and install OBS Studio on your computer.
- Open OBS Studio and create a new scene.
- Click the + icon under Sources.
- Select Display Capture or Window Capture to show your PowerPoint slides.
- Add Video Capture Device to include your webcam.
- Add Audio Input Capture to record your microphone.
- Adjust the webcam size and position.
- Open your PowerPoint presentation.
- Click Start Recording in OBS Studio.
- Start your slideshow and begin speaking.
- Click Stop Recording after finishing your presentation.
OBS Studio saves your recording as a video file. You can use this file to share your presentation or edit it later.
Record a Presentation With Loom
Loom is a screen recording tool that lets you record your screen, webcam, and voice. It is useful for creating short presentations, tutorials, and team updates.
Here is how to record your PowerPoint presentation with Loom:
- Open Loom on your computer or use its desktop app.
- Sign in to your Loom account.
- Select the Screen and Camera recording option.
- Choose the screen or PowerPoint window you want to record.
- Check your camera and microphone settings.
- Select your webcam position.
- Click Start Recording.
- Open your PowerPoint slideshow and begin presenting.
- Speak clearly while moving through your slides.
- Stop the recording after your presentation ends.
Loom processes your recording and provides a video link. You can share this link with your team, students, or clients.
Record a Presentation With Camtasia
Camtasia is a screen recording and video editing tool. It lets you record your PowerPoint slides, webcam, and microphone. You can also edit the video after recording.
Follow these steps to record your presentation:
- Open Camtasia on your computer.
- Select the New Recording option.
- Choose the screen area or PowerPoint window you want to capture.
- Turn on your microphone to record your voice.
- Enable your webcam to show yourself during the presentation.
- Check the audio and video settings.
- Click Start Recording.
- Open your PowerPoint presentation and start the slideshow.
- Present your slides while speaking to the camera.
- Stop the recording after you finish.
- Open the recording in the Camtasia editor.
- Edit the video, adjust the audio, and remove unwanted parts.
- Export the finished video in your preferred format.
Camtasia gives you more control over the final video. You can add text, transitions, and other visual elements during editing.
Record a Presentation With ScreenPal
ScreenPal is another screen recording tool. It lets you capture your screen, webcam, and microphone. You can use it to record PowerPoint presentations and create videos for online learning or work.
Use these steps to record your presentation:
- Open ScreenPal on your computer.
- Launch the screen recorder.
- Choose the screen recording option.
- Select the area that shows your PowerPoint slides.
- Turn on your webcam to record your face.
- Enable your microphone to capture your voice.
- Adjust the recording area and camera position.
- Click the Record button.
- Open your PowerPoint slideshow and start presenting.
- Speak through each slide at a clear pace.
- Stop the recording after the final slide.
- Preview your video and make any needed edits.
- Save or export the finished recording.
ScreenPal also offers basic video editing options. You can trim parts of your recording and make simple changes before sharing the video.
How to Export a Recorded PowerPoint Presentation as a Video
After recording your presentation, you can save it as a video file. This lets you share your presentation with others. They can watch it without opening PowerPoint. You can also upload the video to a website or learning platform.
Open the Export Menu
Start by opening your recorded presentation in PowerPoint.
- Click the File tab in the top-left corner.
- Select Export from the left-side menu.
- Wait for the export options to appear.
Select Create a Video
PowerPoint has a built-in option to turn your recorded slides into a video.
- Click Create a Video under the Export menu.
- PowerPoint will show the video settings.
- You can now set the quality and recording options for your video.
Choose Video Quality and Recording Settings
Before saving the video, select the right settings for your needs.
- Video Quality: Choose the video resolution. Higher quality gives you a clearer video but creates a larger file.
- Use Recorded Timings and Narrations: Select this option to keep your recorded voice, camera feed, and slide timings in the video.
- Seconds Spent on Each Slide: Set how long each slide stays on screen. This setting applies to slides without recorded timings.
Check your settings before moving to the next step. Your choices affect how the final video looks and sounds.
Export and Save Your MP4 File
Now, save your presentation as an MP4 video.
- Click Create Video.
- Choose a folder on your computer.
- Enter a name for your video file.
- Make sure the file type is set to MPEG-4 Video (*.mp4).
- Click Save to start the export.
PowerPoint will begin creating your video. The export may take a few minutes, depending on the presentation length and video quality. You can check the progress in the status bar at the bottom of the PowerPoint window. Once the export is complete, open the MP4 file to check your recorded presentation. Make sure the slides, voice, and camera footage play as expected.
How to Make Your Recorded Presentation Look Professional
A good presentation is not just about your slides. Your camera, lighting, and audio also affect how people see and hear you. Small changes to your recording setup can make a big difference. You do not need expensive equipment to create a clean and professional video. Start with these simple steps to improve your recording.
Position Your Camera at Eye Level
Place your camera at eye level before you start recording. This helps you maintain natural eye contact with your audience. It also gives your video a balanced look.
Avoid placing your camera too low or too high. A low camera can show an awkward angle. A camera placed too high may make you look down at the screen. Use a laptop stand or a few books to adjust the camera height. Keep your face near the center of the frame.
Use Proper Lighting
Good lighting helps your audience see your face clearly. Poor lighting can make your video look dark or uneven.
Place a light source in front of you. Natural light from a window works well. Avoid sitting with a bright window behind you. This can make your face look dark. You can also use a desk lamp or ring light to brighten your face.
Keep the lighting soft and even. Make sure there are no strong shadows on your face.
Improve Your Audio Quality
Clear audio helps your audience follow your presentation. Poor sound can make it hard to understand your message, even with well-designed slides.
Use a good microphone to capture your voice. A headset microphone or an external USB microphone can work well. Keep the microphone close to your mouth, but avoid placing it too close.
Choose a quiet room for recording. Turn off fans, TVs, and other noisy devices. Record a short test to check your voice before starting the full presentation.
Keep Your Background Clean
Your background should not take attention away from your presentation. A clean and simple space helps viewers focus on you and your slides.
Remove items that look messy or distracting. Keep your desk and nearby shelves tidy. A plain wall or a simple home office setup can work well.
Also, check what appears behind your head and shoulders. Move anything that may distract viewers from your message. If you use a virtual background, choose a simple design that looks natural.
Practice Your Presentation Before Recording
A little practice can help you feel more confident in front of the camera. It also helps you speak clearly and stay on track.
Read through your presentation before recording. Check the order of your slides and make sure your key points are clear. Practice speaking at a steady pace. Avoid reading every word directly from the slides.
You can also record a short test video. Watch it to check your speaking style, camera position, and audio. Make any needed changes before recording the full presentation.
Common Uses for Recorded PowerPoint Presentations
A recorded PowerPoint presentation can serve many purposes. It lets viewers watch your slides and listen to your explanation at their own pace. You can share the video online or send it to a group. Here are some common ways to use recorded presentations.
Online Classes and Educational Videos
Teachers can record PowerPoint presentations to create lessons for online classes. They can explain each slide with their voice and add examples to help students understand the topic. Students can watch the video from home and review the lesson later. This also helps teachers share the same lesson with several classes.
Business Meetings and Team Updates
Recorded presentations can help teams share project updates and business plans. You can explain key points without setting up a live meeting. Team members can watch the video at a time that works for them. They can also replay parts of the presentation to review key details.
Employee Training and Onboarding
Companies can use recorded PowerPoint presentations to train new employees. A video can explain company rules, job tasks, work tools, and team roles. New staff can watch the lessons during their first few days. Existing employees can also use these videos to review work steps.
Academic Projects and Assignments
Students can record their PowerPoint presentations for school or college projects. They can explain their research, share key findings, and add their own voice to each slide. This gives teachers a clear view of the student's work. It also helps students submit their presentations as video files.
Common PowerPoint Recording Problems and How to Fix Them
Recording a presentation in PowerPoint does not always go as planned. Your microphone may not capture your voice. Your webcam may not appear on the slides. Sometimes, the final video may have missing audio or playback issues.
Most of these problems have simple fixes. Here are some common PowerPoint recording issues and ways to fix them.
Microphone Not Recording Audio
A PowerPoint recording may capture your slides but miss your voice. This often happens when the wrong microphone is selected or the microphone is turned off.
Follow these steps to fix the issue:
- Open PowerPoint and go to the Record tab.
- Check the microphone icon in the recording controls.
- Make sure the microphone is turned on.
- Check your computer's sound settings.
- Select the correct microphone as the input device.
- Record a short test to check your voice.
Also, check your microphone connection. A loose cable or muted headset can stop audio from recording.
Webcam Not Showing on Slides
Your webcam feed may not appear during a PowerPoint recording. This can happen if camera access is turned off or another app is using the webcam.
Try these steps:
- Open PowerPoint and go to the Record tab.
- Check that the camera option is turned on.
- Open your computer's privacy settings.
- Allow PowerPoint to access your camera.
- Close other apps that may be using the webcam.
- Start a short test recording.
If the camera still does not appear, restart PowerPoint and check your webcam connection.
Camera Feed Covering Important Slide Content
Your camera feed may cover text, images, charts, or other key parts of a slide. This can make your presentation hard to follow.
You can fix this by adjusting the camera position and size.
- Open the slide with the recording.
- Select the camera feed.
- Drag it to an empty area of the slide.
- Resize the camera frame by dragging its corners.
- Keep important text and visuals clear.
- Preview the slide before recording again.
Place your camera feed in a corner with enough empty space. Keep it away from titles, charts, and key points.
Missing Audio or Video After Recording
Sometimes, a recorded presentation may have missing audio or video. Your voice may not play, or your camera feed may not appear in the final recording.
Start by checking the recording settings.
- Open your presentation in PowerPoint.
- Go to the slide with the missing audio or video.
- Check that the microphone and camera were turned on during recording.
- Play the slide in Slide Show mode.
- Check your computer's volume and audio output settings.
- Record the affected slide again if needed.
You should also check whether the recording saved properly. Save your presentation and open it again to test the audio and video.
Exported Video Not Playing Properly
You may face playback issues after exporting your PowerPoint recording as a video. The video may not open, the sound may be missing, or the playback may stop.
Try these steps to fix the problem:
- Open your PowerPoint presentation.
- Go to File > Export > Create a Video.
- Select your preferred video quality.
- Check that Use Recorded Timings and Narrations is selected.
- Export the video again.
- Open the new video in a media player.
You can also try a different video format or media player. Make sure the export process finishes before opening the file. A short test export can help you check the video before saving the full presentation.
Final Thoughts
Recording yourself giving a presentation in PowerPoint is a simple way to share your ideas through video. You can use the built-in recording tools to capture your voice, camera, and slide movements. Cameo also lets you add your face to individual slides. A voice-only recording is another option for lessons and tutorials.
PowerPoint is not your only choice. Tools like OBS Studio, Loom, Camtasia, and ScreenPal offer more ways to record your screen and webcam. You can also edit your video with some of these tools.
Before sharing your recording, check the audio, video, and slide timings. Fix any issues and export the finished presentation as an MP4 file. A little preparation can help you create a clear video that your audience can watch and understand.
Frequently Asked Questions
1. Can I record myself presenting a PowerPoint presentation?
Yes. PowerPoint lets you record your voice, webcam, and slide movements. You can use the Record tab to start and save your presentation.
2. How do I record myself and my slides at the same time in PowerPoint?
Open your presentation and go to the Record tab. Turn on your camera and microphone. Click Record and start presenting your slides. PowerPoint will capture your face, voice, and slide movements.
3. Can I record a PowerPoint presentation without showing my face?
Yes. Turn off your camera in the recording view and keep your microphone on. PowerPoint will record your voice and slide movements without showing your face.
4. How do I add my face to PowerPoint slides?
Use the Cameo feature. Go to Insert > Cameo to add a live camera feed to your slide. You can resize the camera frame and move it to a suitable position.
5. Can I record only one slide in PowerPoint?
Yes. PowerPoint lets you record individual slides. You can also record a slide again without replacing the recordings on other slides.
6. How do I save a recorded PowerPoint presentation as an MP4?
Go to File > Export > Create a Video. Choose your video quality and select Use Recorded Timings and Narrations. Click Create Video, choose MPEG-4 Video (*.mp4), and save the file.
7. Why is my microphone not recording audio in PowerPoint?
Your microphone may be turned off or the wrong input device may be selected. Check the microphone settings in PowerPoint and your computer's sound settings. Record a short test to check the audio.
8. Can I record a PowerPoint presentation using OBS Studio?
Yes. OBS Studio lets you capture your PowerPoint slides, webcam, and microphone. Add the required sources, adjust their positions, and click Start Recording before presenting.
9. Which screen recording software can I use for PowerPoint presentations?
You can use OBS Studio, Loom, Camtasia, or ScreenPal. These tools let you record your screen, voice, and webcam. Some also offer video editing options.
10. Can I edit a PowerPoint recording after saving it?
Yes. You can record individual slides again in PowerPoint. For more video editing options, you can use tools like Camtasia or ScreenPal to trim clips and make other changes.




You may also be interested in ...

How To Create An Eye-Catching Portfolio
If you’re looking to create an eye-catching portfolio, this post will come in handy. In this article, you can find the easies...
23 Jun, 2024

How To Easily Create An Infographic
Infographics are the perfect way to make a presentation that will impact an audience, but their design and composition might...
08 Jun, 2024

PowerPoint Template Tips & Tricks You Ne...
PowerPoint seems to be an unknown world for many people, especially those who have been assigned to create a presentation out...
08 Jun, 2024