How To Easily Do a Hanging Indent on Google Slides

Getting your text to line up neatly in Google Slides is harder than it should be. Many slides end up with uneven margins or cluttered bullet points, which can make your presentation look sloppy and distract your audience.
These small formatting issues may seem minor, but they can slow you down and make your slides appear unprofessional. Fixing spacing or alignment by trial and error takes time and adds frustration.
Luckily, creating a hanging indent in Google Slides is simple. This guide will show three easy methods to make your text clean and organized, so your slides look polished without extra effort.
What Is a Hanging Indent?
A hanging indent is a type of text formatting where the first line of a paragraph starts at the normal margin, and all the lines that follow are indented. This creates a “hanging” effect where the rest of the paragraph appears to drop down slightly.
Hanging indents are often used in lists, bibliographies, citations, and references. For example, in a bibliography, the author’s name begins at the margin, and the rest of the information, like the title or publication date, is indented. This layout makes it easier to see each entry clearly.
Using a hanging indent has clear advantages. It improves readability by separating items visually. It keeps content organized and neat, avoiding long blocks of text that are hard to scan. It also helps readers locate specific details quickly, especially in reference lists or structured lists.
By applying hanging indents, your documents look more professional, and your audience can find information without extra effort.
Why Use Hanging Indents?
Hanging indents in Google Slides help make your text structured, easy to read, and professional. They guide the eye through information and give your slides a clean, organized look.
Let us take a look at some of the key points:
Enhanced Readability: Indenting lines after the first one separates ideas visually. This makes it easier for your audience to follow the text.
Clear Hierarchy: Hanging indents show which parts of the text are main points and which are supporting details. This creates a natural flow and order.
Professional Appearance: Proper formatting adds polish to your slides. Audiences notice organized content and perceive it as well-prepared.
Accurate Citations: Hanging indents are standard for bibliographies and references. They help present sources clearly and correctly.
Concise Presentations: Indented text prevents clutter. Lists and references stay neat and short, keeping your slides readable.
Consistency: Using the same format across slides keeps your presentation uniform. This strengthens overall clarity and impact.
Hanging indents are small changes that make a big difference in clarity and presentation quality.
A Step-by-Step Guide to Creating Hanging Indents in Google Slides
Hanging indents make your text easier to read and help your audience follow key points. They give your slides a clean, organized look and improve comprehension. You can create hanging indents in a few different ways. Each method is simple and works well depending on your needs. Let’s walk through the steps so you can apply hanging indents quickly and neatly.
Method 1: Use a Ruler to do Hanging Indent
Hanging indents make your slides look neat. You can create them using the ruler in Google Slides. Follow these steps carefully.
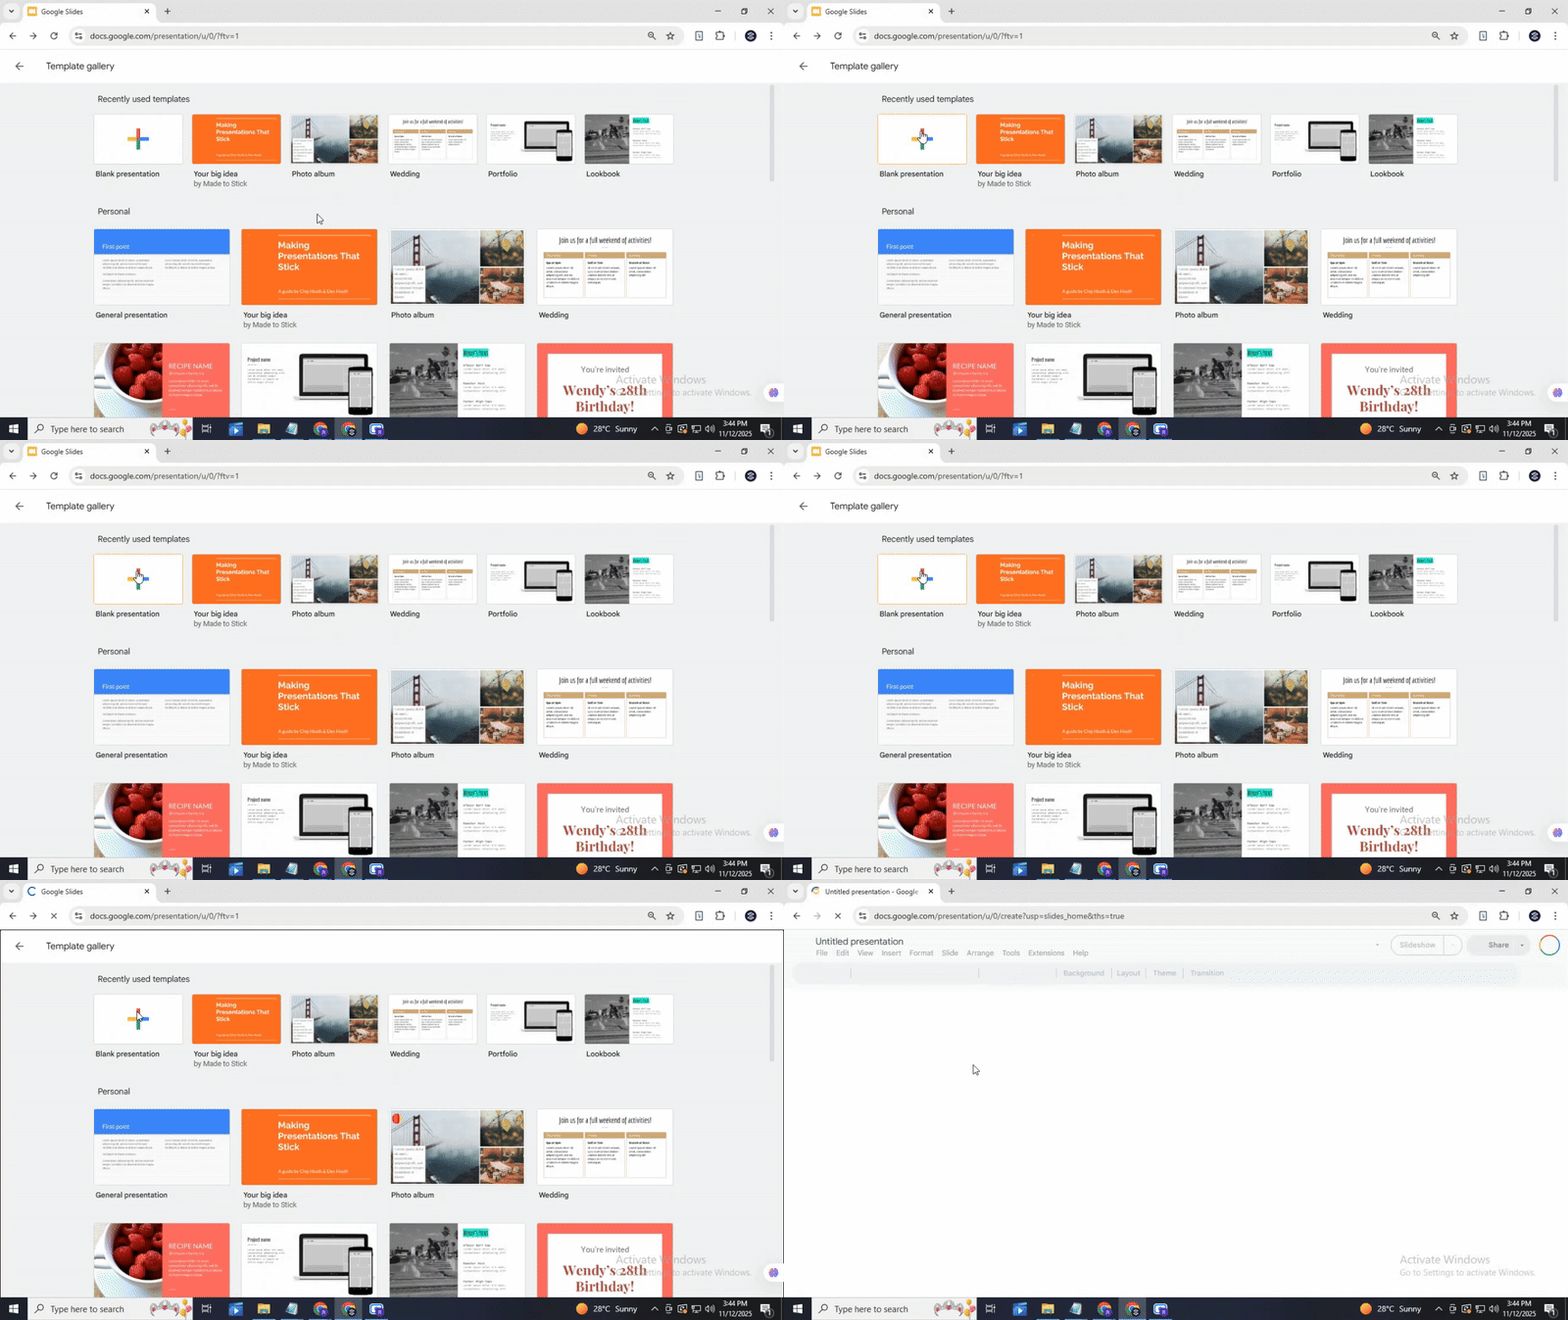
Step 1: Open the presentation
Open the Google Slides file where you want to add the hanging indent. Go to the slide with the text you want to format.
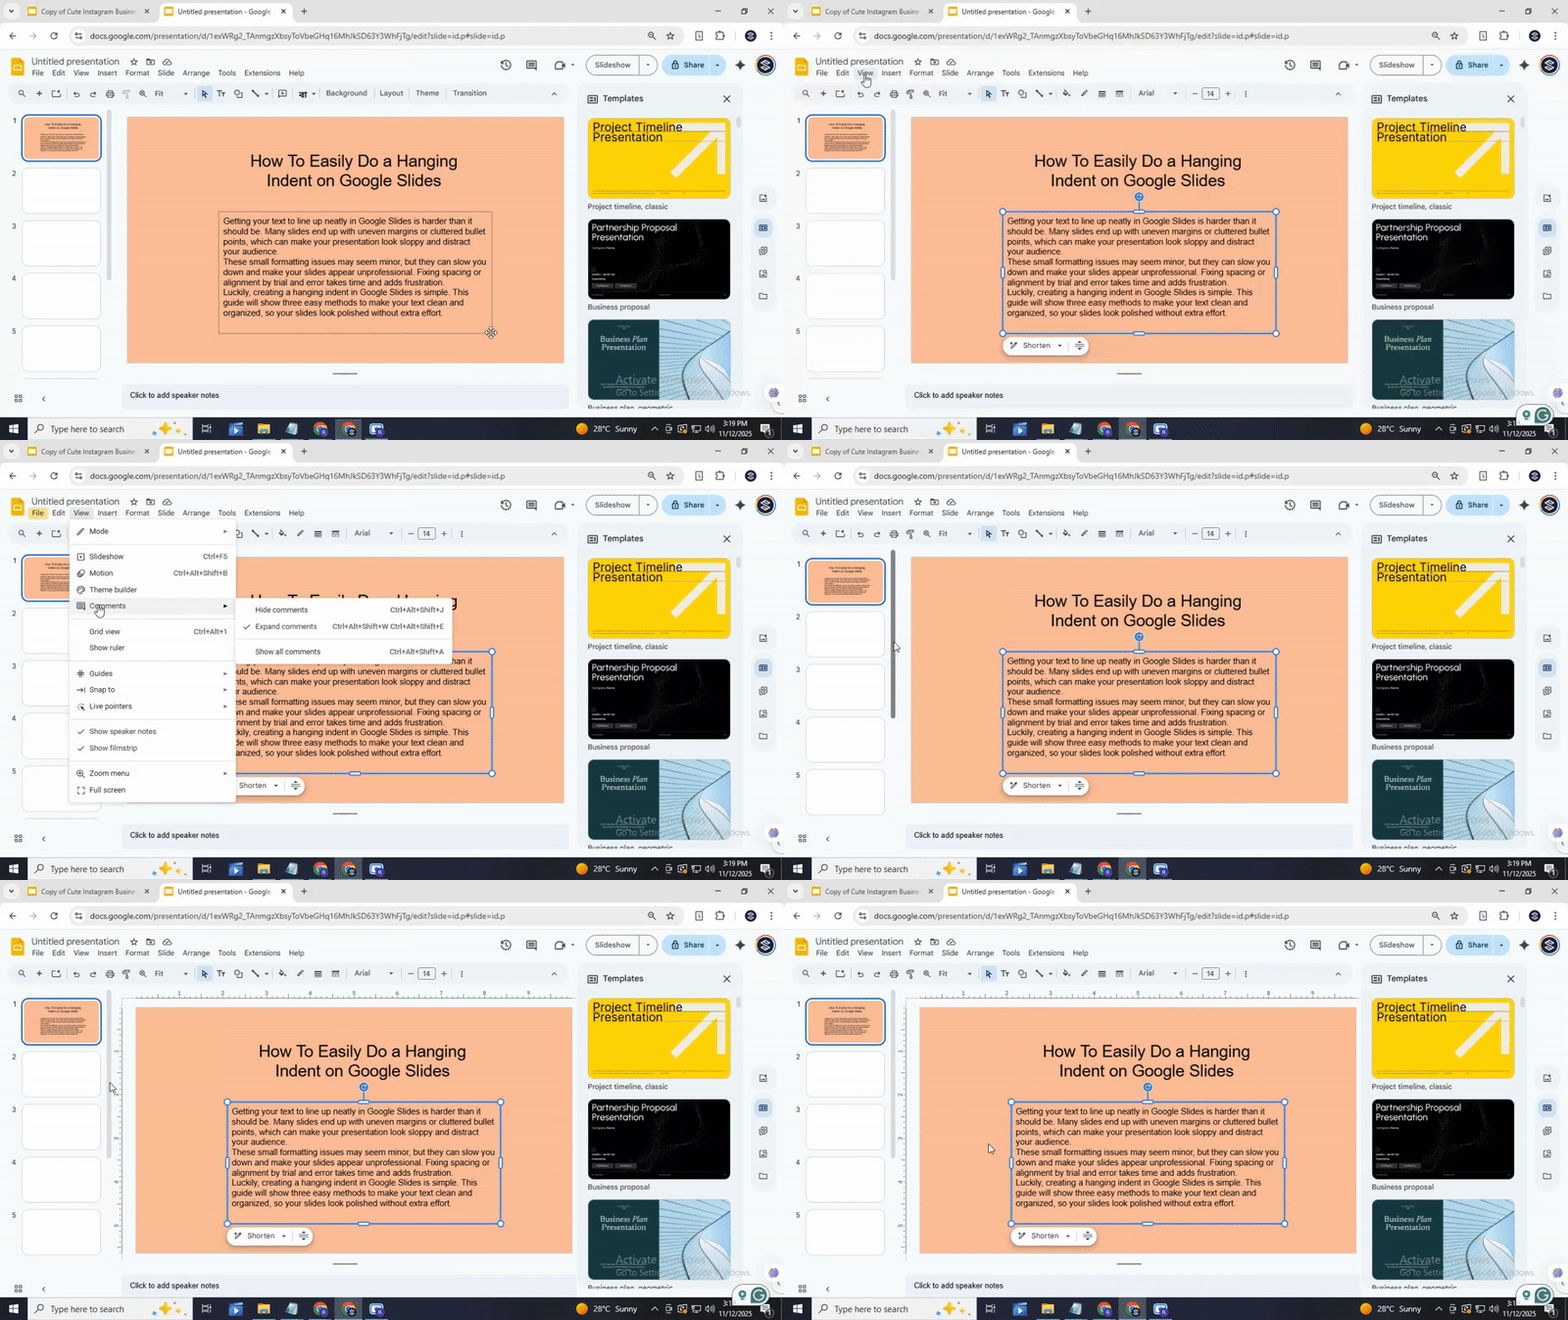
Step 2: Access the ruler
Click on “View” in the top menu. Then select “Show ruler.” A ruler will appear at the top of the slide. The ruler helps you control where your text starts.
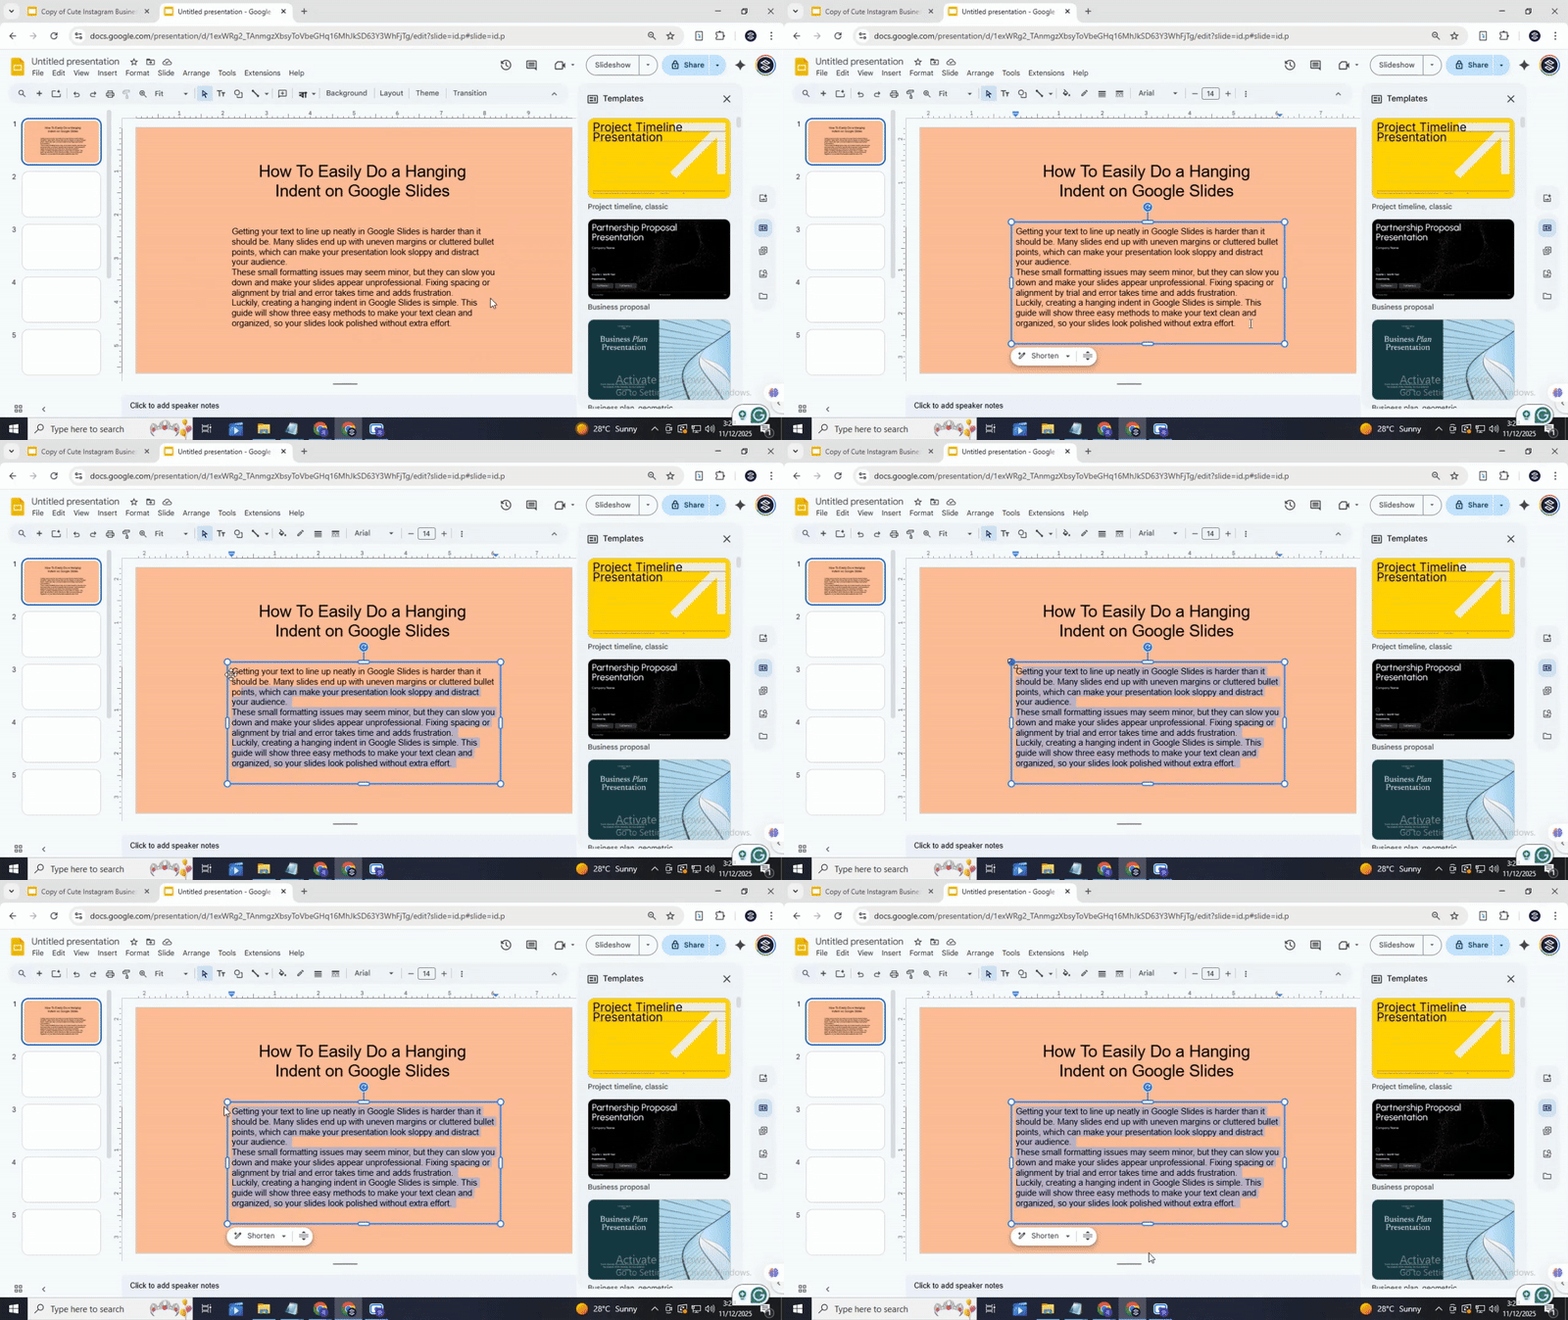
Step 3: Select the text
Click and drag to highlight the text you want to format. Only the highlighted text will change when you adjust the indent.
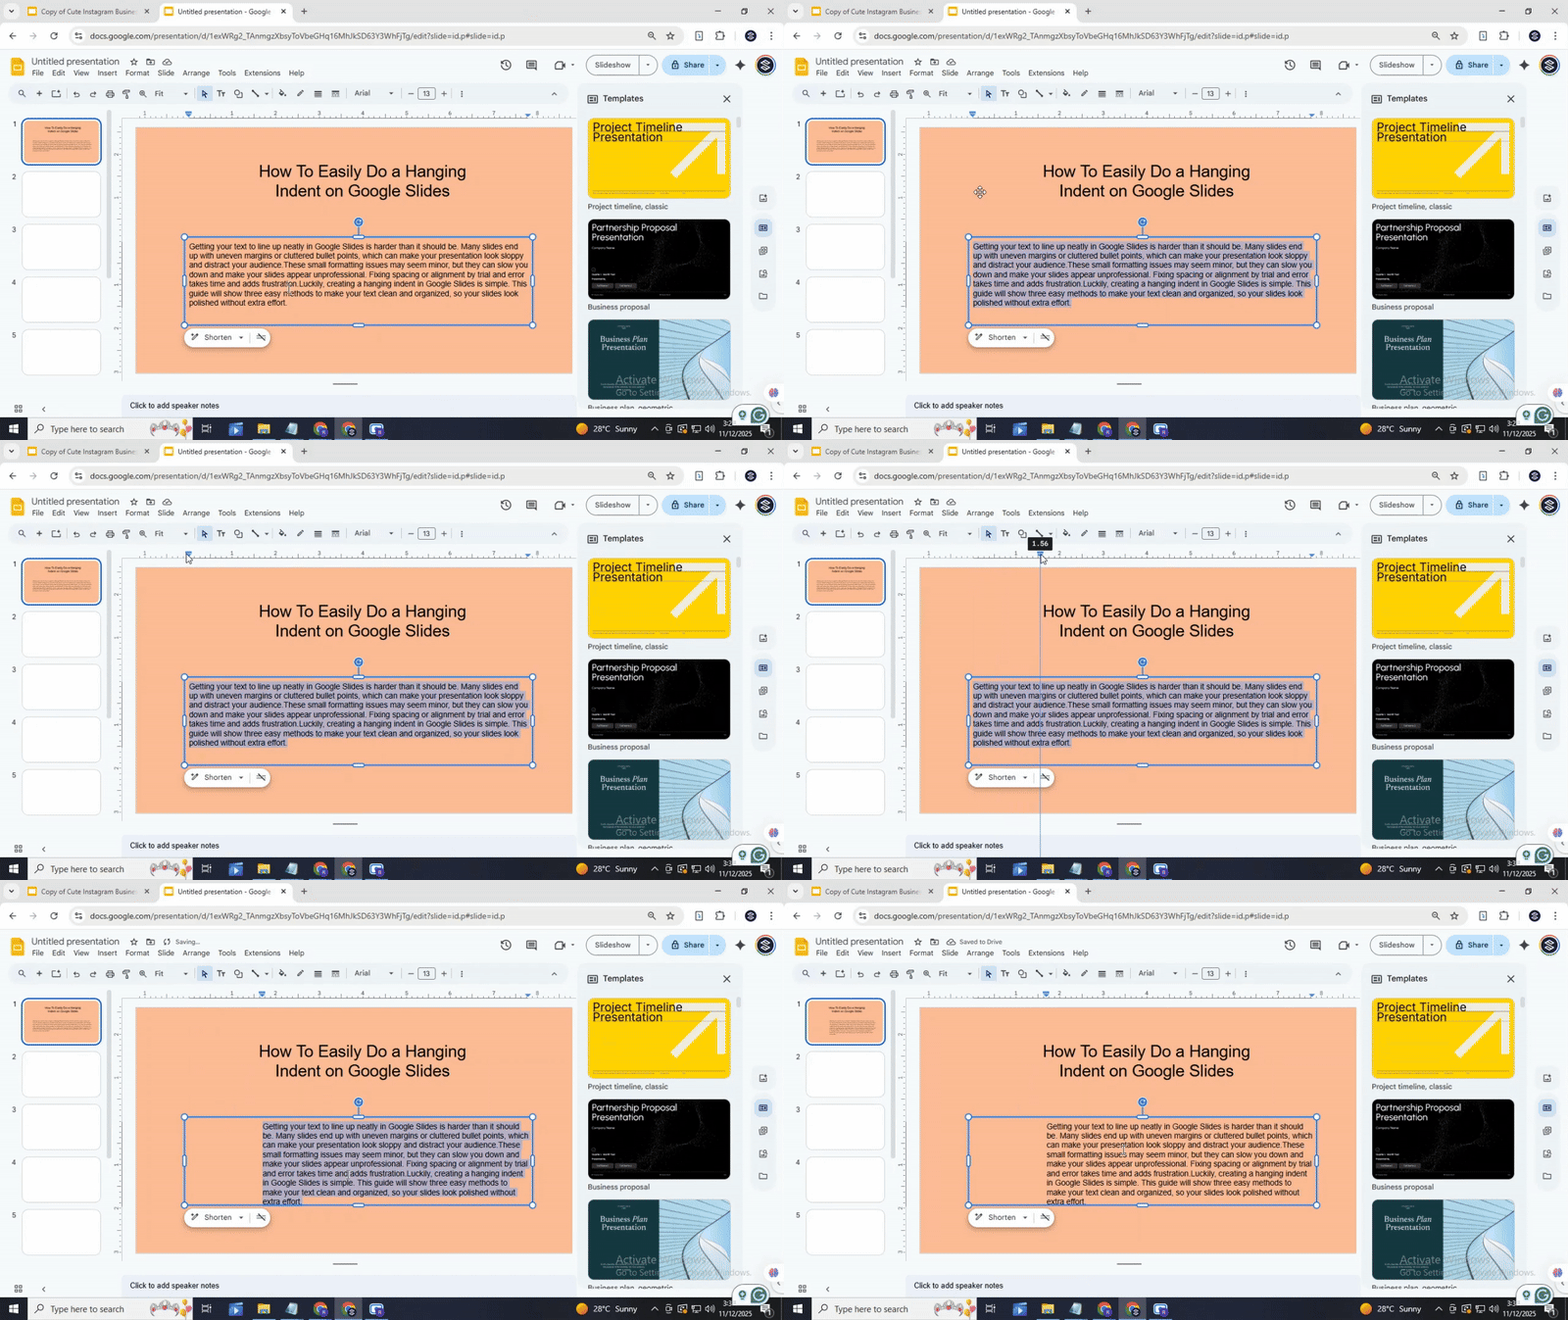
Step 4: Add the first line indent
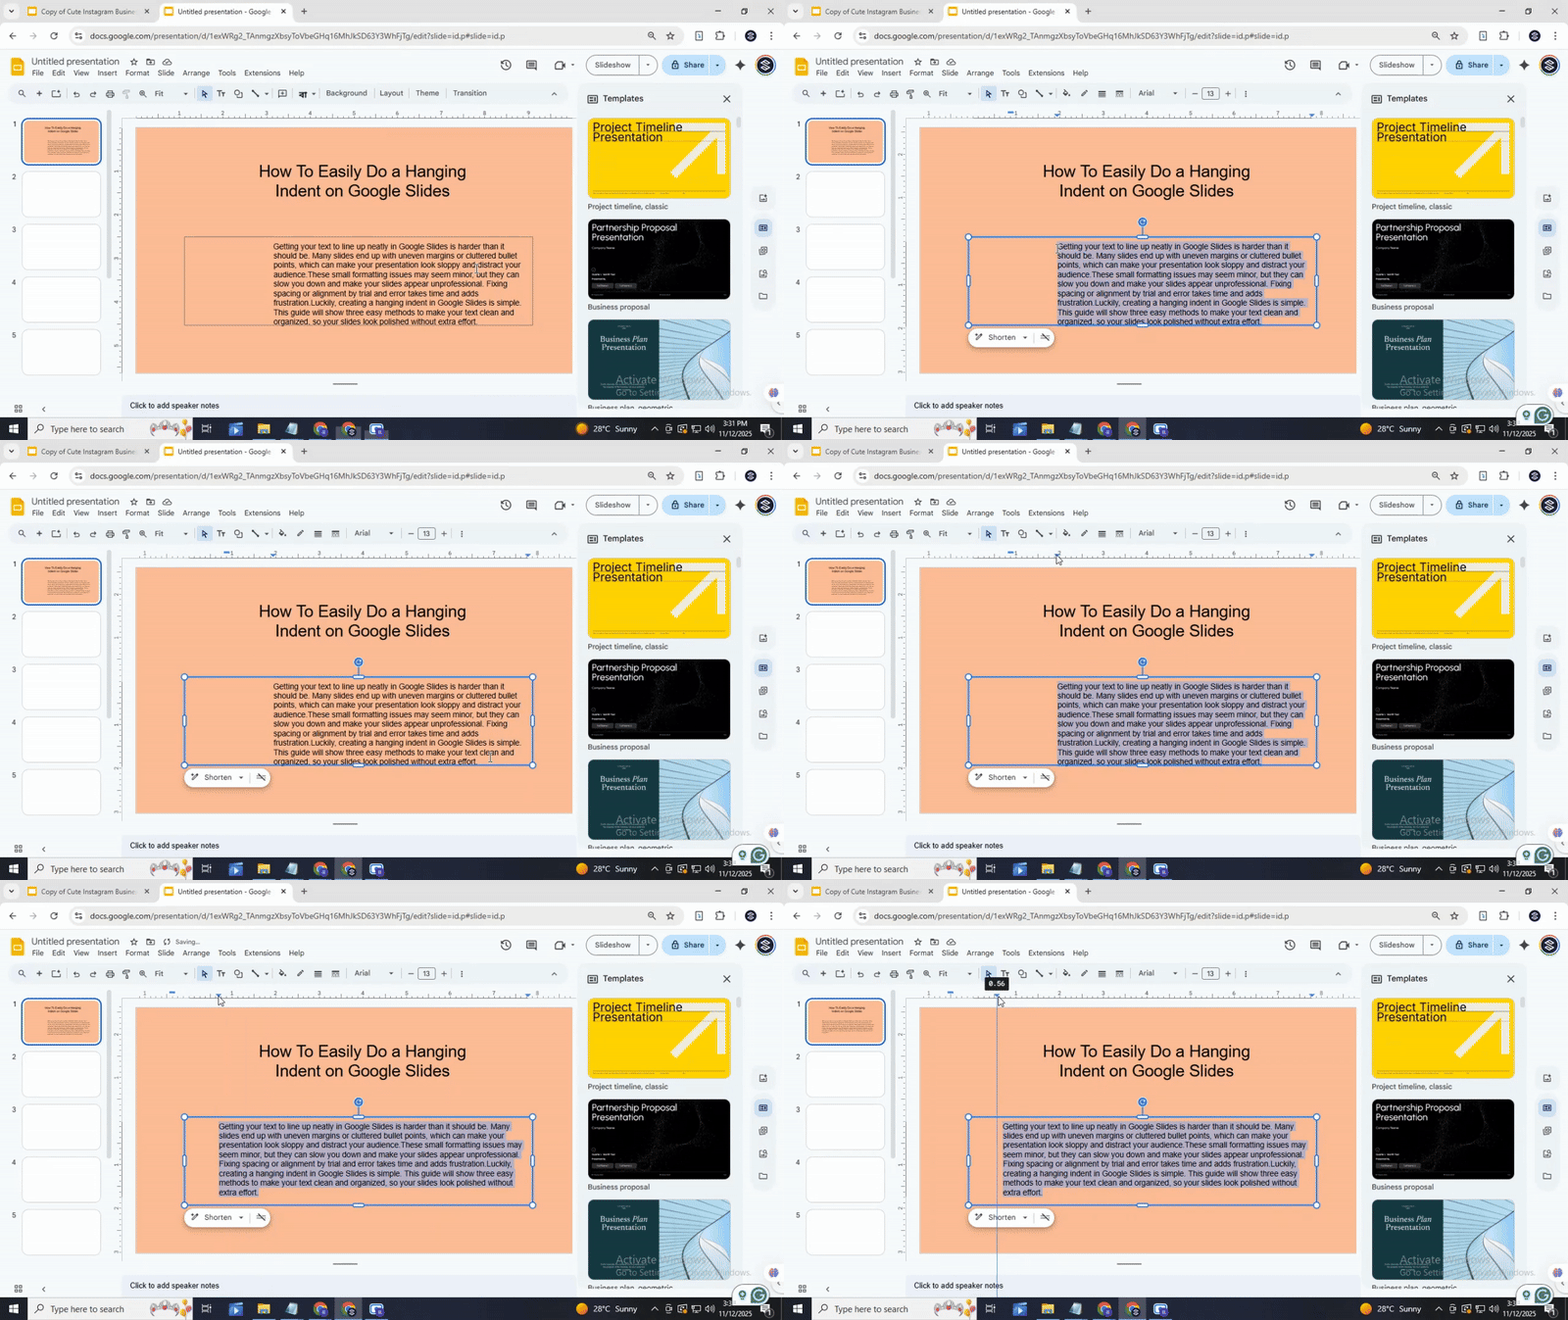
On the ruler, find the small blue triangle pointing down. This is the first line indent marker. Click and drag it to the right. This moves the first line of your paragraph forward.
Step 5: Create the hanging indent
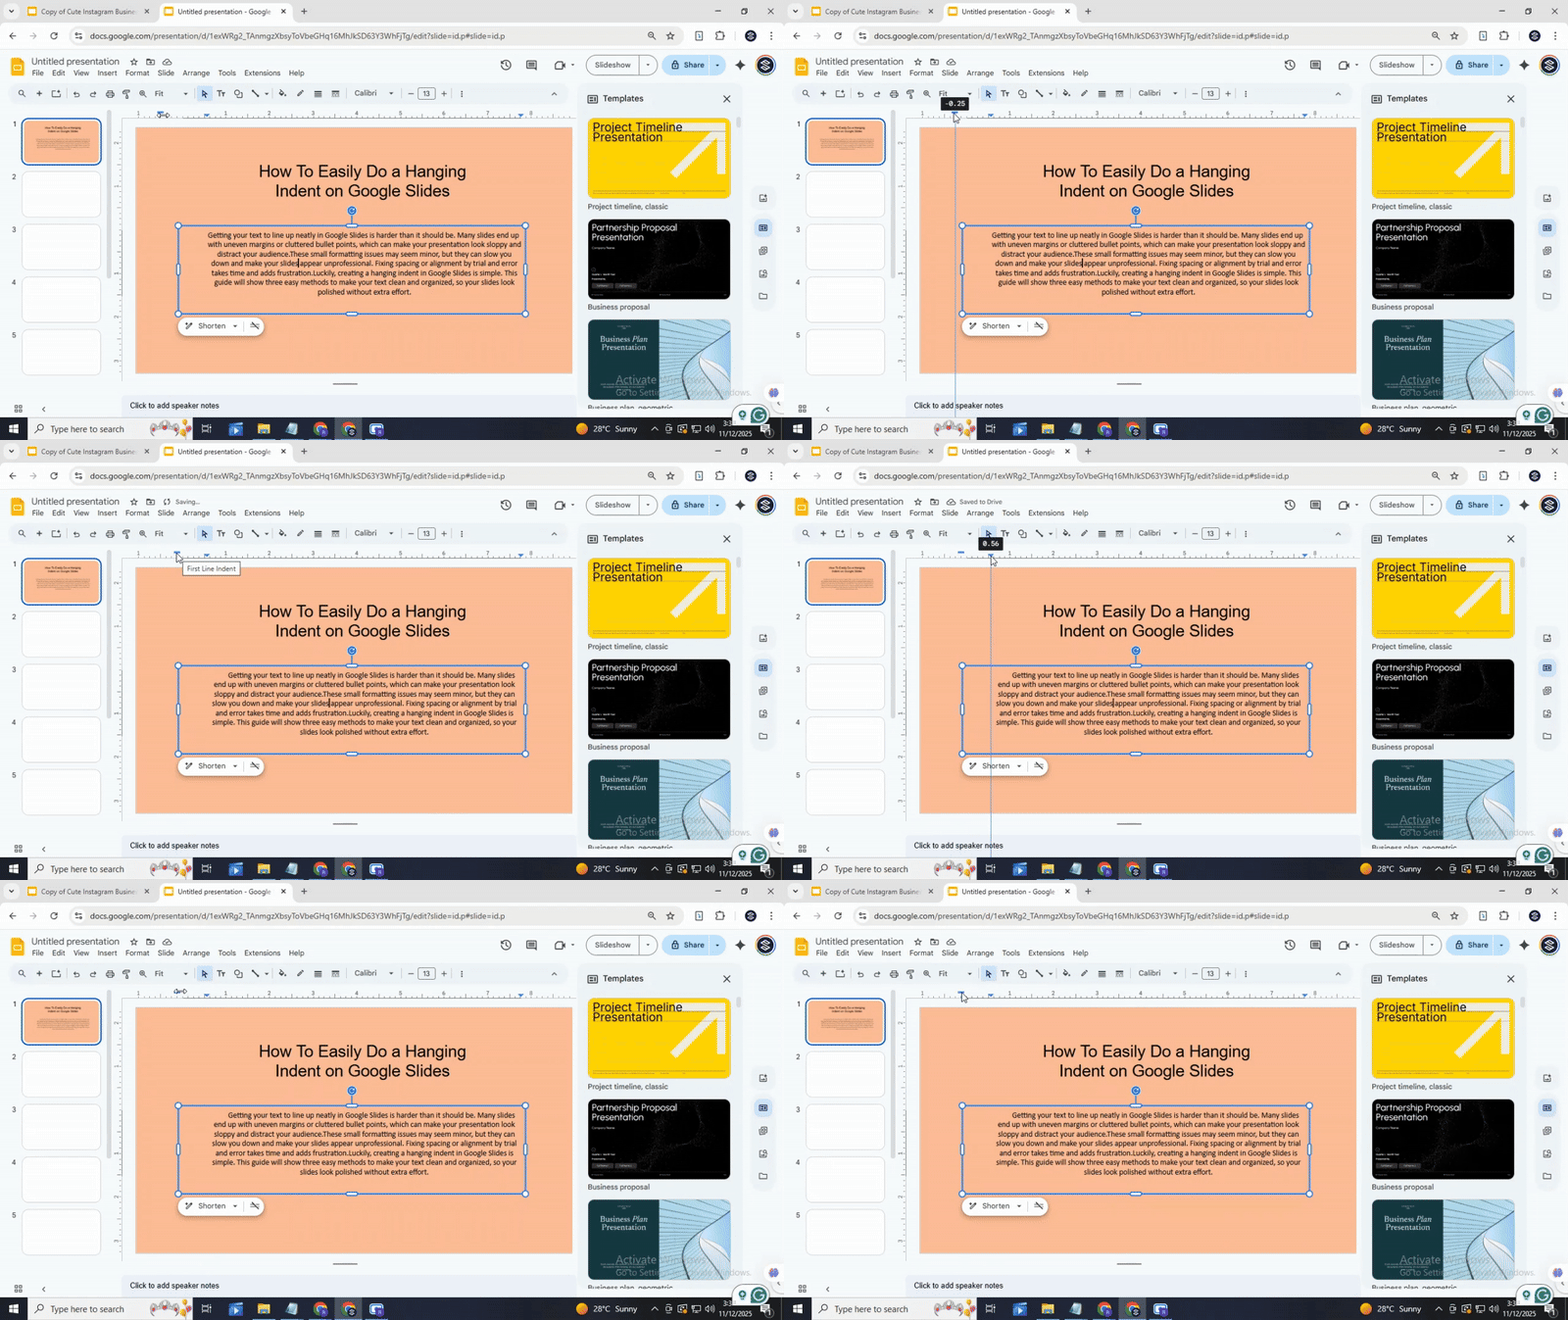
Below the blue triangle is a small blue rectangle. This is the hanging indent marker. Drag it to the left, back toward the margin. The rest of the paragraph will now align differently from the first line.
Step 6: Adjust the hanging indent
Move the markers slowly to get the spacing you want. The triangle controls the first line, and the rectangle controls the other lines. Adjust until your paragraph looks balanced.
Read also: How to Use WordArt in Google Slides Easily
Method 2: Hanging Indent in Google Slides Using Your Keyboard
Open Your Presentation:
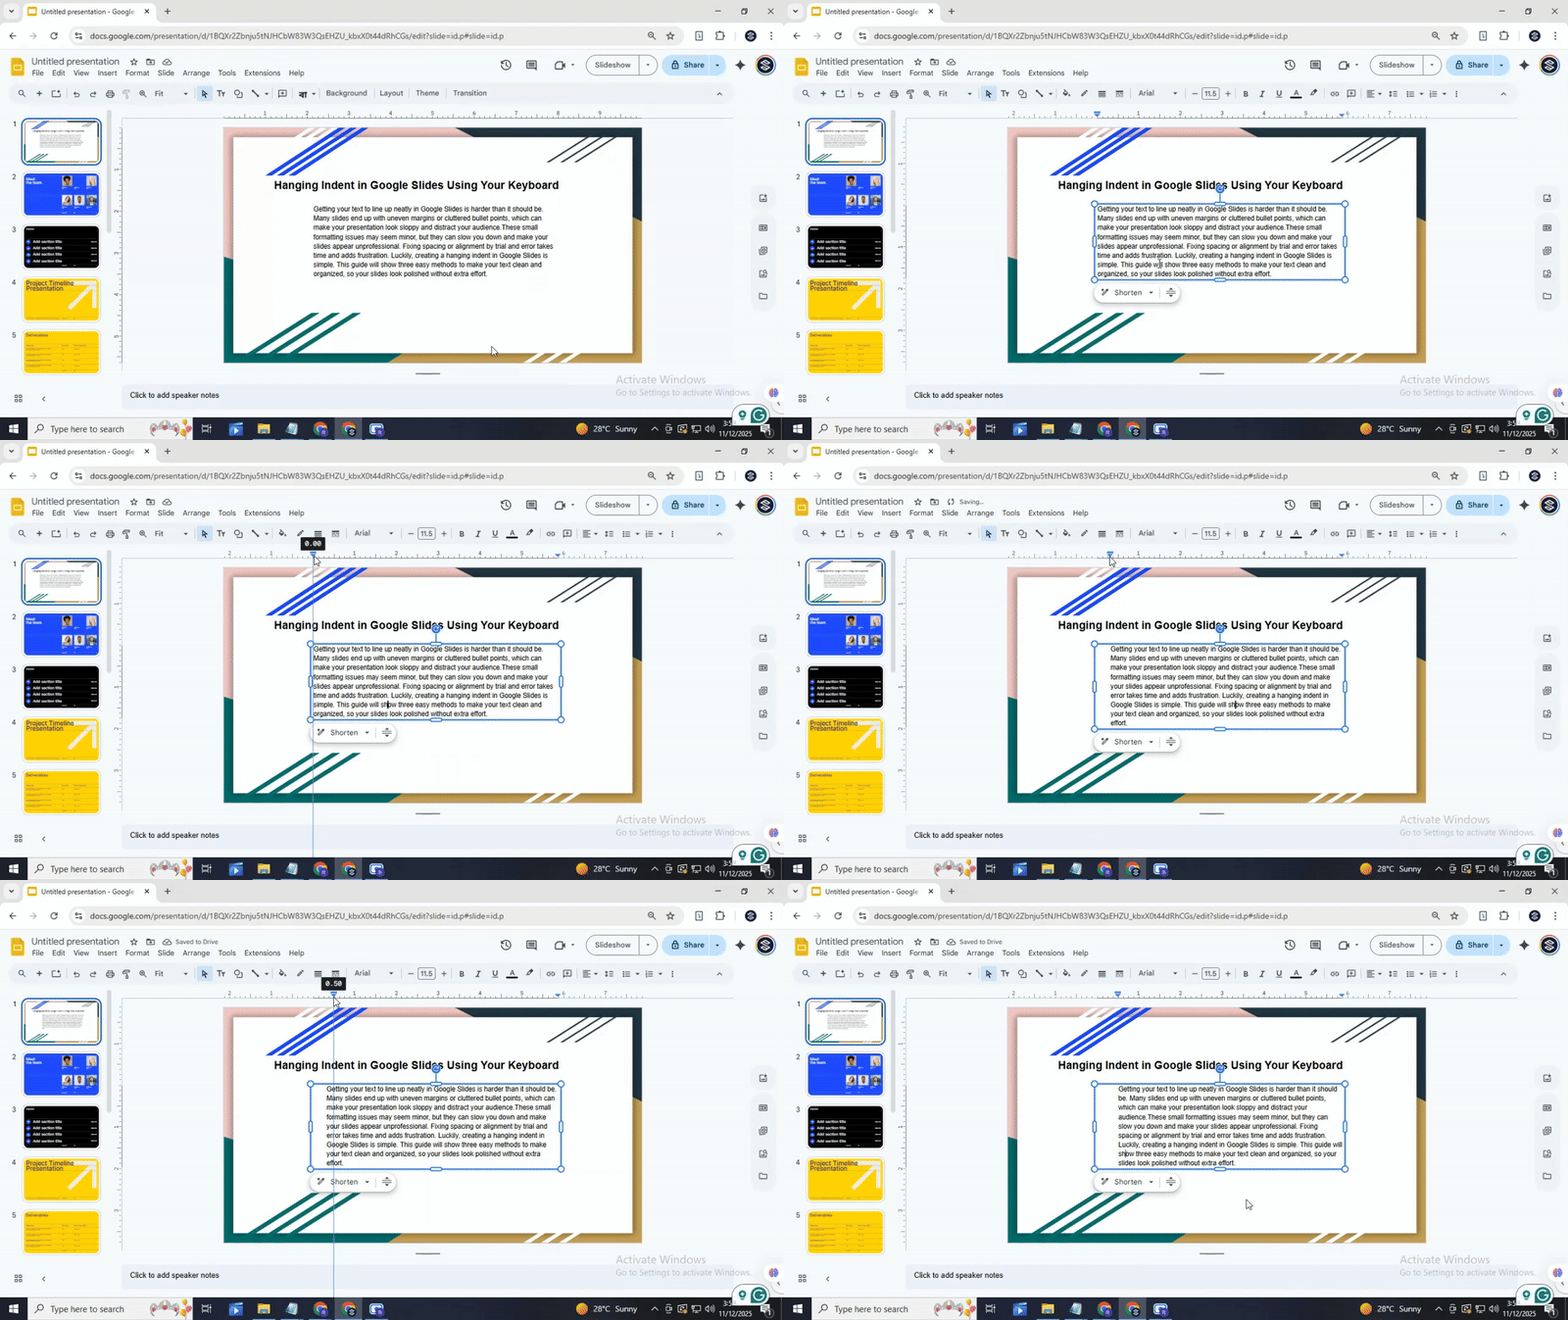
Start by opening the Google Slides file where you want to add a hanging indent. Click on the slide that contains the text you want to adjust.
Adjust the Cursor:
Place the cursor at the start of the line you want to indent. If you want to indent multiple lines, click and drag to select all of them.
Create the Hanging Indent with the Tab key:
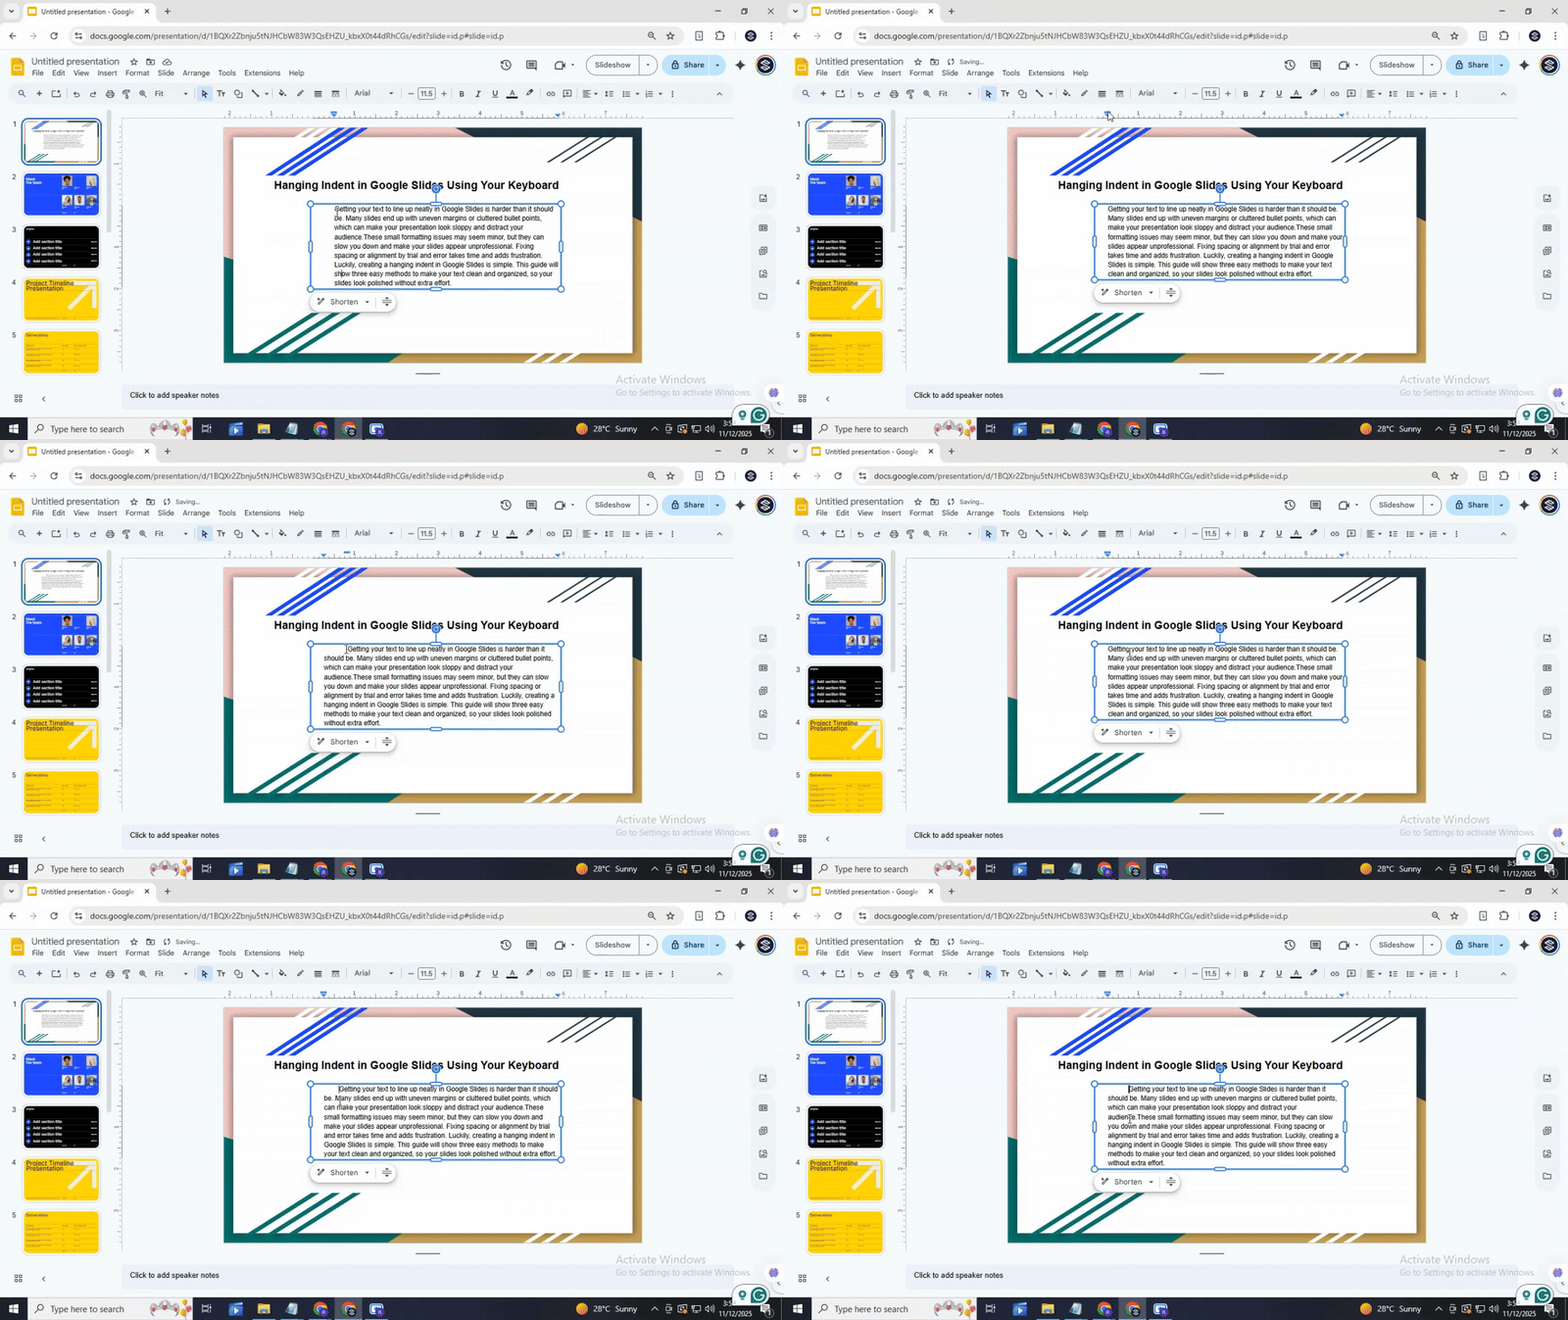
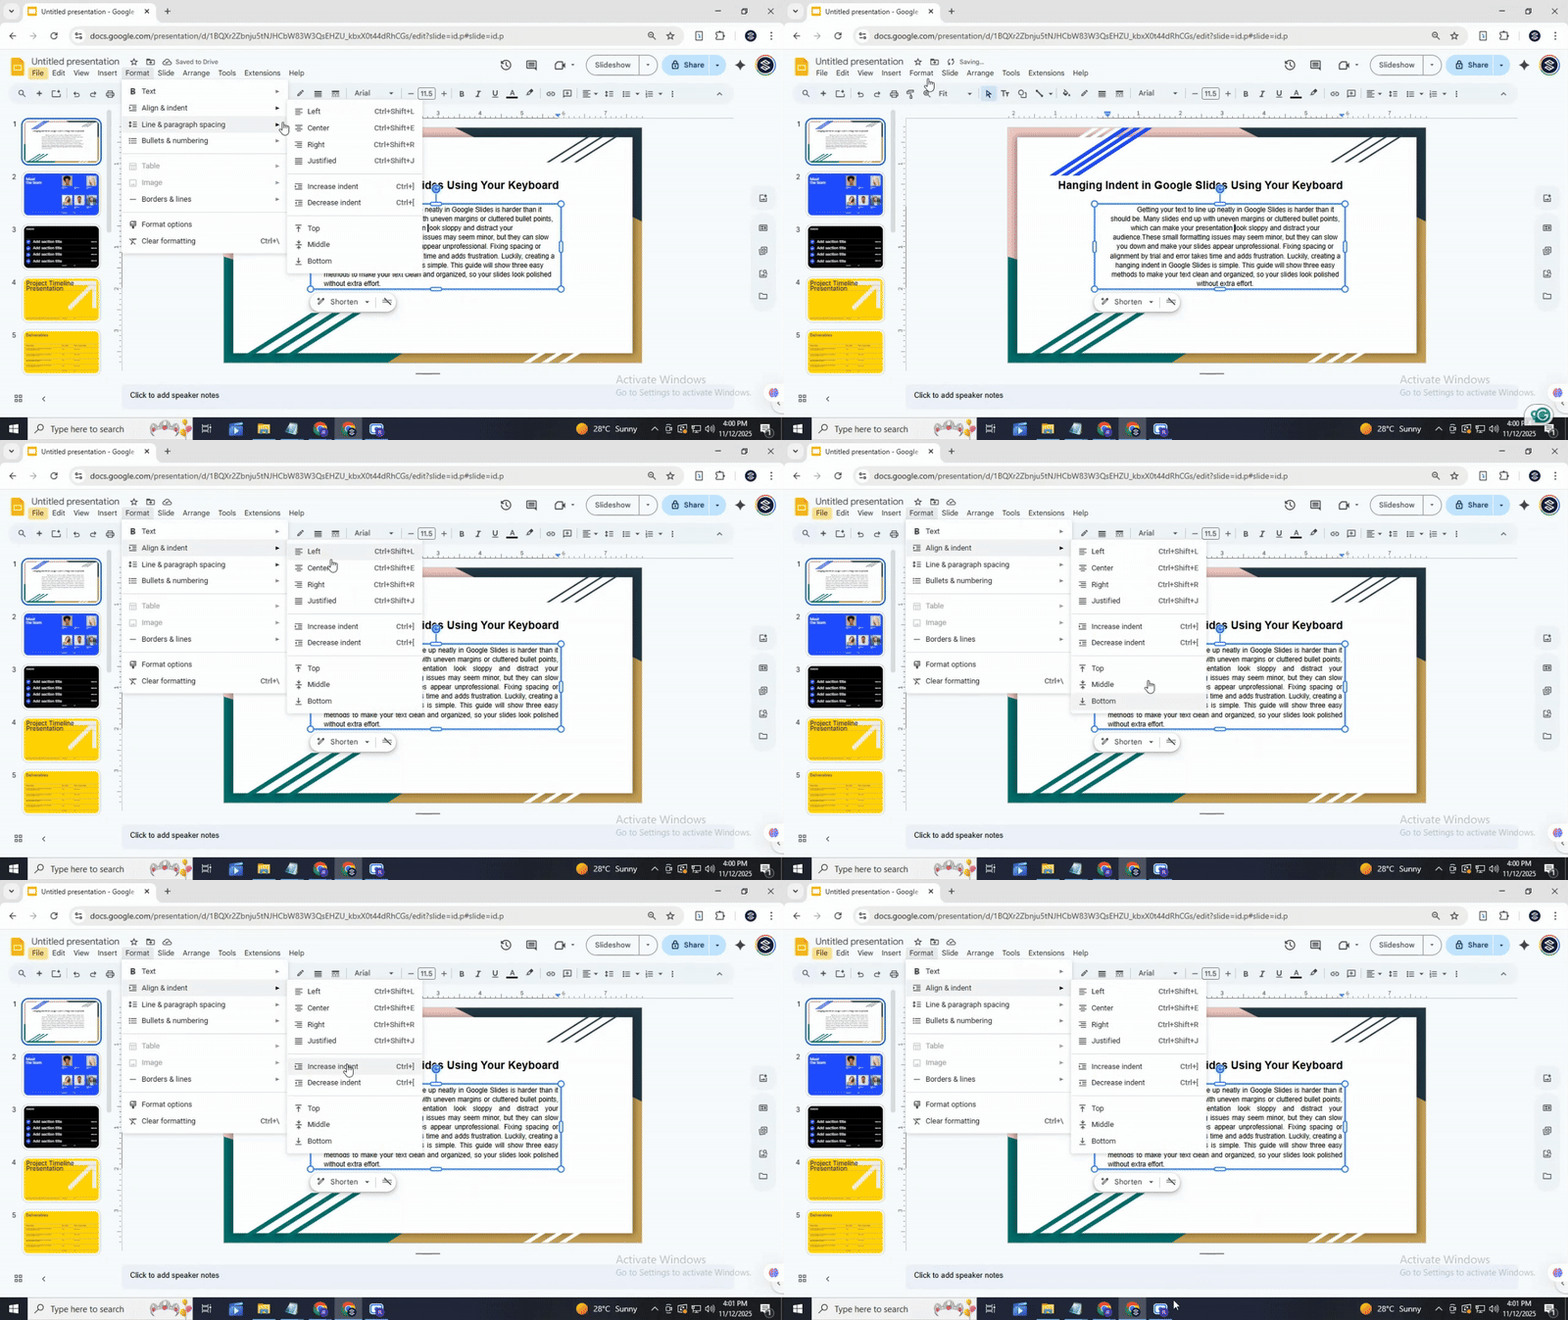
Press the Tab key once to move the first line of text to the right. To adjust the indent further, press Tab again. To reduce the indent, press Shift + Tab. Keep doing this until the text is positioned where you want.
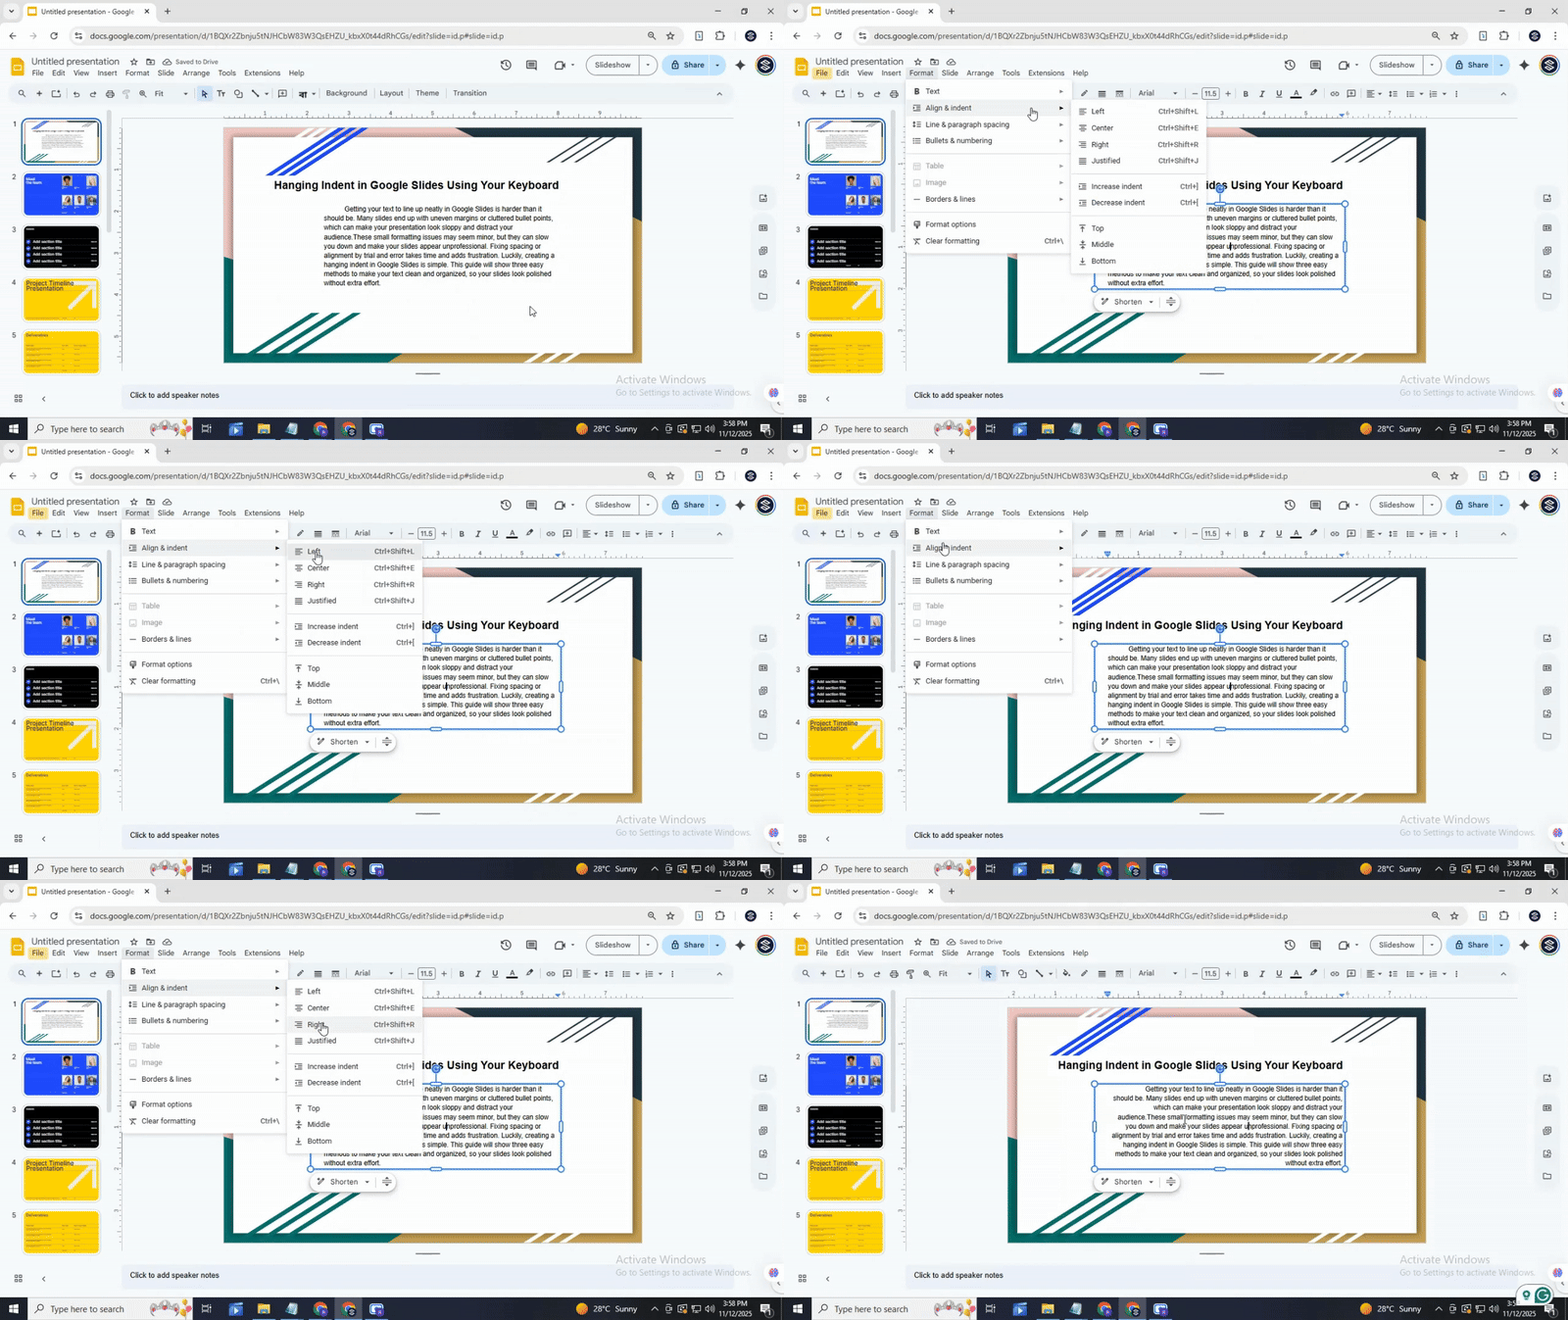
Access the “Align & indent” Submenu:
For more precise control, click Format in the top menu. Then select Align & indent > Indentation options. You can enter a specific value for the hanging indent. This ensures all lines are even and tidy.
There you go! Your text now has a clean hanging indent. Using the keyboard makes it quicker to format slides and keeps your text consistent across your presentation.
Also read: How to Make Columns in Google Slides Quickly and Easily
Method 3: Apply a Hanging Indent in Google Slides Using “Format Options”
This method shows how to create a hanging indent in Google Slides using the Format Options menu. It allows precise control over spacing and alignment.
Select the text
Click on the text box containing the paragraph or bullet list where you want the hanging indent. Highlight the specific lines you want to format.
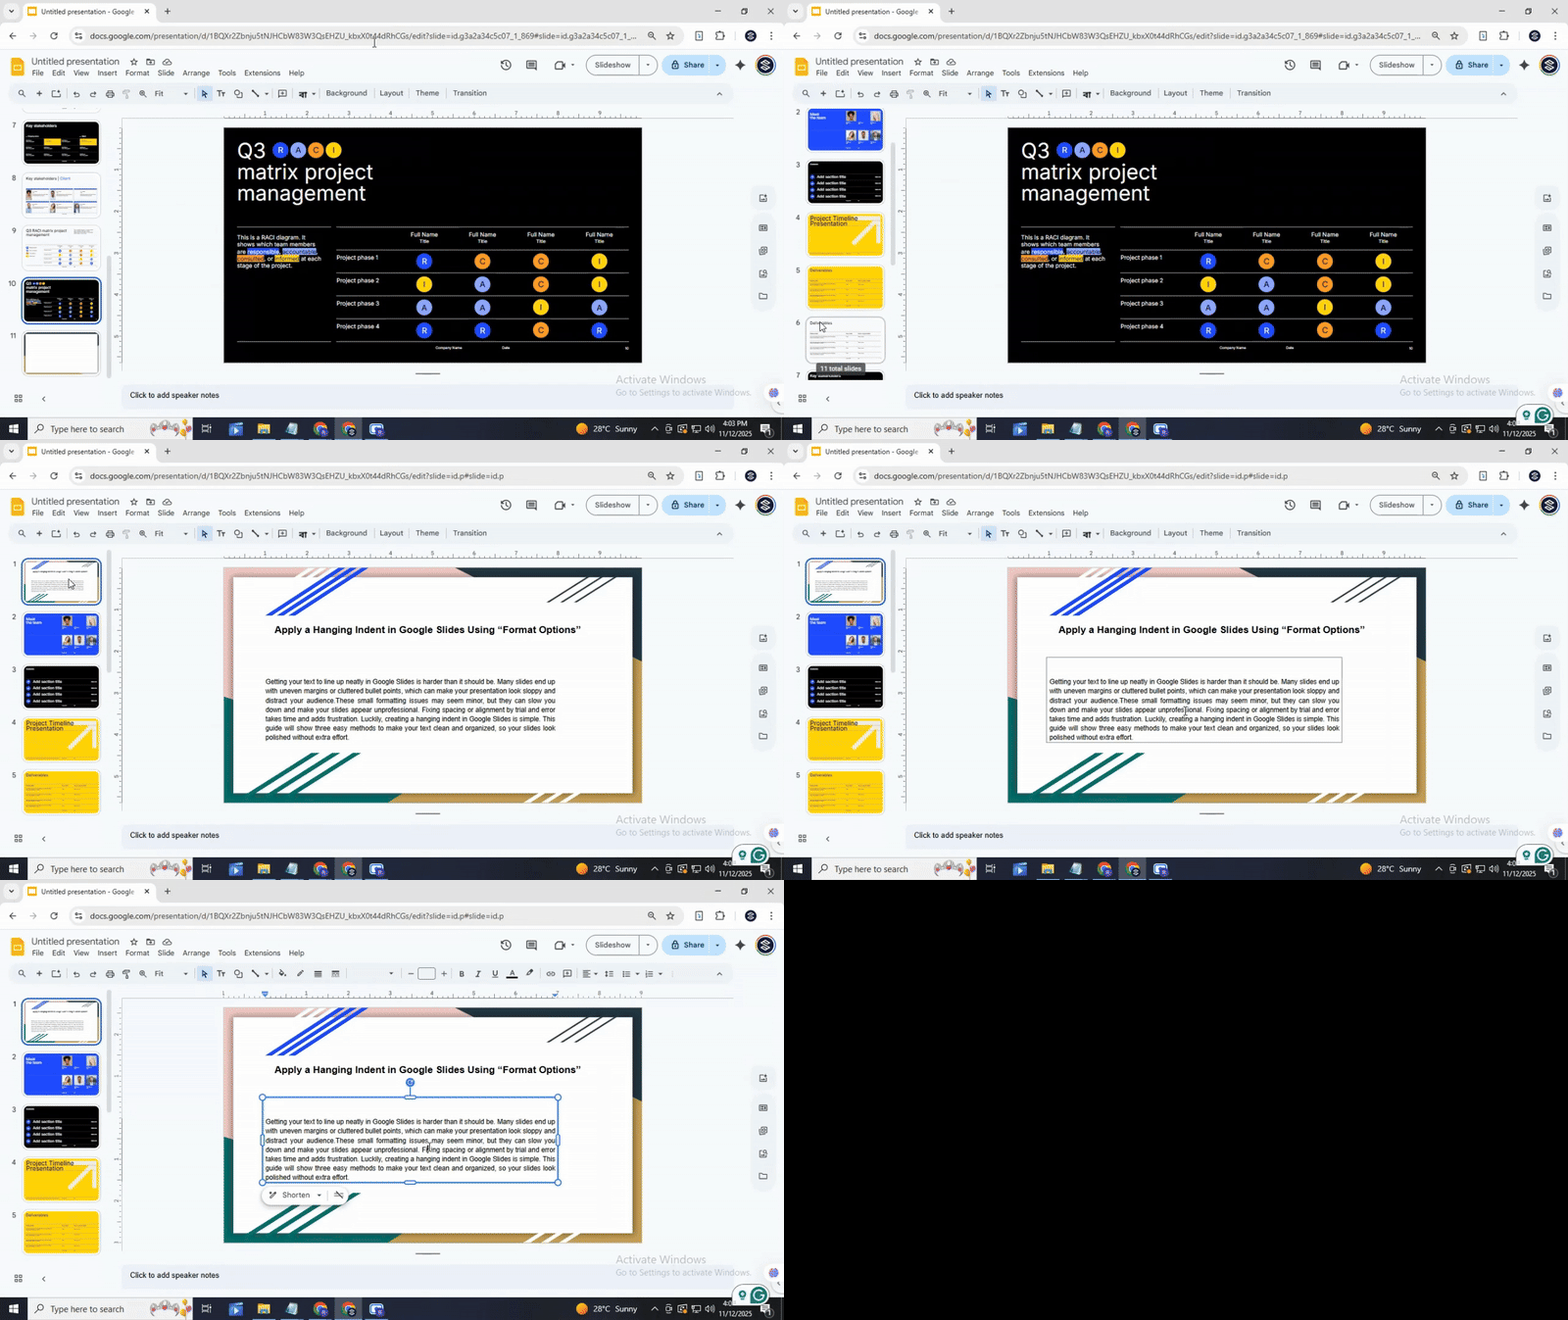
Open Format Options
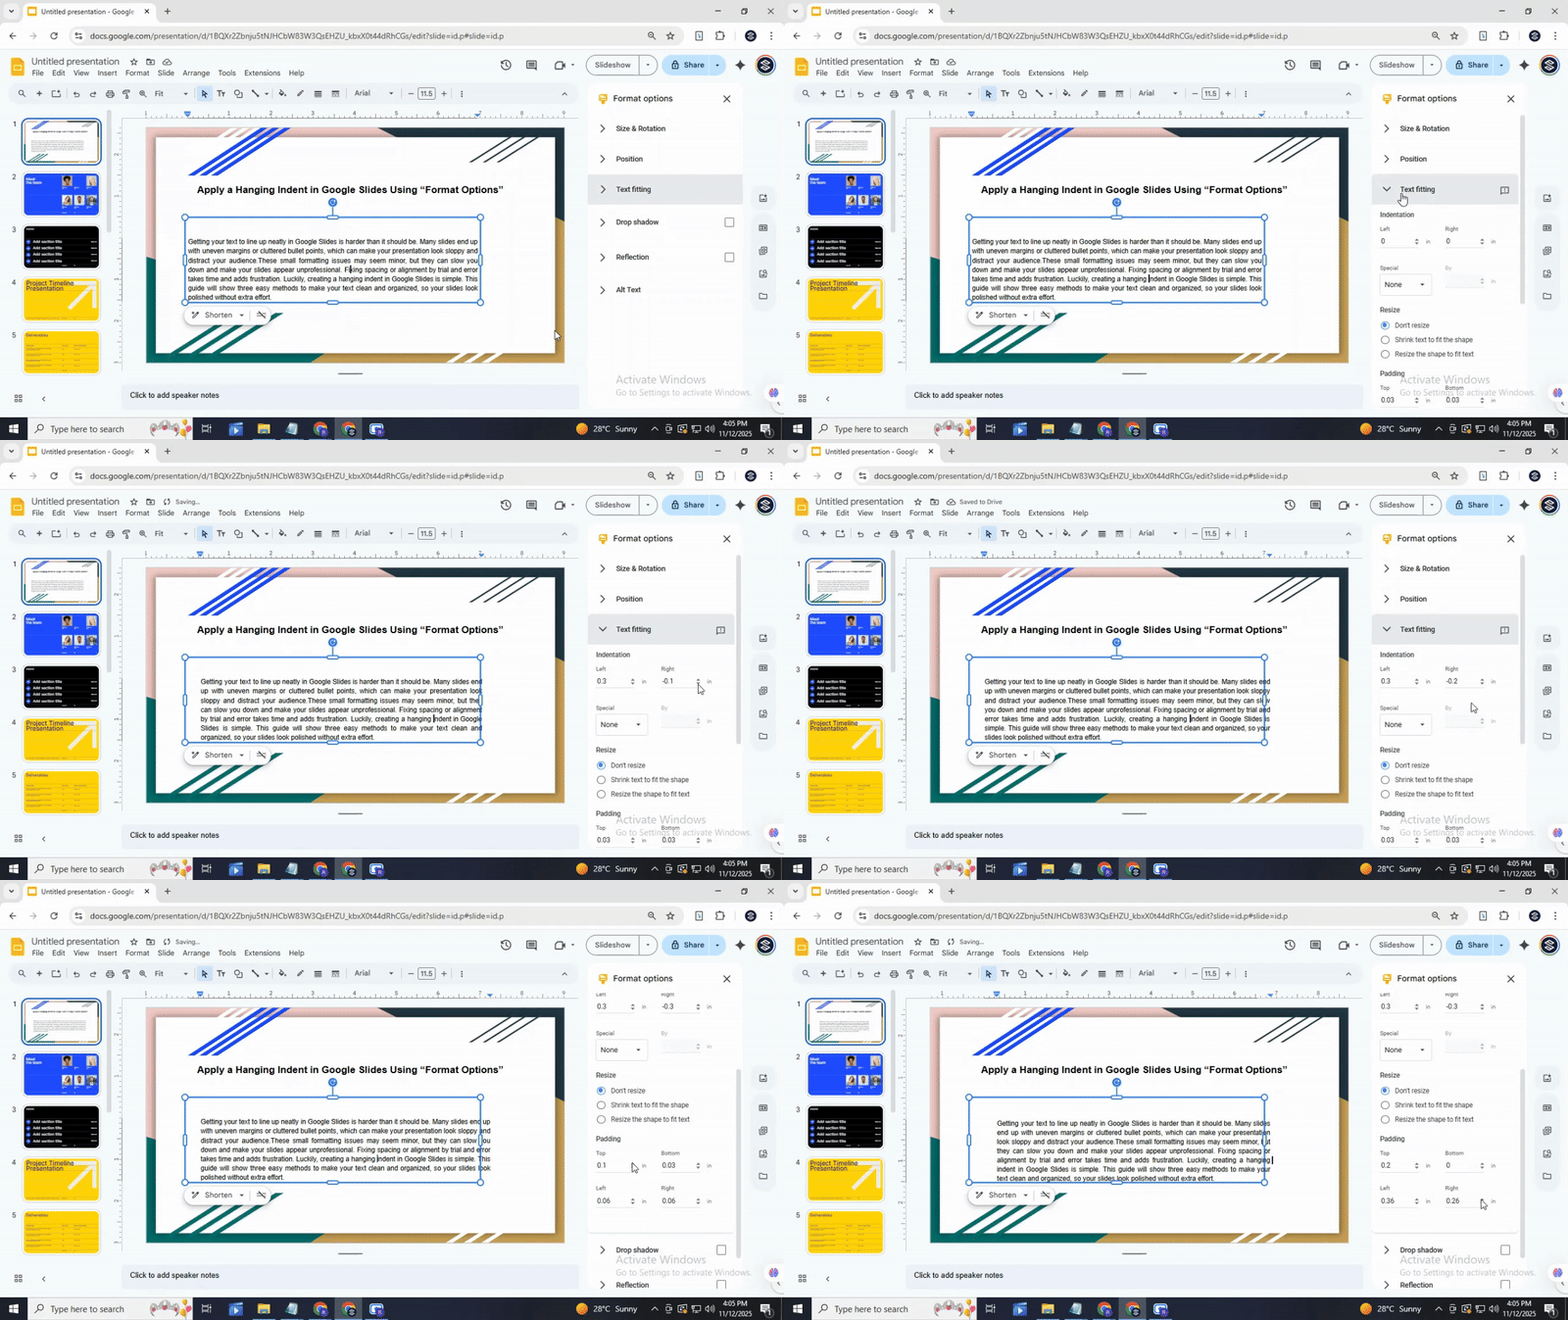
Click on the Format menu at the top of the screen. Then choose Format Options from the dropdown. A sidebar will appear on the right side of the slide.
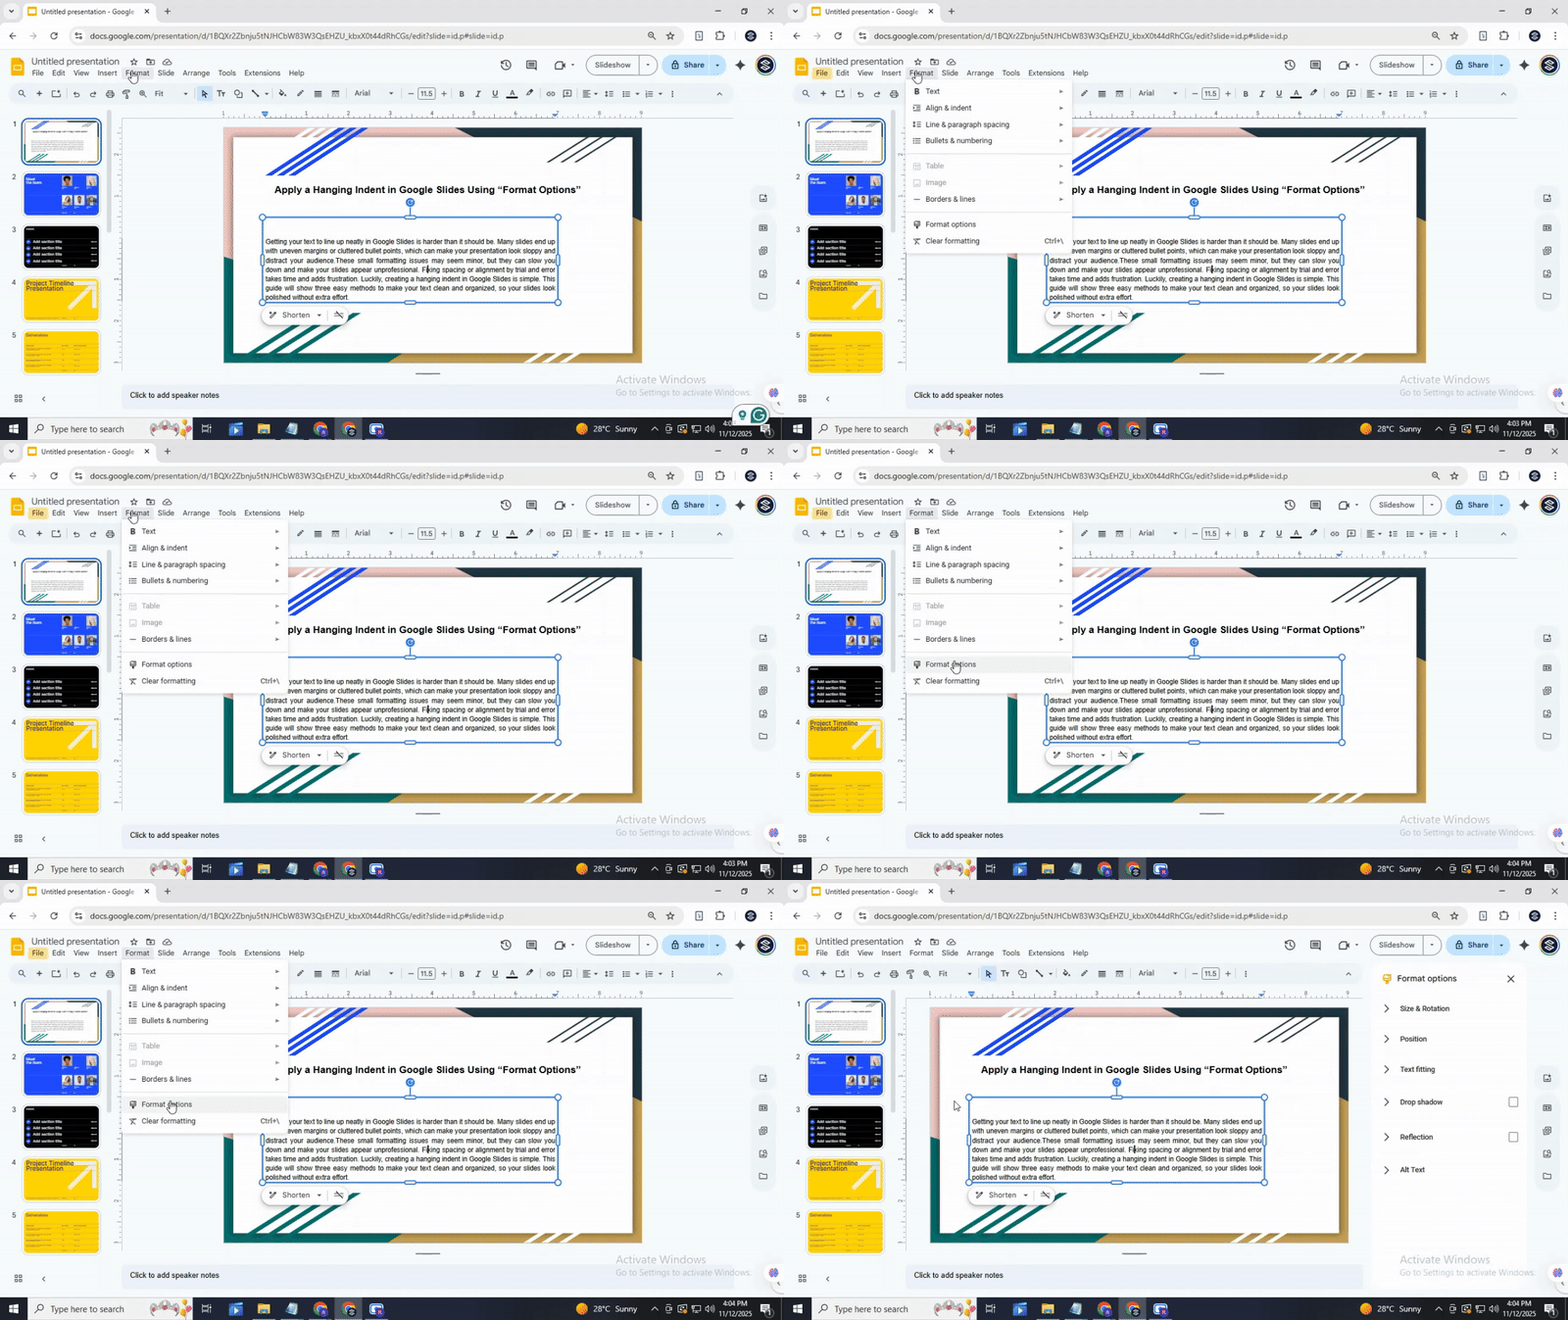
Access the Text Fitting settings
In the Format Options sidebar, click Text fitting. This section controls spacing, padding, and alignment.
Adjust the hanging indent
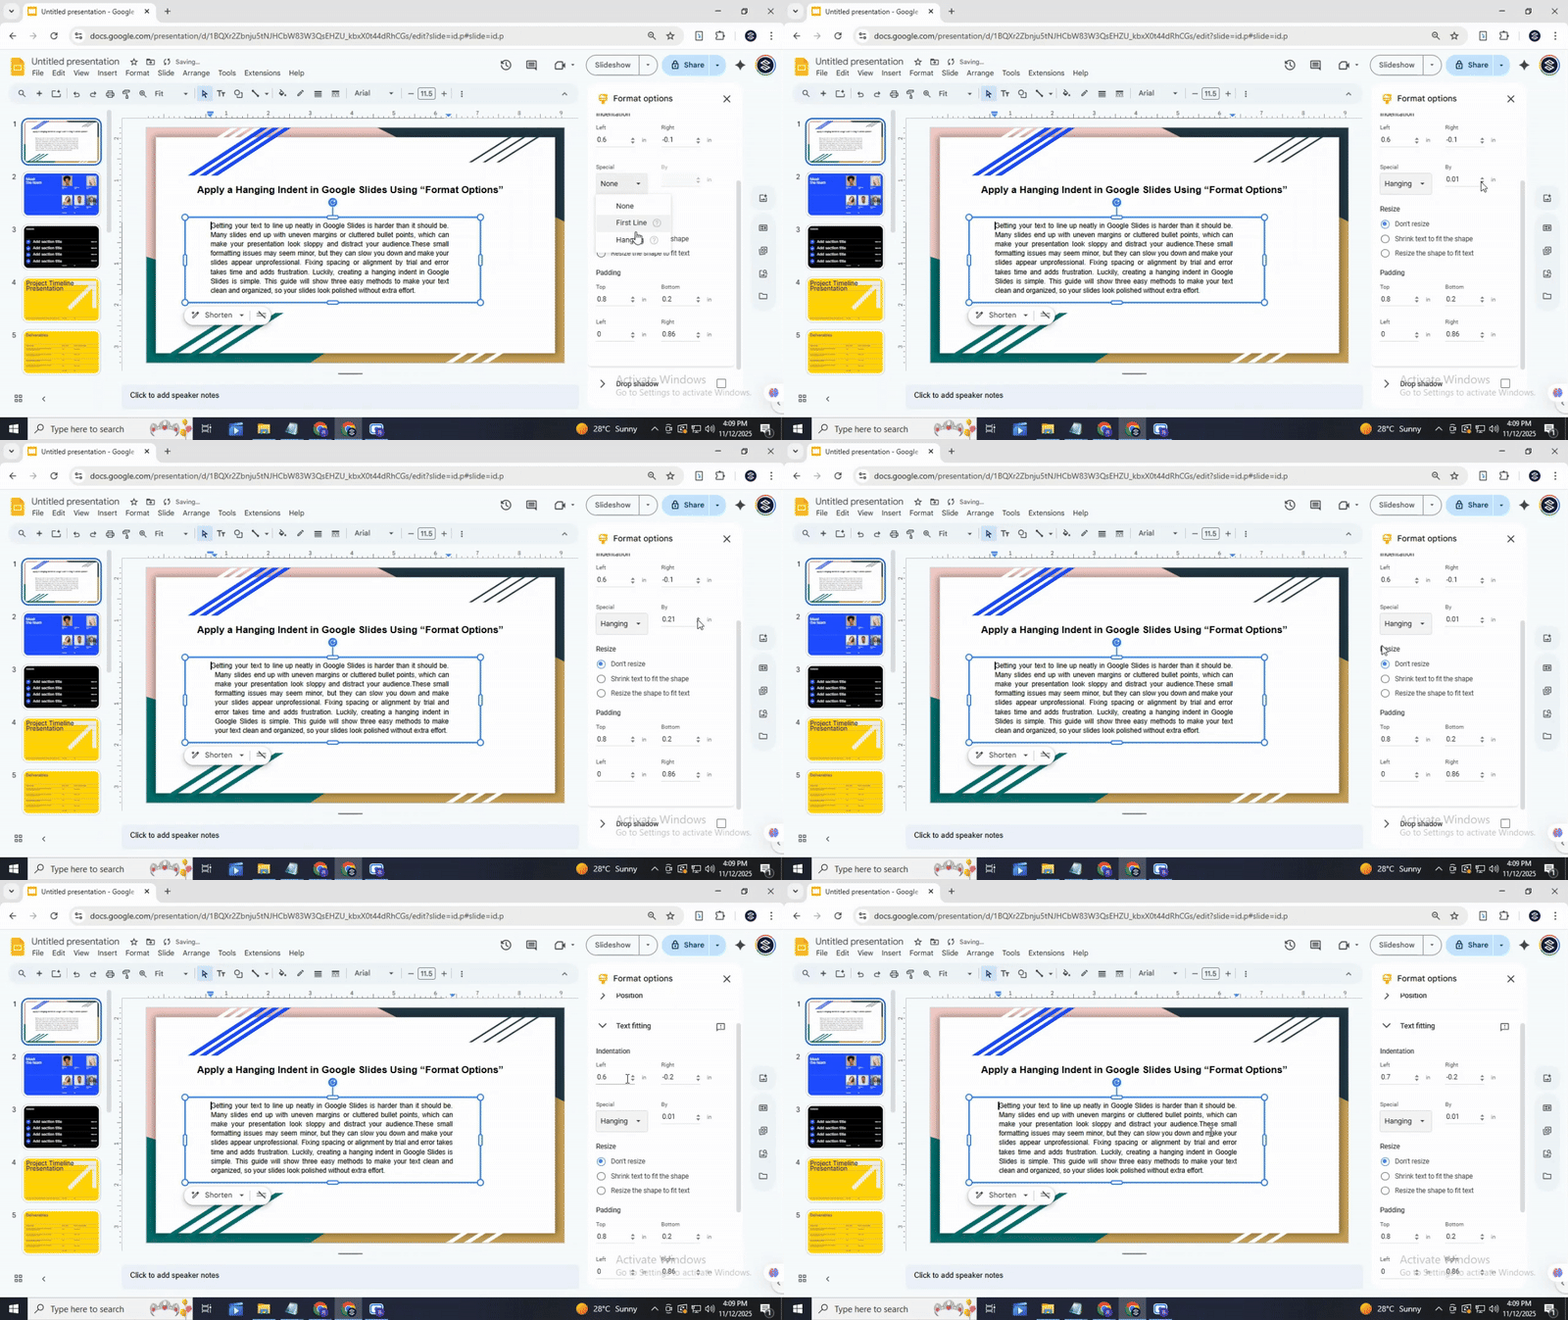
Find the Indentation settings. Enter a value in the Left indent box to move the entire paragraph inward. Then enter a smaller value or zero in the First line indent box to pull back the first line. The text now displays a hanging indent.
Check and apply consistently
Review the slide to see how the indent looks. Repeat the process for other paragraphs or text boxes as needed. Adjust the values if the spacing does not match your design.
Also read: How to Arrange and Align Objects in Google Slides: Tips and Tricks
Conclusion:
Hanging indents are a small change that makes your slides look cleaner and easier to read. Whether you use the ruler, keyboard shortcuts, or format options, each method helps organize your text neatly. Applying hanging indents keeps your content consistent, professional, and easy to follow. With these simple steps, you can improve the look of your slides and make your presentations more effective.
FAQs:
1. How to do a hanging indent on Google Slides on the second line of a bullet?
Click the text box and place your cursor on the second line. Go to the ruler at the top, drag the left indent marker to where you want the second line to start. This will move only that line while keeping the first line in place.
2. How do you overhang an indent in Google Docs?
Select the paragraph you want to format. Drag the left indent marker on the ruler to the right. Then, drag the top triangle (first-line indent) back to the left. This makes the first line stick out while the rest is indented.
3. How to do a 0.5 hanging indent on Google Docs?
Highlight the paragraph. Open the ruler and drag the left indent marker to 0.5 inches. Then move the top triangle (first-line indent) back to the margin. This creates a half-inch hanging indent.
4. How to do hanging indent on Google Slides on Mac?
Select your text and make sure the ruler is visible. Drag the left indent marker for the second line while leaving the first-line marker in place. This works the same as on Windows.
5. Is there a quick way to make a hanging indent?
Yes. Use the ruler to drag the left indent for the second line while keeping the first line where it is. It only takes a few clicks.
6. How can I remove a hanging indent once it’s there?
Click the text, then drag the left indent marker back to align with the first-line marker. This resets the paragraph to normal indentation.
7. Can I apply a hanging indent to multiple lines at once?
Yes. Highlight all the lines you want. Then adjust the left and first-line markers on the ruler. All selected lines will follow the new indent.
8. What formatting issues should I be aware of when using a hanging indent?
Check that your bullet points, spacing, and text alignment are correct. Overlapping indents or inconsistent margins can make your text look messy.
9. My hanging indent isn’t appearing correctly. What’s wrong?
Often, the first-line marker or left indent isn’t in the right place. Make sure you are adjusting the correct markers on the ruler. Also, check that no extra spaces are at the start of the line.
10. The indent is affecting the formatting of other lines in my text. How can I fix it?
Select only the lines you want to adjust. Move the indent markers carefully. Avoid highlighting unrelated paragraphs.
11. I can’t seem to adjust the indent amount using the ruler. What should I do?
Make sure the ruler is visible and your text is selected. Some shapes or text boxes may restrict ruler adjustments. Try copying the text to a regular slide text box.
12. How can I use hanging indents with different bullet point styles?
Select your bullets, then adjust the left and first-line markers. Hanging indents work with circles, squares, or custom bullets in the same way.
13. What are some creative ways to use hanging indents in my presentations?
Use them for citations, lists, or step-by-step instructions. They can also make long bullet points easier to read by separating the first line from the rest.
14. When should I use a hanging indent in my Google Slides presentations?
Use them when you have long bullet points or references. They help the first line stand out while keeping the rest aligned and readable.
You may also be interested in ...
How To Create An Eye-Catching Portfolio
If you’re looking to create an eye-catching portfolio, this post will come in handy. In this article, you can find the easies...
23 Jun, 2024
How To Easily Create An Infographic
Infographics are the perfect way to make a presentation that will impact an audience, but their design and composition might...
08 Jun, 2024
PowerPoint Template Tips & Tricks You Ne...
PowerPoint seems to be an unknown world for many people, especially those who have been assigned to create a presentation out...
08 Jun, 2024
