How to Create a Multilevel List in PowerPoint – Easy Guide
Creating well-structured slides in PowerPoint can be harder than it looks. Many users struggle to organize their content, ending up with messy bullet points that confuse the audience. This problem often wastes time and makes presentations appear unprofessional, leaving you frustrated when your message doesn’t land clearly.
Fortunately, multilevel lists offer a simple way to organize ideas neatly and show hierarchy on your slides. This guide will walk you through creating multilevel lists step by step, using easy methods anyone can follow. You’ll also learn tips to customize designs, use shortcuts, and fix common issues, helping your slides look polished and professional every time.
What Is a Multilevel List in PowerPoint
A multilevel list (sometimes called a multi-tier list) is a list with two or more levels of hierarchy. Each level shows a different degree of importance or detail. This type of list is useful for presenting information that follows a clear structure, such as outlining organizational charts, breaking down project tasks, arranging meeting agendas, or simplifying complex subjects into clear steps.
Example:
• A top-level item represents a main topic or category.
• A second level provides explanation or subcomponents.
• A third level contains supporting details or specific examples.
When to Use a Multilevel List
Before creating a multilevel list, check the hierarchy of your information. Make sure some points naturally fall under others.
Use multilevel lists when you need to show relationships, like parent and child items, categories with subcategories, or steps in a process. They help organize information clearly when some points depend on others.
Avoid multilevel lists if all points are equally important. Too many levels can make your slide confusing and hard to read. Keep it simple to ensure your audience can follow the structure easily.
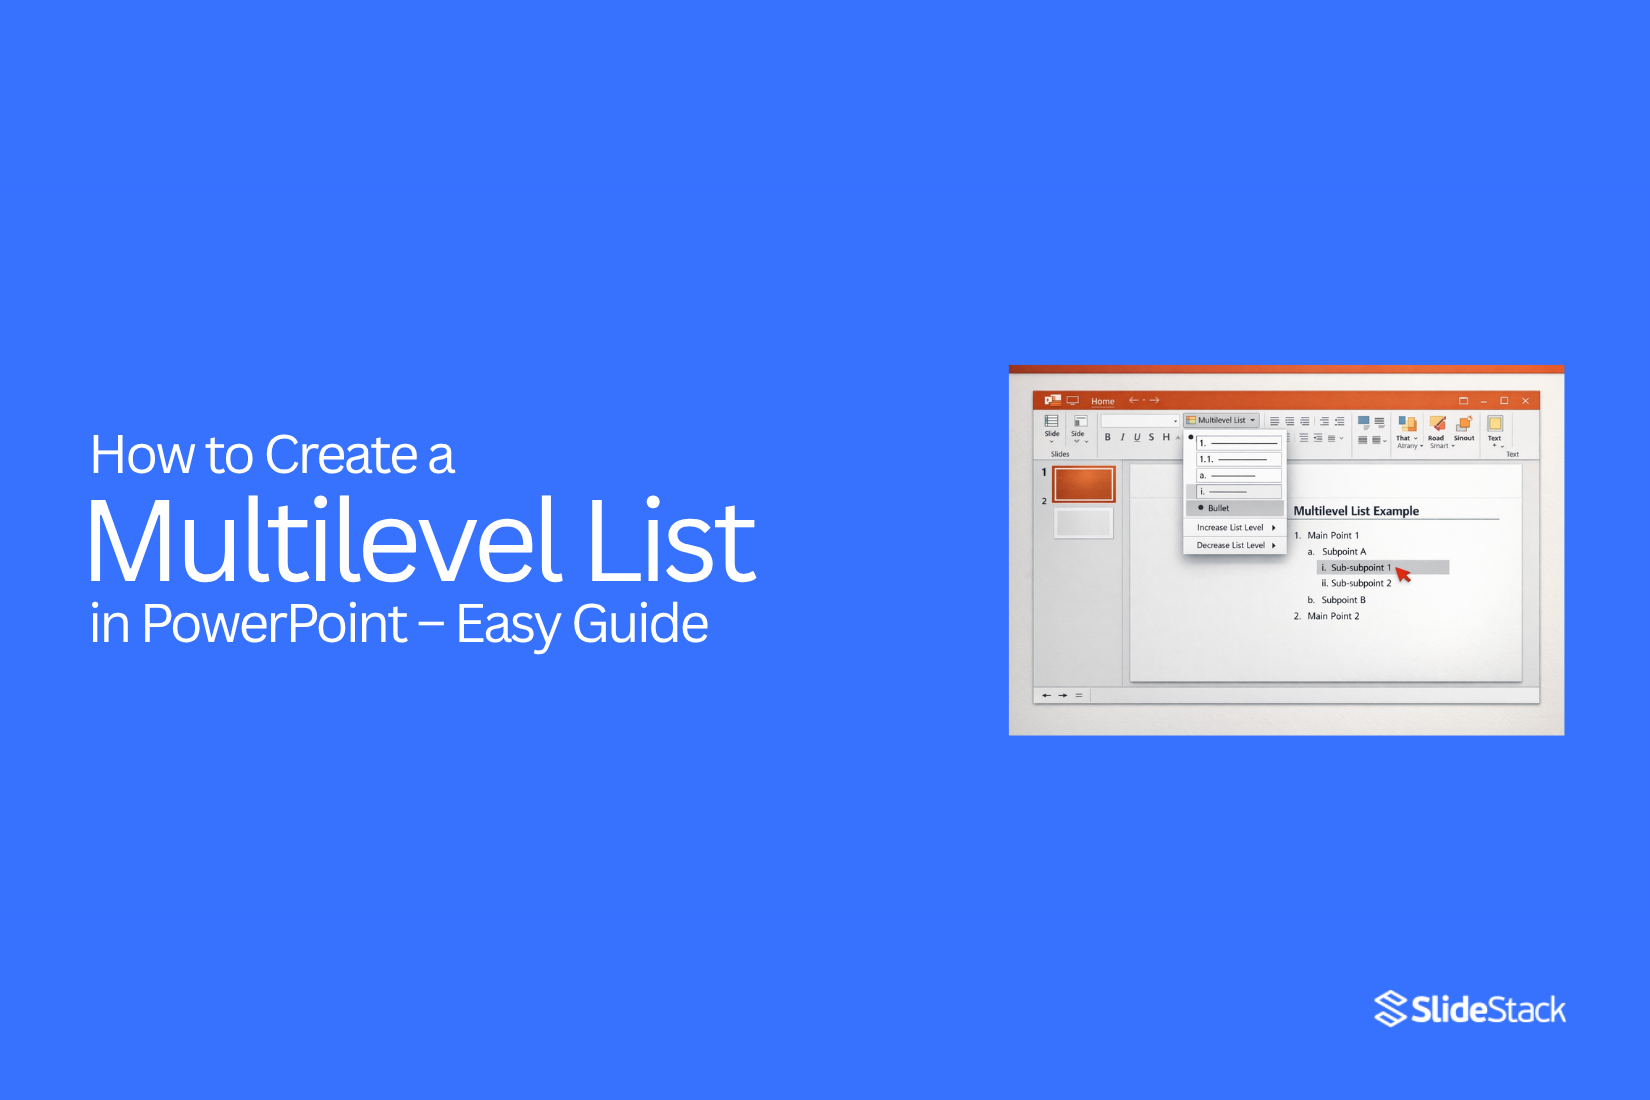
How to Create a Multilevel List in PowerPoint
PowerPoint includes built-in tools to create multilevel lists. These lists help organize information clearly. Using them is simple once you know the steps.
Step 1: Add a Text Box or Placeholder
Start by inserting a text box or using an existing placeholder on your slide. Go to Insert → Text Box and click where you want the text to appear. You can also click a placeholder that already exists on the slide.
Step 2: Enter List Items
Type your first list item. Press Enter to add the next item. Continue adding all the main points for your list. Keep each point short and clear to maintain readability.
Step 3: Use Tab and Shift+Tab for Levels
To create sub-items, place the cursor at the start of a line and press Tab. This moves the item one level deeper. To move an item back to a higher level, press Shift+Tab. Repeat as needed to arrange your points properly.
Step 4: Apply Bullets or Numbering
Highlight the list items. Go to the Home tab and select Bullets or Numbering. Choose the style that fits your presentation. You can also adjust bullet symbols or numbering formats by clicking the drop-down arrow next to the option.
Note
For additional formatting options and guidance on sub-bullets, check PowerPoint’s official support resources. You can customize font size, color, and indentation to make your lists easier to read.
How to Make Creative Multilevel List Designs with PowerPoint Templates
A simple way to create multilevel lists in PowerPoint is to use Multilevel List PowerPoint Templates. These templates help make professional-looking slides with a clear visual hierarchy. They include editable placeholders, color-coded levels, and layouts that range from simple to complex. Below are a few examples of templates you can use to make your lists visually appealing and easy to understand.
Multi-Layered Light Bulb Template for PowerPoint
The Multi-Layered Light Bulb Template uses a bulb shape to show ideas in levels. Each layer can hold text or icons. The colorful bulbs help your list stand out and guide the viewer through each point. Sequential slides allow you to focus on one section at a time, making your presentation clear and engaging.
3-Level Curved Pyramid PowerPoint Template
This three-level curved pyramid template is perfect for multilevel lists. It works well for project milestones, product development steps, or hierarchical diagrams. Each layer highlights a level of importance, giving a clear structure to your content. This template moves beyond basic bullet points and adds a professional, modern look.
Interlocking Pyramids PowerPoint Template
Some ideas are too complex for simple lists. The Interlocking Pyramids Template lets you display multiple multilevel lists on one slide. It shows relationships between different sections clearly. This template makes complex ideas easy to scan and understand, keeping your audience focused.
How to Customize Multilevel Lists
Multilevel lists help organize information clearly. You can change their style to match your needs. Start by selecting the list you want to edit. Then, open the list options. Here, you can adjust the number style, bullet shapes, or indentation.
Changing the look of each level is easy. Click on the level you want to modify. Pick a number or bullet style that fits your document. You can also adjust the spacing to make the list easier to read.
Customizing lists makes your content more structured. Each level can stand out while staying connected. This approach works well for outlines, instructions, and step-by-step guides.
Keyboard Shortcuts for Multilevel Lists
Working with multilevel lists can take time if you do it with just your mouse. Using keyboard shortcuts makes it quicker. You can move items in and out of levels, start new sublists, and keep your list neat.
• Tab – Indent a list item to create a sublevel.
• Shift + Tab – Move a list item back to a higher level.
• Enter – Add a new item at the same level.
• Ctrl + Shift + L – Apply the default list style quickly.
These shortcuts save time and make your lists easier to manage. Try them while creating your next outline or notes.
Using Slide Master for Consistency
Slide Master helps keep your slides uniform. It lets you set fonts, colors, and layouts once. Then, all slides follow the same style.
Using it saves time. You do not need to adjust each slide separately. It also makes your presentation look neat and professional.
You can change a layout or font in the master, and it updates every slide automatically. This keeps your design consistent from start to finish.
Common Mistakes to Avoid
Creating multilevel lists can make information easier to follow, but only if done correctly. A clear visual hierarchy is essential. Simply indenting text is not enough. Without proper structure, lists can confuse rather than clarify.
Avoid Too Many Levels: Too many bullet levels can overwhelm your slides. If a list has more than three or four levels, it can be hard for your audience to track. Break long lists into separate slides, or use interlocking designs where related points appear side by side. This keeps information organized and easy to digest.
Properly Format Lists: Consistency matters. Keep bullet shapes, spacing, and font sizes uniform across all levels. Avoid mixing numbering and bullets within the same list. Small adjustments in spacing can improve readability and make the hierarchy clear.
Keep Text Concise: Long sentences make lists hard to read. Each line should convey a single idea. Short, focused points maintain clarity and reinforce the hierarchy. Avoid cramming too much information into one bullet.
Simplify Content: Match your layout to the audience’s understanding. Remove unnecessary details and focus on what matters. Lists should make content easier to follow, not more complicated. Aim for simplicity without losing important information.
Best Practices for Multilevel Lists
Start by keeping your list simple. Use only a few levels. Too many levels can make slides hard to read.
Use consistent indentation. Each level should line up the same way on every slide. This makes your content easier to follow.
Keep text short. Each bullet should have one idea. Avoid long sentences.
Use parallel structure. Start each bullet with the same type of word, like a verb or a noun. This keeps the list clear and organized.
Use spacing wisely. Add space between levels so the list does not feel crowded.
Check alignment with visuals. Make sure the list does not block images, charts, or other content.
Advanced Tips for Better Structure
Start with a clear outline. A simple map of your main points helps you stay organized. When your ideas are planned, your writing flows more smoothly. Group related points together. Keeping similar ideas in one section makes it easier for readers to follow your thoughts.
Use headings and subheadings to break your text into smaller sections. This helps readers scan your content and find the information they need. Keep paragraphs short. Three to five sentences per paragraph is enough. Long blocks of text can feel heavy and tiring to read.
Add lists or bullet points when you need to explain steps or multiple ideas. Lists make complex information easier to understand. End each section with a mini summary. One or two sentences can remind readers of the key points before moving on.
Final Thoughts
Creating multilevel lists in PowerPoint makes your slides organized and easy to follow. They show hierarchy clearly, helping your audience understand the flow of ideas. Using built-in tools, templates, and shortcuts saves time and keeps your lists neat.
Customizing bullet styles, spacing, and indentation improves readability. Slide Master ensures all slides stay consistent. Avoid too many levels, long sentences, or inconsistent formatting to keep your slides clear.
Start simple, plan your points, and group related ideas. Short, focused bullets and clear structure make your presentation professional and easy to follow. With practice, multilevel lists can turn a messy slide into a clear, polished one every time.
FAQs:
What is a multilevel list?
A multilevel list is a list with multiple levels. Each level shows a different detail or importance. It helps organize information clearly.
How do I create a multilevel list in PowerPoint?
Type your main points in a text box or placeholder. Press Tab to move an item to a lower level. Press Shift + Tab to move it back. Add bullets or numbers from the Home tab.
Can I customize the look of my list?
Yes. You can change bullet shapes, numbering, font size, color, and spacing. Each level can look different to make it easier to read.
Are there shortcuts for multilevel lists?
Yes.
• Tab – Indent a line to a lower level.
• Shift + Tab – Move a line up to a higher level.
• Enter – Add a new item at the same level.
• Ctrl + Shift + L – Apply the default list style quickly.
When should I use a multilevel list?
Use it to show hierarchy or relationships, like steps in a process or categories with subcategories. Avoid it if all points are equally important.
How many levels should I use?
Keep it simple. Two or three levels are enough. Too many levels can make the slide hard to read.
How do I keep lists consistent across slides?
Use Slide Master. It sets fonts, colors, and layouts once. All slides follow the same style automatically.


You may also be interested in ...

How To Create An Eye-Catching Portfolio
If you’re looking to create an eye-catching portfolio, this post will come in handy. In this article, you can find the easies...
23 Jun, 2024

How To Easily Create An Infographic
Infographics are the perfect way to make a presentation that will impact an audience, but their design and composition might...
08 Jun, 2024

PowerPoint Template Tips & Tricks You Ne...
PowerPoint seems to be an unknown world for many people, especially those who have been assigned to create a presentation out...
08 Jun, 2024