How to Add Macros in PowerPoint Easily
You may have faced repetitive tasks in PowerPoint, like formatting slides, arranging objects, or creating interactive elements. These tasks can take a lot of time and often lead to small mistakes that slow down your workflow.
Macros offer a simple way to handle these challenges. By automating routine actions, you can save time, maintain consistency across slides, and expand what PowerPoint can do.
In this guide, we’ll cover what macros are, show how to add them on Windows and Mac, explain how to run them, explore practical use cases, and point out common errors and limitations to keep in mind.
What Are Macros in PowerPoint
Macros are a series of recorded actions or commands that automate tasks in PowerPoint. They allow users to perform repetitive actions quickly without manually repeating each step. Essentially, macros serve as shortcuts that save time and help maintain consistency across slides.
Macros in PowerPoint are created using a programming language called VBA, or Visual Basic for Applications. VBA scripts can control many aspects of PowerPoint, from formatting to navigation. To use macros, presentations must be saved in macro-enabled file types. These include .pptm for presentations, .potm for templates, and .ppsm for slide shows. Files in standard formats, like .pptx, do not support macros, so attempting to run them will not work.
Macros have many practical uses. They can select multiple objects at once, apply consistent formatting across slides, or modify text automatically. Users can also create custom navigation, such as interactive menus or shortcuts between slides. By automating these tasks, macros reduce errors and speed up the workflow, making presentations easier to manage and more consistent in appearance.
Why Use Macros in PowerPoint
Large or complex presentations often require the same edits or formatting across multiple slides. Doing these tasks manually can take a lot of time and increase the chance of mistakes. This is where macros become useful. They let you automate repetitive tasks and make managing presentations much easier.
Key Advantages of Working with Macros
• Automating repetitive tasks – Apply the same changes to multiple slides with a single click.
• Maintaining brand and layout consistency – Ensure fonts, colors, and designs stay uniform across all slides.
• Extending PowerPoint functionality – Add features that are not built into the standard software.
• Saving time and reducing errors – Complete tasks faster while lowering the chance of mistakes.
Using macros helps you work more efficiently. By automating routine tasks, you can focus on the content of your slides while keeping presentations professional and consistent.
How to Add Macros (PowerPoint Windows)
Macros let you automate repetitive tasks in PowerPoint. They can save time and make presentations more interactive. Even if you are new to VBA, you can follow these simple steps to add macros to your slides.
Step 1: Before you can add or edit macros, you need to enable the Developer tab (if it’s not already done). Go to File → Options → Customize Ribbon, check Developer, and click OK. The Developer tab now appears in the Ribbon, giving you access to the VBA editor and macro tools.
Step 2: Open the VBA Editor by selecting Developer → Visual Basic, or press the Alt + F11 hotkey. This opens the VBA editor, where you write and manage macro code.
Step 3: In the VBA editor, right-click your presentation in the Project panel and select Insert → Module. This creates a new module where you can add your macro.
Step 4: Inside the module window, write your macro. A simple example might loop through slides, align shapes, or create navigation buttons.
Note: Save your presentation as a PowerPoint Macro-Enabled Presentation (.pptm). If you are new to VBA, check a beginner-friendly tutorial to learn the basics safely.
How to Add Macros (PowerPoint Mac)
Adding macros to PowerPoint on Mac is similar to doing it on Windows. Here is a clear method for adding macros that anyone can follow.
Step 1: Before you can add or edit macros, you need the Developer tab. Go to PowerPoint → Preferences → Ribbon & Toolbar, check Developer, then click Save. The Developer tab now appears in the Ribbon.
Step 2: Go to Developer → Visual Basic. This opens the VBA editor, where you can write and manage macro code.
Step 3: In the VBA editor, right-click your presentation in the Project panel. Select Insert → Module. A new module appears where you can add your macro code.
Step 4: Inside the module window, write or paste your VBA code. Keep it simple if you are new to macros.
Note:
Save your presentation as a PowerPoint Macro-Enabled Presentation (.pptm) to keep the macros. Macros created on Windows may not always work correctly on Mac because of differences in the PowerPoint object model. Test macros on the Mac to ensure they run properly.
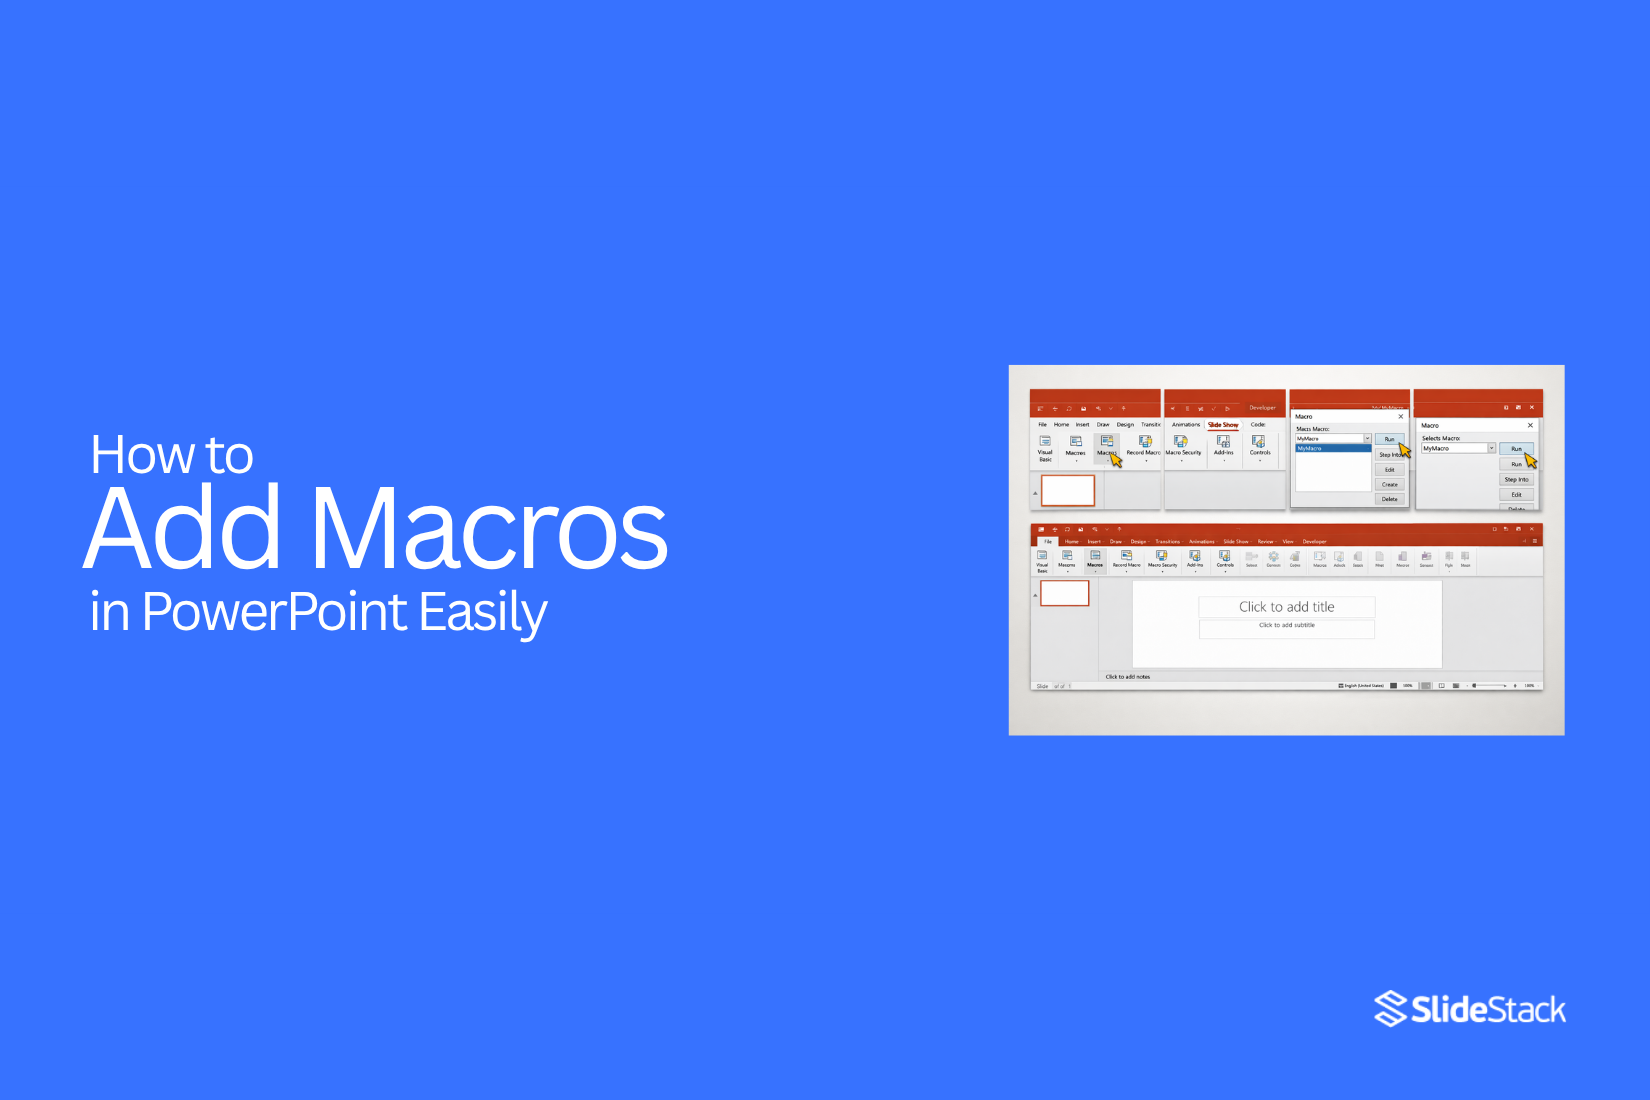
How to Run a Macro in PowerPoint
Now that you know how to insert macros, let’s look at how to run them. You can run macros in several ways, including the methods below.
Method 1: Select to Run a Macro
You can select and run macros directly on both Windows and Mac:
• Windows: Go to Developer → Macros, select the macro, and click Run.
• Mac: Go to Tools → Macro → Macros, select the macro, and click Run.
This method is best when you want to run a macro manually, such as formatting slides or applying a style to multiple objects.
Method 2: Assign Macros to a Slide Element
You can attach a macro to a slide element, like a shape, so it runs when clicked. This method is widely used for interactive presentations, menus, dashboards, or kiosk-style decks. To do this, insert or select a shape, button, icon, or text box, then open Action Settings via the Insert tab. Assign the macro to run on mouse-click. When presenting, clicking the assigned element will trigger the macro, allowing you to control navigation, reveal hidden content, or trigger animations instantly.
Method 3: Trigger a Macro During Slide Show Mode
Macros can also run during Slide Show mode when triggered by a user action. To set this up, assign the macro to a shape using Action Settings in the Insert tab. Then, while presenting, clicking the assigned object will run the macro. This approach is practical for dynamic slides that need to respond to audience interaction, such as revealing answers in a quiz, jumping to specific sections, or resetting slide elements without leaving the presentation mode.
Use Cases for PowerPoint Macros
PowerPoint macros are widely used where teams manage large, complex, or frequently updated presentations. Below are common scenarios in which companies worldwide use macros.
Batch Formatting and Brand Consistency
Macros are frequently used to enforce branding standards across large slide decks by looping through all slides and automatically applying formatting rules. Typical macro-driven tasks include applying corporate fonts and approved color palettes, standardizing title and body text sizes, margins, spacing, and alignment.
Example: Large consulting firms and enterprise marketing teams often receive slide contributions from multiple authors. In environments such as management consulting, investment banking, or corporate communications, macros are commonly used to remove third-party branding and reinforce corporate branding in decks before client delivery, ensuring visual consistency without manually reviewing every slide.
Automating Slide Layout and Object Positioning
Macros can programmatically position and resize objects across an entire presentation, removing the need for repetitive manual alignment. Typical uses include centering logos or footers on every slide, aligning icons and shapes to a consistent grid, and resizing images to uniform dimensions.
Example: Product teams and internal strategy groups at large organizations often maintain recurring slide templates for quarterly business reviews or executive updates. Macros help ensure every slide adheres to layout standards, especially when decks are reused or adapted across departments.
Creating Interactive Navigation and Menus
Macros enable custom navigation logic that goes beyond PowerPoint’s default hyperlinking. They are often used to create interactive menus and dashboards, buttons that jump to different sections based on user choice, and actions for non-linear presentations.
Example: Training departments and event teams commonly use macro-driven navigation for self-paced learning modules, sales enablement tools, and kiosk-style presentations. For example, internal onboarding decks or trade-show displays often rely on button-based navigation rather than linear slide progression.
Data-Driven or Dynamic Content Insertion
Although PowerPoint is not as data-focused as Excel, macros can still automate content generation by dynamically inserting or updating information. In this case, macros can be used to pull text values from external data sources or files, generate slides based on predefined rules, and update labels, placeholders, or chart titles programmatically.
Example: Organizational reporting teams and sales operations groups often use macros to refresh recurring presentations, such as monthly performance updates or territory reviews. This can be done without rebuilding slides from scratch. While Excel typically handles raw data, PowerPoint macros help translate that data into presentation-ready content.
Bulk Cleanup and Modernization of Legacy Slide Decks
Macros are especially valuable when dealing with older or inherited presentations that lack consistent formatting. Typical cleanup tasks include removing unused or empty placeholders, deleting hidden or overlapping text boxes, and standardizing layouts across legacy slides.
Example: Organizations with long presentation histories, such as enterprises with years of archived training or sales materials, often rely on macros to modernize older decks. This is common during rebranding initiatives, platform migrations, or content audits, where hundreds of slides must be updated quickly.
Considerations & Limitations
Working with macros also comes with trade-offs. They can save time, but there are risks to keep in mind.
1. Security Risks: Macros can carry harmful code. Many companies block them by default. You may need to enable macros each time you open a file. Some systems may not allow them at all. It is best to use macros from trusted sources only. You can also use digital signatures if your company allows it. Be careful when sharing macro files with others.
2. Limited Recording Capabilities: PowerPoint does not record actions as well as Excel. Some steps may not be captured. In many cases, the recorder does not work at all. Because of this, you often need to write code by hand. This means you need some basic knowledge of VBA to create useful macros.
3. Maintenance: Macros need updates over time. A macro that works today may stop working after a software update. Different versions of PowerPoint may also behave in different ways. Small changes in slides can cause errors. Testing your macros often helps prevent issues.
4. Undo / Redo Behavior: Macros can change many things at once. After running a macro, the undo option may not fully work. Some changes cannot be reversed. This can affect your slides in a big way. Working on a copy of your file helps you avoid losing important content.
5. Complexity: Simple tasks are easy to automate. More advanced tasks need coding skills. You must understand VBA and how PowerPoint works. Without this knowledge, creating complex macros can be difficult.
Common Errors and Troubleshooting
Small issues can break the flow of your slide. A common problem appears when an object shows before its animation starts. This often links to the start setting. Open the Animation Pane and check how the effect begins. Set it to “On Click” or “With Previous” based on your need. Also, review the object to ensure no extra animations are applied.
At times, the order of animations feels off. The slide may play in a way that confuses the viewer. A quick look at the Animation Pane helps here. You can drag items up or down to fix the sequence. A clear order keeps everything easy to follow.
Another issue comes up when an object does not hide after an exit effect. The object stays on the slide even after it should be gone. This usually means the exit animation is missing or placed in the wrong spot. Add an exit effect and place it after the entrance. Then adjust the timing so it runs at the right moment.
Some slides show no animation at all during playback. This can feel confusing at first. Start by checking the trigger. Make sure the animation is set to begin on click or at the right time. Also, check if the object is grouped with others, as this can block the effect.
Too many animations on one object can create problems as well. The motion may look messy or fail to run in a smooth way. A simple setup works best. Use one entrance and one exit where possible. Remove any extra effects that do not add value.
The speed of an animation can also affect the result. A very fast effect may feel rushed, while a slow one can drag the slide. Adjust the duration setting to find a good balance. A quick preview helps you see the change right away.
Pro Tips for Using Macros Efficiently
Start small. Record a simple task first. This helps you see how macros work. Keep your macros short. Long macros can break more easily. Short ones are easier to fix. Name each macro clearly. Use names that match the task. This makes them easy to find later. Group similar steps together. This keeps your workflow clean and easy to follow. Test your macro often. Run it step by step. Fix small issues early. Use shortcut keys. This saves time during daily tasks. Store macros in the right place. Keep them in a file you use often. This helps you access them quickly. Clean up your code. Remove extra steps or unused lines. This keeps your macro simple. Back up your macros. Save a copy in another file. This protects your work. Finally, review your macros from time to time. Small updates can make them work better.
Final Thoughts:
Macros can change how you work in PowerPoint. Repetitive tasks no longer slow you down. A few lines of code can handle work that once took many steps.
As you move through your slides, the benefit becomes clear. Formatting stays the same. Objects line up the right way. Small errors appear less often. Your slides feel clean and easy to manage.
There is also more control in your hands. You can add actions that PowerPoint does not offer by default. Simple buttons can guide users through a deck. Slides can respond to clicks in a more dynamic way.
At the same time, care is still needed. Macros can break or behave in unexpected ways. A quick test helps you catch issues early. Working on a copy of your file keeps your main slides safe.
Over time, your workflow becomes smoother. Tasks feel lighter. You spend less time fixing slides and more time shaping your message.
FAQs:
What is a macro in PowerPoint?
A macro is a set of actions saved as a script. It runs tasks for you. This helps you avoid doing the same steps again and again.
Do macros work in all PowerPoint files?
No. Macros only work in macro-enabled files like .pptm. Standard files like .pptx do not support macros.
Is it safe to use macros?
Macros can carry harmful code. Only use files from sources you trust. Always check settings before you enable them.
Do I need coding skills to use macros?
Basic tasks can be simple. You can start with small edits. More advanced tasks need some knowledge of VBA.
Can I use macros on both Windows and Mac?
Yes. Both support macros. Some macros may not work the same way on each system, so testing helps.
Why is my macro not running?
The file may not be saved in the right format. Macros may also be turned off in settings. Check both before you try again.
Can I undo changes made by a macro?
Not always. Some actions cannot be reversed. It is safer to test macros on a copy of your file.
How can I run a macro quickly?
You can run it from the menu. You can also link it to a button or shape. This lets you trigger it with a click.
Do macros slow down PowerPoint?
Simple macros run fast. Large or complex ones may take more time. Keeping them short helps avoid delays.
Can macros help with slide design?
Yes. They can apply styles, align objects, and keep layouts the same across slides. This keeps your deck neat and consistent.


You may also be interested in ...

Tips To Create A Great Infographic
Infographics Have been around for a while, but not many people know about them or are their preferred presentation choice. If...
08 Jun, 2024

3 Steps To Create The Best Presentation...
Presentations are something wonderful when well done, you can captivate an audience or be super interested in what another pe...
23 Jun, 2024

3 Tips For Your Next Presentation You MU...
PowerPoint presentations are perfect for explaining a topic and communicating your ideas with a visual aid. But most people s...
08 Jun, 2024