How to Save Individual PowerPoint Slides as Images in Canva
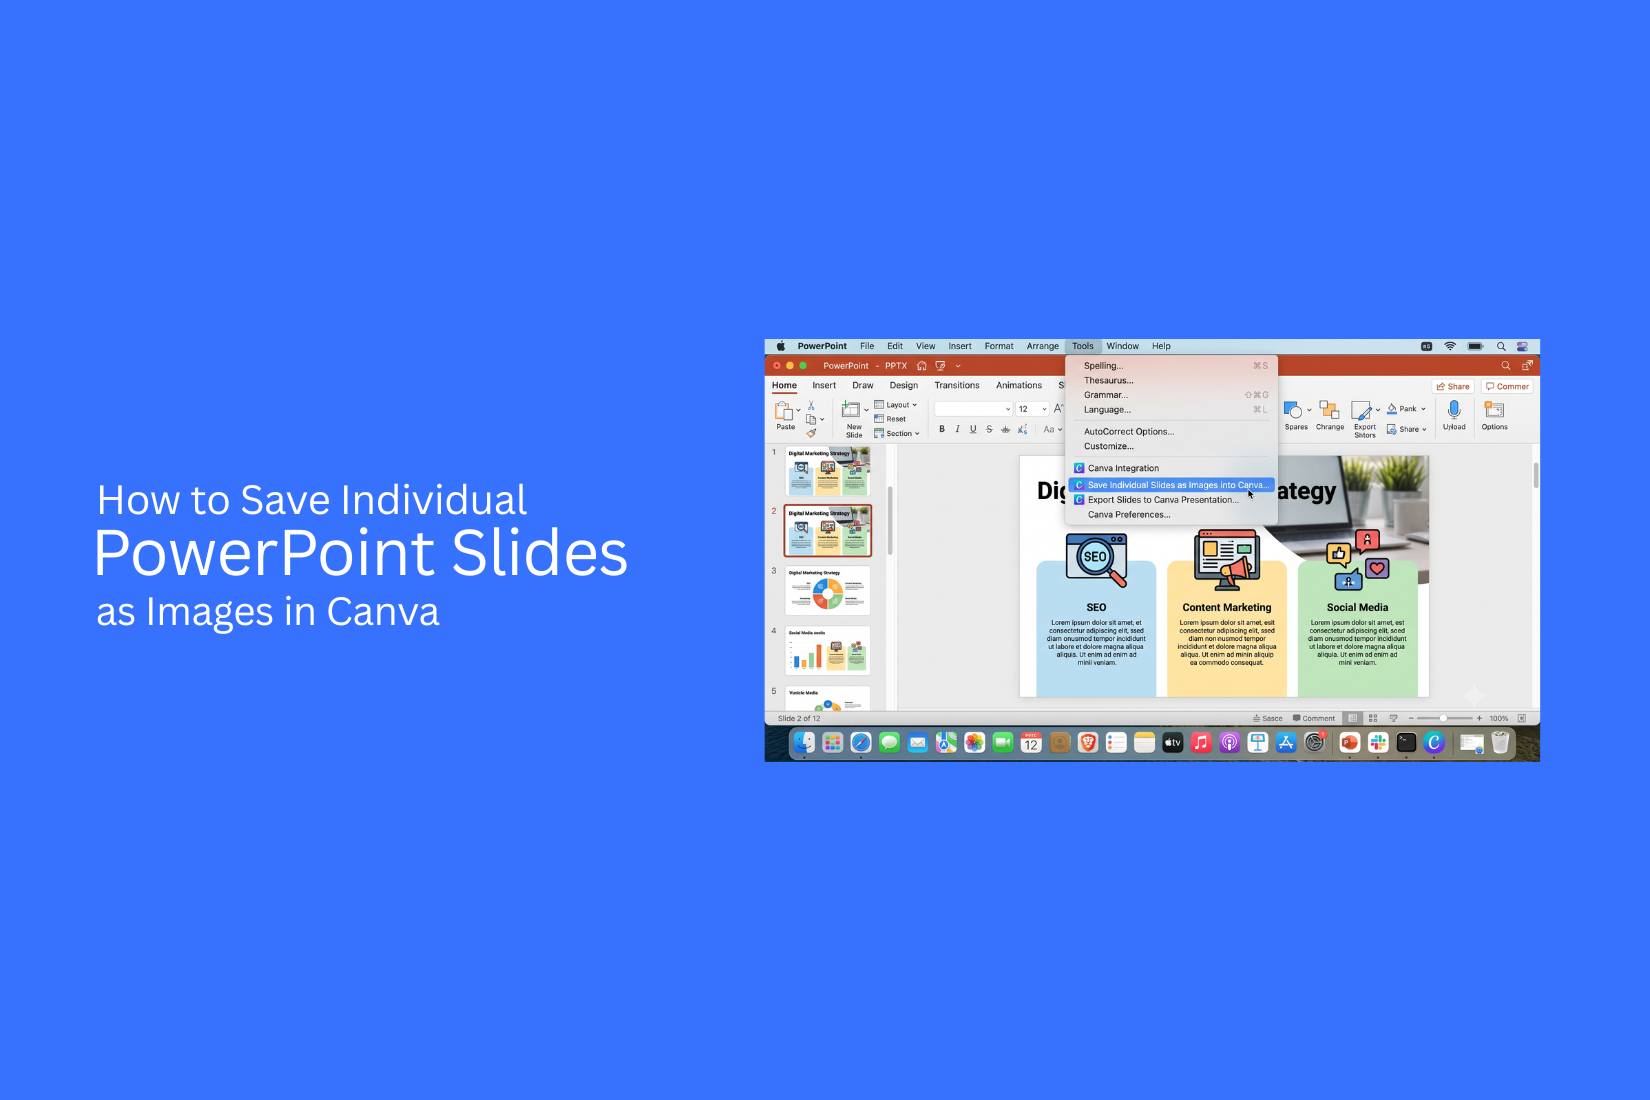
Many people create presentations in PowerPoint and edit them in Canva. Saving one slide as an image may seem simple, yet the right option is not always easy to find. This can slow your work and lead to the wrong file or poor image quality. The good news is that Canva lets you save individual slides in just a few steps. This guide explains how to save one or more PowerPoint slides as PNG or JPG images. You will also learn the best time to use each format, ways to improve image quality, common problems, and simple fixes to help you get better results.
Can You Save Individual PowerPoint Slides as Images in Canva?
Yes, you can save individual PowerPoint slides as images in Canva. This helps you use a single slide for social media posts, documents, websites, or other projects. Canva lets you upload a PowerPoint file and edit the slides inside the editor. After making changes, you can download each slide as an image file. You can choose formats like PNG or JPG based on your needs.
Saving slides as images is useful for sharing specific parts of a presentation without sending the full PowerPoint file. It also keeps the slide design, text, and visual elements in a clear image format. The process is simple. Upload your PowerPoint file to Canva, select the slide you want to use, and export it as an image. This gives you more control over how each slide appears outside the presentation.
When You Should Save a PowerPoint Slide as an Image
Saving a PowerPoint slide as an image helps you use your designs in more places. A slide image keeps the layout, text, and visuals in one file. This makes sharing and adding slides to other projects much easier.
Share Slides on Social Media
Social media posts need clear visuals that look good on different screens. Saving a PowerPoint slide as an image lets you share your presentation ideas as posts, updates, or visual content without uploading the full presentation file.
Add Slides to Blogs or Websites
Slide images work well inside blog posts and website pages. They help explain ideas with visuals and give readers a quick view of your presentation content. A saved image also keeps the original slide design unchanged.
Include Slides in Reports or Documents
Reports and documents often need charts, graphics, or key points from presentations. Adding a slide image helps place your presentation content into another file without rebuilding the design.
Print Individual Slides
A saved slide image makes printing single slides simple. You can print selected pages for handouts, posters, or reference materials while keeping the original formatting.
Reuse Slide Graphics in Other Projects
A PowerPoint slide often contains useful graphics, layouts, and visual elements. Saving it as an image allows you to use the same design pieces in other creative projects without starting from scratch.
How to Save Individual PowerPoint Slides as Images in Canva
Saving a single PowerPoint slide as an image in Canva helps you reuse your slide design in different ways. You can share it on social media, add it to a document, or keep it as a separate image file. Canva makes this process simple after you upload your PowerPoint file. Follow these steps to save any slide as a PNG or JPG image.
Upload Your PowerPoint Presentation
Start by opening Canva and creating a new design. Click the option to upload your PowerPoint file. Choose the presentation from your device and wait for Canva to import the slides. The upload process may take a short time based on the file size. Once the import is complete, Canva will turn your PowerPoint slides into editable pages.
Open the Imported Presentation
After Canva finishes importing the file, open the presentation. You will see all PowerPoint slides arranged as separate pages inside the Canva editor. Review the slides to make sure everything looks correct. Check the text, images, and layout before saving any slide as an image.
Select the Slide You Want to Save
Find the slide you want to export. Click on that page to select it in the Canva editor. You can save any single slide from your presentation. There is no need to download the full file if you only need one page.
Click the Share or Download Option
After selecting the slide, click the Share button in the top-right corner of Canva. A menu will appear with different options. Choose Download to open the file settings. This section lets you select the image format and page you want to save.
Choose PNG or JPG
In the download settings, open the file type menu. Select PNG or JPG based on your needs. PNG usually keeps better image quality and works well for presentations with text and graphics. JPG creates a smaller file size and works well for quick sharing.
Select the Current Page Only
Canva may select all pages by default. Change the page selection option to save only the slide you selected. Choose Current page or the option that saves the selected page only. This prevents Canva from downloading every slide in your presentation.
Download the Image
Click the Download button after choosing your settings. Canva will save the selected PowerPoint slide as an image file on your device. Open the downloaded file to check the quality. Your slide is now ready to use as a PNG or JPG image.
How to Save Multiple Selected Slides as Images
Saving several Canva slides as images at once saves time and keeps your files ready for sharing, editing, or storage. Canva lets you choose multiple pages from your presentation and export them together as image files.
Select Multiple Pages
Open your PowerPoint presentation in Canva and go to the page panel. Select the slides you want to save as images. You can choose more than one page by holding the Ctrl key on Windows or the Command key on Mac while clicking each slide. Check your selection before moving ahead. This helps you avoid saving extra slides or missing the pages you need.
Download as PNG or JPG
After selecting the slides, click the Share button and choose Download. Pick PNG or JPG from the file type options. PNG works well for clear graphics and text, while JPG creates smaller files that are easier to share. Make sure the selected pages option is active before starting the download. Canva will create image files from your chosen slides.
Organize the Downloaded Images
After saving the images, create a folder to keep all slide files together. Use clear file names so you can find each slide quickly later. You can sort images by slide number, topic, or project name. A simple file system makes it easier to reuse your presentation images across different platforms.
PNG vs JPG: Which Image Format Should You Choose?
The right image format helps your slide look clear and fit the place where you plan to use it. Canva lets you save slides as PNG or JPG files, but each format works best for different needs.
When to Use PNG
PNG is a good choice for slides that need sharp details and clear backgrounds. It keeps text, icons, and design elements crisp after export.
Use PNG for:
• Presentation slides with small text
• Graphics with transparent backgrounds
• Charts, diagrams, and detailed visuals
• Website images that need high quality
PNG files are usually larger than JPG files, but they keep more visual details from the original slide.
When to Use JPG
JPG works well for simple images that need a smaller file size. It reduces file size while keeping the image quality suitable for most sharing needs.
Use JPG for:
• Social media posts
• Blog images
• Quick previews
• Slides with photos or large background images
JPG is a practical option for photos because it handles image colors well and creates smaller files.
Key Differences at a Glance
PNG and JPG have different strengths. PNG focuses on quality and clear details, while JPG focuses on smaller file sizes.
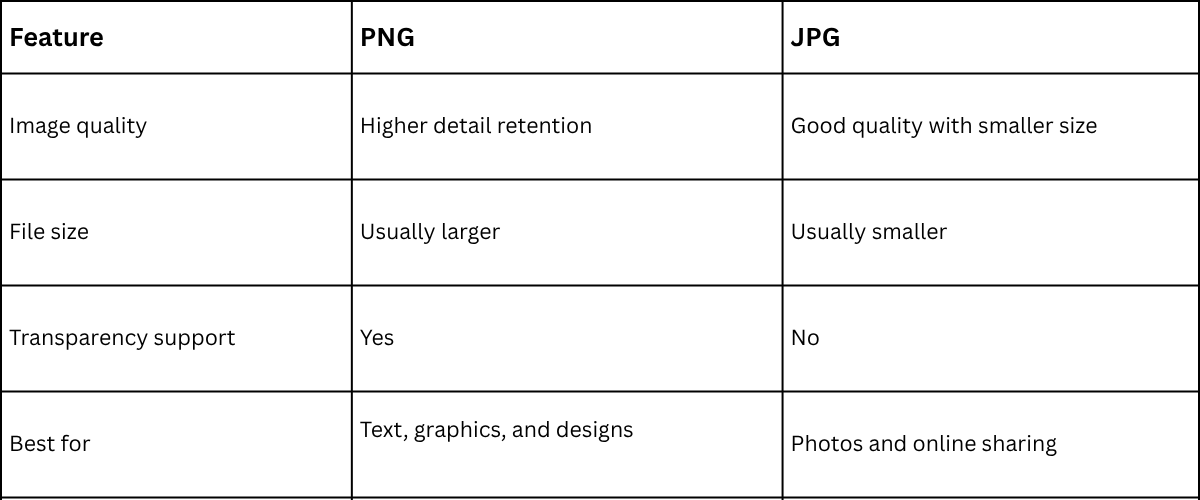
For Canva slides with lots of text or design elements, PNG is often the better choice. JPG works well for slides that mainly contain photos or need a smaller file size.
Tips for Better Image Quality
Saving a PowerPoint slide as an image is easy, but the final result depends on the slide quality. A few small checks can help you create clear images that look good on different platforms. Follow these tips before exporting your slides.
Use High-Resolution Slides
Start with a slide that has clear images, sharp graphics, and proper spacing. Low-quality images inside a presentation may look blurry after saving the slide as a PNG or JPG. Use high-quality visuals from the start. Keep images large enough to fit the slide without losing clarity. A clean slide layout also helps the exported image look more professional.
Keep Text Readable
Text size plays a big role in image quality. Small text may look fine inside Canva but become hard to read after downloading. Use clear fonts and proper spacing between lines. Avoid adding too much text to one slide. A simple layout helps readers view the content easily.
Check Image Size Before Downloading
The download settings affect the final image quality. Check the image size before exporting the slide from Canva. A larger size usually keeps more details in the image. Choose the right file type based on your needs. PNG works well for slides with text, icons, and graphics. JPG can work better for slides with many photos.
Review Fonts and Graphics
Fonts and graphics should match the slide design. Check every text box, icon, and image before saving the file. Some elements may shift during editing or importing. A quick review helps you catch spacing issues, missing graphics, or font changes.
Preview Before Exporting
A final preview helps you spot problems before downloading the image. Look at the slide at full size and check the details. Review the text, images, colors, and alignment. Small fixes before export can improve the final image quality and save time later.
Common Problems and How to Fix Them
Saving PowerPoint slides as images in Canva is usually simple, but small issues can affect the final file. A few settings and checks can help you get clear images and the right slide output.
Download Option Is Missing
The download option may not appear if the design is still loading or the file is not fully opened. Check that your PowerPoint file has finished importing into Canva. Refresh the page and open the presentation again. The download button should appear after the design loads properly.
Slide Looks Blurry
A blurry slide usually happens because of low download quality or small image sizes. Choose PNG format for better clarity. Avoid stretching the slide image after saving it. Keeping the original slide size helps maintain sharp details.
Fonts Changed After Import
Fonts may look different after moving a PowerPoint file into Canva. This happens if Canva does not have the same fonts used in the original presentation. Check the text style after import and replace missing fonts with similar options. Review each slide before downloading the image.
Images Appear Cropped
Images can look cropped if the original PowerPoint layout does not match Canva’s page size. Adjust the image position and size inside Canva. Check the edges of each slide to make sure all visual elements are visible before saving.
Wrong Slide Downloaded
Downloading the wrong slide can happen if the selected page is not correct. Open the slide list and select the exact page you need. Use the current page option during download to save only that slide as an image.
Alternatives to Saving Slides as Images in Canva
Canva is a useful option for turning PowerPoint slides into image files. There are other ways to save or share slide visuals too. The best choice depends on your workflow, file quality needs, and where you plan to use the image.
Export Slides Directly from PowerPoint
PowerPoint has a built-in export option that lets you save slides as image files. You can choose formats like PNG or JPG during the export process. This keeps the slide layout, text, and graphics in their original positions. Exporting from PowerPoint works well for users who already have the original presentation file. It also helps keep image quality consistent without moving the slides into another tool.
Take a High-Resolution Screenshot
A high-resolution screenshot can be a quick way to save a single slide as an image. This method works best for small projects or quick sharing. To get better results, open the slide in full-screen mode before taking the screenshot. A larger display size helps capture more details. This option may not match the quality of a direct export, but it is simple and does not require extra steps.
Use Other Presentation Tools
Other presentation tools also offer ways to save slides as images. Many platforms include export features for common image formats. These tools can help if your presentation was created outside PowerPoint or Canva. They allow you to keep working in the platform you already use while creating image files from your slides.
Best Practices for Using Slide Images
Saving PowerPoint slides as images makes them easier to share across different platforms. A few simple practices help keep your slide images clear, organized, and ready for use.
Optimize Images for Web
Web images need to load quickly while keeping good quality. Choose a suitable image format based on your needs. PNG works well for slides with text, charts, and sharp graphics. JPG can work better for slides with many photos. Check the image size before uploading it to a website. A large image may slow down page loading and affect the user experience.
Maintain Brand Consistency
Slide images should match your brand style. Use the same colors, fonts, and design elements across all images. This helps people recognize your content easily. Keep logos, icons, and visual details in the same position across slides. A consistent design creates a cleaner look across your website, social media, and other platforms.
Keep File Sizes Small
Large image files take more space and may load slowly. Reduce file size without losing too much quality. Image compression tools can help lower the size while keeping the slide readable. Remove extra elements that are not needed before exporting the slide. This helps create lighter files that are easier to manage and share.
Store Original Presentation Files
Keep the original PowerPoint or Canva presentation files after saving slides as images. Original files let you edit text, images, and layouts later. Create folders with clear names for each project. Store image exports and source files together so you can find them easily for future updates.
Final Notes
Saving individual PowerPoint slides as images in Canva is a simple way to reuse presentation content. A single slide can become a social media graphic, website image, report visual, or file for printing. Choose the right image format based on your needs. PNG works well for slides with text, charts, and detailed designs. JPG is useful for smaller files and slides with more photos.
Before exporting, check your slide layout, fonts, images, and page selection. These small steps help you create clear image files without extra edits later. Keeping your original presentation file also gives you more control for future changes. With the right export settings and a quick review, your Canva slide images can stay clear, organized, and ready for different uses.
FAQs
Can I save one PowerPoint slide as an image in Canva?
Yes, you can save a single PowerPoint slide as an image in Canva. Upload your presentation, select the slide you need, choose the download option, and export it as a PNG or JPG file.
Which image format is better for Canva slides, PNG or JPG?
PNG is better for slides with text, charts, icons, and detailed graphics because it keeps more details clear. JPG is a good choice for slides with photos or smaller file size needs.
Can I save multiple PowerPoint slides as images in Canva?
Yes, Canva allows you to select multiple slides and download them as image files. Choose the pages you need before exporting to avoid saving unwanted slides.
Why does my PowerPoint slide look blurry after saving it as an image?
A blurry slide can happen because of low image quality, small slide size, or stretching the image after download. Use PNG format and keep the original slide size for better clarity.
Do PowerPoint fonts stay the same after uploading to Canva?
Not always. Some fonts may change if Canva does not have the same font used in the PowerPoint file. Review the slide and replace missing fonts before exporting.
Can I use Canva to edit PowerPoint slides before saving them as images?
Yes, Canva lets you edit imported PowerPoint slides. You can adjust text, images, layouts, and other design elements before downloading the slide as an image.
Can I save a PowerPoint slide as a JPG without using Canva?
Yes, PowerPoint has its own export option for saving slides as JPG or PNG files. You can also use screenshots or other presentation tools to create image files.
Why are my Canva slide images getting cropped after export?
Cropping can happen if the slide size or image position changes during import. Check the page size and adjust the image placement before downloading the file.
Should I keep my PowerPoint file after saving slides as images?
Yes, keeping the original file makes future edits easier. You can update text, graphics, or layouts later without rebuilding the slide.



You may also be interested in ...

How To Create An Eye-Catching Portfolio
If you’re looking to create an eye-catching portfolio, this post will come in handy. In this article, you can find the easies...
23 Jun, 2024

How To Easily Create An Infographic
Infographics are the perfect way to make a presentation that will impact an audience, but their design and composition might...
08 Jun, 2024

PowerPoint Template Tips & Tricks You Ne...
PowerPoint seems to be an unknown world for many people, especially those who have been assigned to create a presentation out...
08 Jun, 2024