How to Add Footnotes in Google Slides Properly
Many users find it hard to include references in Google Slides without cluttering their slides or breaking the flow of their presentation. This can make your slides look unprofessional and confuse your audience.
Fortunately, there is a clear way to handle footnotes properly. In this guide, you will learn what footnotes are, how to add them to a single slide or multiple slides, and even include indicators for easy reference. Plus, we’ll show how creating custom themes with SlideStack can make the process even simpler. By following these steps, your slides will stay organised and polished.
What is a footnote?
A footnote is a note placed at the bottom of a slide or page that gives extra information about something in the main content. You mark it with a small number, symbol, or letter next to the text that needs more detail. On Google Slides, footnotes can explain terms, add examples, or give brief instructions without cluttering the main slide. For example, you might add a footnote to define a technical word or show a short tip on using a chart. Footnotes help your audience understand details without overwhelming your slides.
When to Use Footnotes in Slides
Footnotes work best for small extra details. They keep the main slide clean. The main message stays easy to read.
Use footnotes for data sources. Add them for short notes that support a claim. They also fit well for extra context that does not need attention right away.
Large blocks of text do not belong in footnotes. That slows down the slide. It also pulls focus away from the main point.
A slide should guide the viewer first. Footnotes stay in the background and support the message quietly.
Types of Radial Charts You Can Create
Radial charts show data in a circle shape. Each type uses the circle in a different way. The design changes based on the goal of the chart.
Some radial charts focus on comparison. These charts place values around a center point. Each segment shows a different item. The length of each segment shows the value.
Other radial charts show progress. These charts use rings or arcs. Each ring shows how far a task has moved forward. A full circle often means complete work.
Some charts show parts of a whole. Each slice of the circle represents a share. Bigger slices show larger values. Smaller slices show smaller values.
You may also see multi-layer radial charts. These charts stack circles on top of each other. Each layer adds more detail to the data.
Tools You’ll Use in Google Slides
Google Slides gives you simple tools to build clear and clean designs. The left panel shows all your slides. You can move, copy, or delete them with a right click. This helps you keep your structure organized.
The top menu holds most of your editing options. You can add text, images, shapes, and lines. Each tool is easy to find and quick to use. The toolbar above the slide helps you change font, size, and alignment in seconds.
The “Insert” menu plays a big role in design work. It lets you add charts, tables, and diagrams. You can also bring in images from your device or the web. This helps turn basic slides into visual content.
The theme panel gives ready-made design styles. It sets colors, fonts, and layout in one click. This keeps your slides consistent without extra effort.
Add a footnote to a single slide
Footnotes let you give extra information without cluttering your slide.
To add one, click on the text box where you want the footnote to appear. Type the footnote number or symbol, then add the note at the bottom of the slide. Keep it small and subtle so it doesn’t distract from your main content. You can adjust the font size, style, and color for clarity and consistency. Position it close to the bottom or corner for a clean look.
Adding a Footnote Indicator
Adding a footnote indicator helps your readers know where extra information or sources are provided. Start by placing the cursor at the point in your text where you want the footnote. Then, insert a superscript number using your word processor’s footnote feature or by manually formatting a number as superscript. If you have multiple references to the same note, use the same number to avoid confusion. Make sure the formatting is consistent throughout your document.
Tip: Keep footnotes brief so they don’t distract from the main text.
Add Footnotes to Several or All Slides
Footnotes can help your audience understand extra details without cluttering your slides. You can add them to a few slides or every slide in your presentation.
Adding Footnotes to All Slides
- Go to Slide > Edit Slide.
- Click on the Edit slide at the top of the left panel.
- Insert a text box at the bottom of the slide.
- Type your footnote text.
- Adjust size and position. This will appear on all slides that use this master layout.
- Close the master view when done.
Editing or Removing Footnotes

- To edit, click the footnote text on a slide or in the master, then make changes.
- To remove, select the text box and press Delete.
Footnotes make your slides more informative while keeping the main content clean.
Using Text Boxes for Footnotes
Text boxes help place footnotes in a clear spot on a slide. They keep notes separate from the main content. This makes the slide easier to read.
Open your slide and select the insert option. Choose a text box. Click on the slide where the footnote should go. Type the note inside the box.
Small font size works best here. Keep the text short. Long notes take up too much space and can distract from the main message.
Place the text box near the bottom of the slide. This keeps it out of the main focus area. It also helps the viewer find it quickly.
Alignment matters. Keep the text box lined up with slide margins. This creates a clean look and avoids visual clutter.
Footnotes should support the main idea. They should not compete with it.
Adding Footnotes for Images and Data
Footnotes give clear credit for images and data. They also help readers trust the slide.
Place a small number near the image or chart. Keep it out of the main visual space so the slide stays clean.
At the bottom of the slide, add the matching note. Include the source name or link. Keep it short and easy to read.
Use the same style for every slide. This keeps your presentation consistent and simple to follow.
Each footnote should match only one item. This avoids confusion when multiple images or data points appear on the same slide.
Formatting Footnotes Correctly
Footnotes sit at the bottom of a slide or document page. They give extra details without crowding the main content.
Place a small number in the text where the note is needed. The number should be raised slightly above the line. This is called a superscript style.
At the bottom of the slide, match the same number. Add the extra note next to it. Keep the text short and clear.
Use a smaller font size for footnotes. This helps separate them from the main message. Keep spacing clean so each note is easy to read.
Too many footnotes can distract the reader. Stick to only what is needed for clarity or source details.
Common Mistakes to Avoid
Many people rush the setup process. That leads to small errors that affect the final result. Taking a calm and careful approach helps prevent these issues.
One common mistake is using too many effects at once. Slides start to feel crowded. The message gets lost behind the movement. Simple use of effects keeps attention on the content.
Another issue is poor timing. Effects that move too quickly can confuse viewers. Slow or uneven timing can feel off. A steady pace keeps everything clear and easy to follow.
Some users also forget to check consistency. Different slides may use different styles. This breaks the flow of the presentation. Keeping fonts, colors, and motion similar across slides creates a smoother experience.
Overusing transitions is another problem. Every slide does not need a special effect. Too many transitions can distract from the main message.
Careful choices at each step help the presentation feel clean and focused.
Alternative Ways to Reference Sources
Citing sources keeps your work clear and trustworthy. It also helps readers see where ideas come from. There are several simple ways to do this, and each one works in a different situation.
One common method uses short in-text notes. These appear inside the sentence or at the end of a sentence. They point the reader to a full detail list later in the document.
Another method uses footnotes. A small number appears in the text. The full reference sits at the bottom of the page. This keeps the main content clean and easy to read.
Some writers prefer endnotes. These work like footnotes, but all details are grouped at the end of the document. This keeps pages free from extra text while still giving full credit.
A reference list is also widely used. It appears at the end of the document. It includes full details like author names, titles, and dates. Readers can scan it to find the original sources.
Each method serves the same goal. It shows where information comes from and supports the main ideas in a clear way.
Advanced Tips to Make Your Chart Stand Out
Start with clear data. Keep only what matters. Too much data makes the chart hard to read. Pick colors with purpose. Use contrast so each part is easy to see. Avoid random color choices. Keep labels short. Long text can slow the reader down. Simple words work better.
Add spacing between elements. A little space helps the chart feel clean and easier to follow. Use one focus point. Highlight one key part so the viewer knows where to look first. Check alignment before finishing. Small shifts can improve balance and clarity.
Using Google Sheets Data with Radial Charts
Data in Google Sheets often starts simple. Rows and columns hold the numbers. A radial chart gives that data a new shape. It turns values into a circular view that is easier to scan.
Start with clean data. Each category needs its own row. Each value must be clear and consistent. Small errors in numbers can change the chart result.
Open your chart tool and link it to the sheet. Select the full range of data. Make sure labels match the values. A mismatch can confuse the chart output.
Once the chart appears, adjust the scale. Check how each segment is displayed. Some values may look too large or too small. Balance helps the chart stay readable.
You may also group similar data. This helps reduce clutter. The chart becomes easier to read at a glance.
A radial chart works best when the dataset stays simple and structured. Clean input leads to a clear visual result.
Creative Use Cases for Radial Charts
Radial charts help show data in a circular form. They make patterns easier to see at a glance.
Many teams use them in business reports. Sales data fits well in this format. It shows progress across regions or time periods in a clear way. Marketing teams also use radial charts to compare campaign performance. Each segment can represent a channel or metric.
Teachers use radial charts in learning materials. They help students compare scores across subjects. The circular shape makes differences stand out without heavy text.
Designers use them in presentations and dashboards. They help turn plain numbers into something visual and simple to follow. Data feels more organized and less crowded.
Health and fitness apps use radial charts too. They track daily steps, sleep, and activity goals. Each ring shows progress in a clear way.
Exporting and Sharing Your Radial Chart
Your radial chart is ready. Now it is time to save it. Google Slides gives you simple export options that keep your design clear and sharp.
Start by opening the File menu. Choose Download. You will see several format options. Pick the one that fits your use.
PNG works well for clear images. It keeps the chart sharp for posts and slides. PDF works better for reports and print use. It keeps the layout fixed and clean.
Sharing is also easy. You can send the file through email or cloud storage. You can also share a link from Google Drive. This lets others view or edit your chart based on your settings.
A clean export helps your work stay professional across platforms.
Keep Your Slides Clean with SlideStack Footnotes
SlideStack makes adding footnotes simple and seamless. With SlideStack, you can insert, edit, or remove footnotes without cluttering your slides. Stay organized, give proper references, and make every presentation look polished. Try SlideStack today and make your slides more professional and easier to follow.
Final Workflow for Creating a Radial Chart in Google Slides
Start with a clean slide. Remove anything that does not support the chart. A clear base helps every step that follows. Move to Insert and open Shapes. Choose the pie shape. Place it in the center of the slide. This forms the outer structure of the radial chart. Adjust the size by dragging the corner handles. Keep the shape even and round. Alignment matters for a balanced look.
Copy the shape and paste it on the same slide. Place it directly over the first one. Use alignment guides so both shapes share the same center point. Change the color of the duplicate shape. Pick a tone that separates it from the base layer. Rotate it slightly to build visual depth.
Copy the shape again for the inner layers. Reduce the size each time. Place each layer in the center. Keep spacing even between all circles. Shift focus to labels. Insert a rounded rectangle from Shapes. Place it near the chart. Add short text that matches each data point.
Duplicate labels for all sections. Keep text short and clear. Place each label close to its related part of the chart. Add connectors next. Use a Line or Elbow Connector from Shapes. Draw a line from each label to its matching section. Keep lines straight and clean.
Adjust line style. Change color to match the chart theme. Set a medium thickness so lines stay visible without dominating the design. Add supporting text where needed. Insert a text box under each label. Keep details short. Avoid long paragraphs.
Check spacing across the slide. Each element should feel evenly placed. Nothing should crowd another element. Review color use. Stick to a small set of colors. Keep contrast strong enough for easy reading.
Scan alignment again. Small shifts can affect balance. Center everything carefully. Remove anything that does not add value. Clean design always improves clarity.
Export the slide once everything looks complete. Go to File and select Download. Choose PNG for images or PDF for documents. Share the final file through Google Drive or email. Keep access simple for viewers. A finished radial chart should feel clear, balanced, and easy to read.
FAQs:
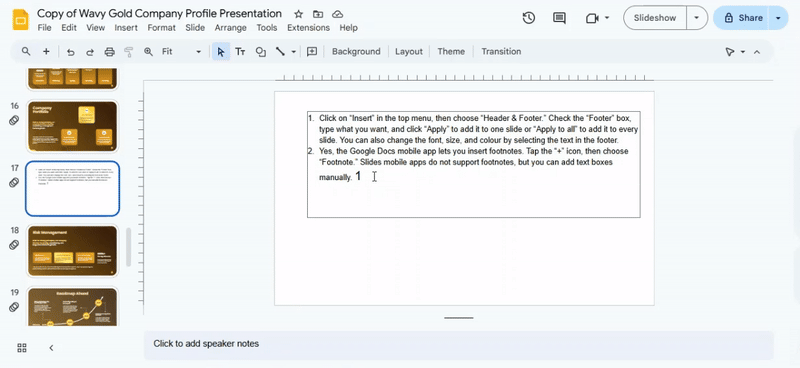
How do you format a footer in Slides?
Click on “Insert” in the top menu, then choose “Header & Footer.” Check the “Footer” box, type what you want, and click “Apply” to add it to one slide or “Apply to all” to add it to every slide. You can also change the font, size, and colour by selecting the text in the footer.
How to do a footnote in Google Docs?
Place your cursor where you want the footnote. Go to “Insert” and select “Footnote.” A small number will appear, and you can type your footnote text at the bottom of the page.
How do I add a header in Google Slides?
Google Slides doesn’t have a built-in header feature like Docs. You can create a text box at the top of your slide and type your header. Copy it to other slides if you want it to appear on all slides.
Can I customise footnote formatting?
Yes, you can change the font, size, and colour of footnotes in Google Docs. Highlight the footnote text and use the formatting toolbar. Slides text boxes used as headers or footers can also be customised the same way.
Is there a limit to footnote length?
There isn’t a strict limit, but very long footnotes can be hard to read. Keep them short and focused to make them easy to follow.
Can I collaborate on footnotes?
Yes. If your document is shared, anyone with editing access can add or edit footnotes. Changes appear in real time for all collaborators.
Can I add footnotes on the mobile app?
Yes, the Google Docs mobile app lets you insert footnotes. Tap the “+” icon, then choose “Footnote.” Slides mobile apps do not support footnotes, but you can add text boxes manually.
Can I add links in footnotes?
Yes. Highlight the text in your footnote, click the “Insert link” option, and enter the URL. Readers can click the link directly from the footnote.


You may also be interested in ...

How To Create An Eye-Catching Portfolio
If you’re looking to create an eye-catching portfolio, this post will come in handy. In this article, you can find the easies...
23 Jun, 2024

How To Easily Create An Infographic
Infographics are the perfect way to make a presentation that will impact an audience, but their design and composition might...
08 Jun, 2024

PowerPoint Template Tips & Tricks You Ne...
PowerPoint seems to be an unknown world for many people, especially those who have been assigned to create a presentation out...
08 Jun, 2024