How to Lock an Image in Google Slides (4 Easy Methods That Actually Work)
Google Slides does not have a built-in “lock image” feature. However, you can stop images from moving by using these practical workarounds:
• Set the image as a background (best for fixed elements)
• Use the theme (master slides) for template-level control
• Group objects to reduce accidental movement
• Apply layout discipline to prevent edits in shared slides
Each method works in different situations. The right choice depends on how much control and flexibility you need.
Why You Can’t Lock Images in Google Slides
Unlike Microsoft PowerPoint, Google Slides does not offer a native “lock object” feature. This is intentional.
Google Slides is designed for collaboration. Instead of restricting elements, it prioritizes easy editing and shared access. As a result, users need to rely on alternative methods to keep images fixed in place.
Method 1: Set the Image as Background (Best Overall Method)
This is the most reliable way to “lock” an image so it cannot be moved or edited.
Steps:
- Open your slide
- Click on Slide in the top menu
- Select Change background
- Click Choose image and upload your picture
- Click Done
When to use:
• Logos that should stay fixed
• Watermarks
• Full-slide designs or backgrounds
Limitations:
• You cannot select or edit the image afterward
• You must replace the background to make changes
👉 This method is ideal when you want zero movement and zero risk of accidental edits.
Method 2: Use Theme Builder (Master Slides)
This method gives you more structured control, especially for templates and team presentations.
Steps:
- Click View → Theme builder
- Select a layout (or create a new one)
- Insert your image
- Close the theme builder
- Apply that layout to your slides
When to use:
• Company templates
• Reusable presentation layouts
• Team environments with multiple editors
Advantages:
• Prevents accidental movement in normal editing mode
• Keeps design consistent across slides
Limitations:
• Editing requires going back into the theme builder
• Slightly more advanced setup
👉 This is the best method for scalable, professional presentations.
Method 3: Grouping Objects (Partial Control)
Grouping doesn’t truly lock an image, but it reduces the chances of accidental movement.
Steps:
- Select the image and any related elements
- Right-click and choose Group
When to use:
• Multiple elements that should stay together
• Simple slide designs
Limitations:
• Objects can still be moved
• Not a true locking solution
👉 Use this when you need flexibility but less accidental misalignment.
Method 4: Prevent Movement with Layout Discipline
This is a strategic approach rather than a feature. It’s especially useful in shared or team presentations.
Techniques:
• Use placeholders instead of free-floating images
• Keep important visuals aligned within layouts
• Avoid dragging elements casually during editing
• Assign editing responsibilities in team projects
When to use:
• Collaborative presentations
• Large teams working on the same file
👉 This method helps reduce errors without restricting usability.
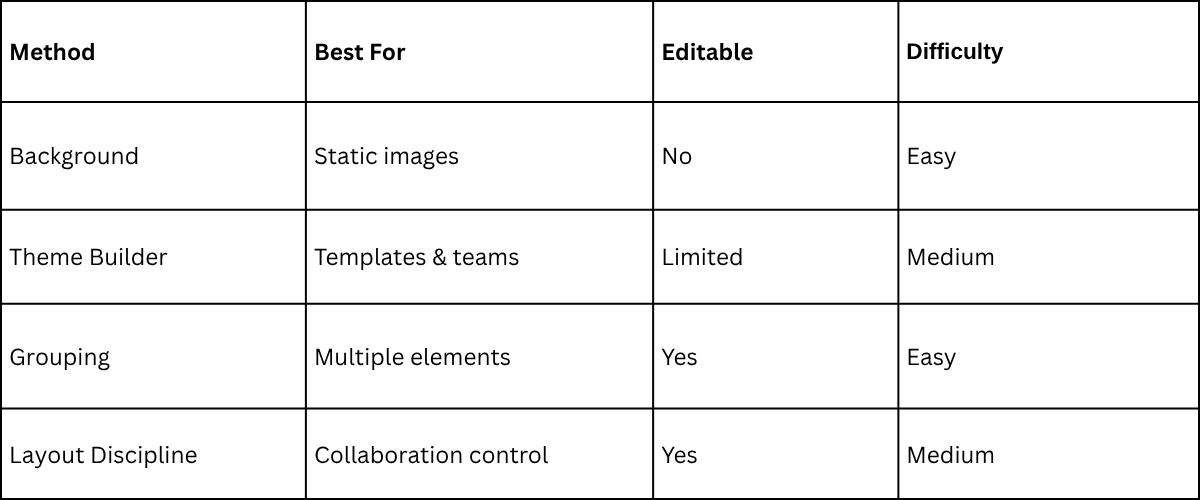
Best Method Comparison
Common Mistakes to Avoid
1. Expecting a built-in lock feature: Google Slides doesn’t support this natively, so relying on it will lead to frustration.
2. Overusing grouping: Grouping helps, but it doesn’t prevent movement completely.
3. Ignoring theme builder: Many users skip this feature, even though it’s one of the most powerful ways to control layouts.
FAQs
Can you lock an image in Google Slides?
No, there is no built-in lock feature. You must use workarounds like background images or theme layouts.
What is the best way to lock an image?
Setting the image as a background is the most effective method for preventing movement.
Which method is best for team presentations?
Using the theme builder for maintaining consistency and preventing accidental edits.
Final Thoughts
There’s no single “lock” button in Google Slides, but there are multiple ways to achieve the same result.
If you want:
- Complete control → use background
- Structured layouts → use theme builder
- Flexibility → use grouping
The key is choosing the method that matches your workflow.


You may also be interested in ...

Tips To Create A Great Infographic
Infographics Have been around for a while, but not many people know about them or are their preferred presentation choice. If...
08 Jun, 2024

3 Steps To Create The Best Presentation...
Presentations are something wonderful when well done, you can captivate an audience or be super interested in what another pe...
23 Jun, 2024

3 Tips For Your Next Presentation You MU...
PowerPoint presentations are perfect for explaining a topic and communicating your ideas with a visual aid. But most people s...
08 Jun, 2024