How to Add a Watermark to Google Slides Easily

Many users find their work copied or shared without credit, leaving their effort unprotected. It can be frustrating to spend hours crafting slides only to worry about misuse or loss of ownership.
Transitioning from this problem, there is a simple way to protect your content and add a professional touch. By learning how to insert a watermark in Google Slides, you can clearly mark your presentations while keeping them visually clean. This guide will walk you through each step, making watermarking easy, quick, and effective for all your slides.
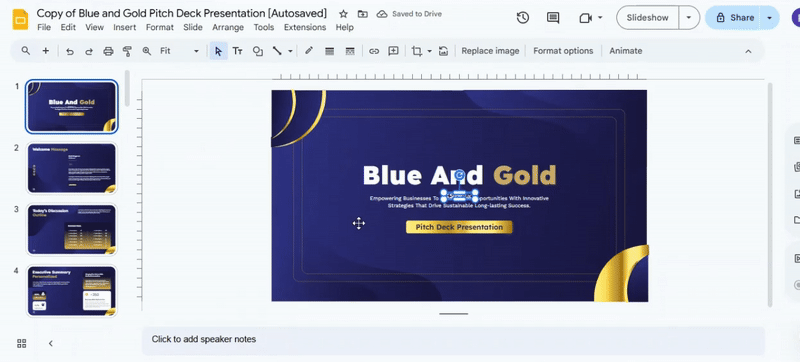
What is a watermark in Google Slides?
A watermark in Google Slides is a faint image or text placed behind slide content. It stays in the background and does not block the main information on the slide. People use watermarks to show ownership. It can include a logo, brand name, or simple text like “Draft” or “Confidential.” It helps viewers know who made the presentation. The watermark is usually light in color. It is often transparent or faded. This keeps the main content easy to read while still showing the mark in the background. In Google Slides, a watermark is not a built-in feature. Users often create it by adding an image or text box and placing it on each slide.
When to Use a Watermark in Google Slides
A watermark helps show ownership of a slide. It also keeps content protected during sharing or presentation. Some presentations need branding on every slide. A watermark keeps a logo or name visible in a soft way without blocking content. This works well for business decks and client reports.
Some slides contain sensitive content. A watermark can signal that the material is private or not for sharing. This helps control how the content is used. Teachers and trainers often use watermarks in learning materials. It helps show the source of the content while keeping the focus on the lesson.
Watermarks also help with draft versions. A simple “draft” label can stop confusion when multiple versions of a slide deck exist.
Why You Should Use a Watermark in Presentations
A watermark helps protect your slides. It shows ownership. This can reduce misuse of your content. Many people share slides after a meeting. A watermark keeps your name or brand visible. Even if the file moves to another person, the source stays clear.
It also supports consistency. Slides look more complete with a light background mark. It adds structure without taking focus away from the main content. Some teams use watermarks to mark draft work. This helps others know the file is not final. It reduces confusion during review and feedback rounds. You may also use it for branding. A simple logo or text in the background keeps your identity present across every slide.
How to Add a Watermark to a Slide
Guide to placing a faint image or text behind slide content for consistent branding or protection.
Step 1: Open the Slide
Open the presentation software and select the slide that requires a watermark.

Step 2: Insert an Image or Text
Use the insert function to add the image or text that will serve as the watermark.
Step 3: Resize and Position
Adjust the size and placement of the watermark to cover the desired area without obstructing the main content.
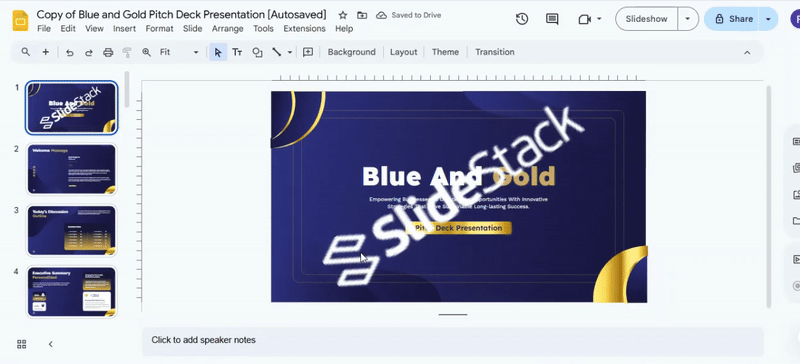
Step 4: Adjust Transparency
Change the transparency or opacity settings so the watermark is visible but faint enough to avoid distracting from the slide’s content.
Step 5: Apply to Other Slides (Optional)
If needed, copy the watermark to additional slides to maintain consistency throughout the presentation.
Adding a watermark to all the slides
Apply a text or image watermark to every slide by editing the master slide layout.
Step 1: Open the Presentation
Open the presentation where you want to add the watermark. Ensure all slides are accessible and that you have editing permissions.
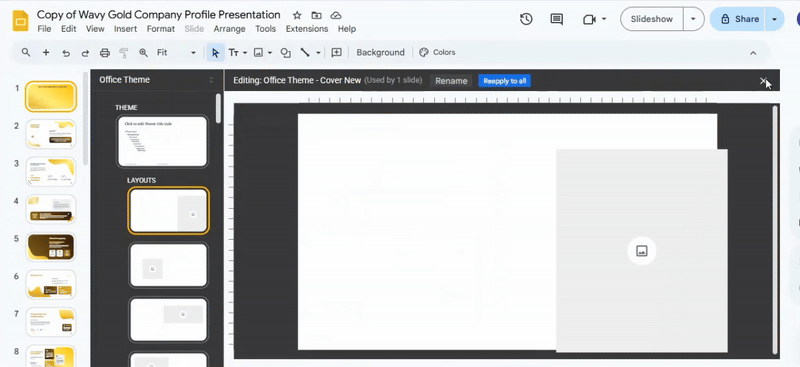
Step 2: Access the Master Slide
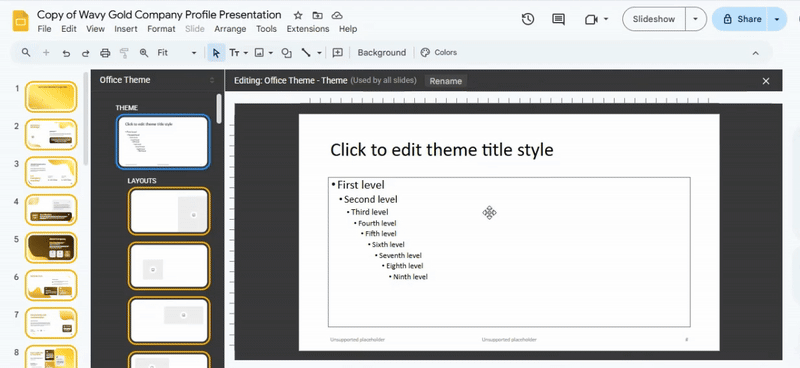
Go to the “Slide” menu and select “Master” or “Edit Theme.” This opens the master slide layout, which controls all slides in the presentation.
Step 3: Insert the Watermark
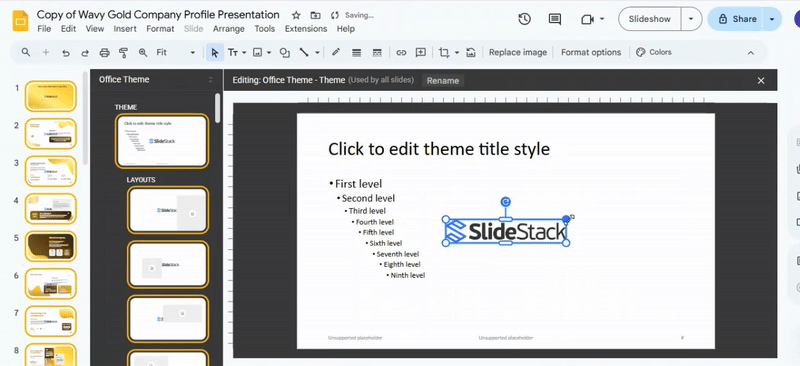
Select “Insert” and choose either “Text Box” or “Image,” depending on the type of watermark. Type the text or insert the image you want to use.
Step 4: Adjust the Watermark
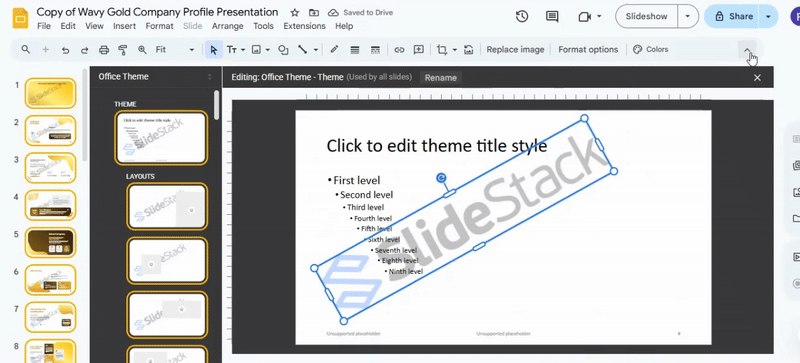
Position the watermark where it will appear on all slides. Resize, rotate, or adjust transparency as needed. Make sure it does not obscure important content.
Step 5: Exit the Master Slide
Close the master slide view by selecting “Close Master” or “Close Master View.”
Step 6: Verify the Changes
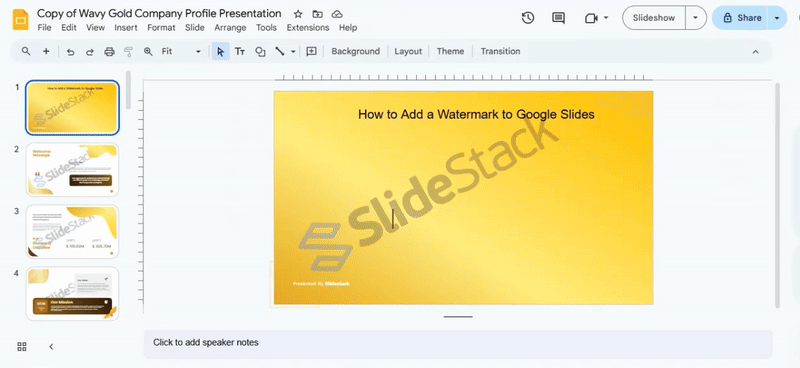
Go through a few slides to ensure the watermark appears consistently and is placed correctly.
How to Remove or Edit a Watermark
Watermarks often sit on top of slides or images. They are usually faint but still visible. Some are placed in the background. Others sit directly on text or graphics.
Open your file and look at the slide layout. Many watermarks come from the master slide. That is the main design layer behind all slides. Editing it can remove the watermark from every slide at once.
Another path is selecting the watermark itself. Click on the image or text box. Press delete if removal is the goal. If editing is needed, adjust color, size, or transparency from the formatting panel.
Some watermarks are grouped with other elements. Right-click and check for grouping options. Ungrouping lets you access the watermark separately.
A few slides may use locked templates. In that case, open the theme settings or slide master again. Small changes there often fix the issue across the whole presentation.
Best Practices for Using Watermarks
A watermark should support your message. It should not fight for attention. The goal is clear slides that still protect your work. Keep the watermark light. A strong watermark can block text and images. A soft opacity works better. Your content should stay easy to read at all times. Place the watermark in a steady spot. The center is common, but it should not cover key points. Corners also work well. They stay out of the way but still remain visible. Use the same style across slides. Changing fonts or shapes can feel messy. Consistency helps the presentation look clean and stable. Keep the design simple. A logo or short word is enough. Extra details can distract from the slide content. Match the watermark size to the slide. A large mark can feel heavy. A small mark can go unnoticed. Balance is key for both protection and clarity.
Common Mistakes to Avoid
Many people rush the setup. They skip small steps. This leads to broken layouts and messy slides.
Another issue comes from too much text on one slide. Slides lose focus. The main idea gets lost in long paragraphs.
Some users pick random fonts and colors. This makes the slide hard to read. A clear style keeps everything easy on the eyes.
Poor alignment also causes trouble. Objects placed without order look unbalanced. A simple grid helps keep things neat.
There is also a habit of adding too many effects. Motion and animations can distract from the message. Simple movement works better.
Careful planning before building slides helps avoid these problems.
Text Watermark vs Image Watermark (Comparison)
Text and image watermarks both help control how content appears behind your slides. Each one serves a different purpose based on design needs and how much visual detail you want.

The choice depends on your goal. Text works well for clean, simple slides. Image watermarks fit better when brand visuals need more presence.
Advanced Branding Tips for Presentations
Branding is more than a logo on a slide. It is the full look and feel across every page. Strong branding helps people remember your message.
Start with color consistency. Pick a small set of colors and stick to them. Use the same shades for backgrounds, shapes, and icons. Random colors make slides feel messy and disconnected.
Font choice also matters. Use one or two fonts across the whole deck. One for headings and one for body text works well. Changing fonts too often breaks visual flow and weakens the design.
Icons need the same visual style. Mixing thin line icons with bold filled icons creates an imbalance. Keep all icons in the same style family. This keeps slides clean and unified.
Spacing plays a quiet but strong role. Equal spacing between elements builds structure. Crowded slides feel harder to read. Empty space gives content room to breathe and improves focus.
Consistency across slides builds trust. Each slide should feel like part of one system, not separate pieces. That connection keeps attention on your message instead of the design itself.
Troubleshooting Watermark Issues
Watermarks in PowerPoint can sometimes cause problems after icons are replaced. These problems usually show up on the slide instead of the Slide Master. Small layout shifts can make the design look uneven. A common issue is a watermark that is too strong. It can cover icons and make text harder to read. Lowering the transparency helps restore balance between the background and content.
Some slides show a watermark in the wrong position. This often happens after moving icons or resizing elements. Aligning everything to the same grid keeps spacing clean across slides.
Another problem appears when the watermark does not show at all. This usually connects to layering. The watermark may sit behind the background or outside the visible area. Moving it forward in the layer order brings it back into view. Different slide layouts can also behave differently. One layout may look correct while another looks off. Applying the same watermark setup across all layouts keeps consistency steady. A clean slide design depends on small details working together. Watermark placement, icon size, and spacing all affect the final look.
Alternative Tools for Watermarking
PowerPoint is not the only option for adding watermarks. Some tools give more control over design and placement. Others make the process quicker. Microsoft PowerPoint has built-in options. You can place text or an image on the slide master. This keeps the watermark in the same position across slides. It also helps keep layouts steady.
Canva is another option. It lets you drag and drop elements. You can set a logo or text as a watermark. It works well for simple designs and quick edits. Google Slides also supports watermark-style elements. You can add images or text to the background. This keeps the main content clear while the watermark stays visible.
Adobe Express offers more design control. It allows layering of text and images. This helps when a stronger visual style is needed. Figma can also be used for watermark creation. It gives precise control over placement. Designers often use it for clean, structured layouts. Each tool has a different strength. The right choice depends on how simple or detailed the watermark needs to be.
Final Notes:
A watermark helps protect slide content. It also shows who made the work. This adds clear ownership to every presentation. A light design works best. Dark or heavy marks can hide key information. The main content should always stay easy to read. Slide Master gives control over all slides at once. A watermark placed there stays in the same position across the deck. This keeps the design steady. Simple text or a logo works well for most cases. Extra detail is not needed. Clean design keeps focus on the message.
Check every slide after adding the watermark. Small layout shifts can happen. A quick review keeps everything aligned. Good slide design comes from small, careful choices. Consistent watermarks, clean spacing, and simple visuals keep presentations clear and easy to follow.
FAQs:
Can I have different watermarks on different slides?
Yes, you can. Google Slides doesn’t have a built-in feature for multiple watermarks, but you can add different images or text to individual slides manually. Each slide can have its own unique watermark this way.
Can I edit the watermark after adding it?
Yes. Just click on the watermark on your slide and make the changes you need. You can move it, resize it, change the text, or replace the image anytime.
What kind of watermarks can I use?
You can use text, images, or logos as watermarks. Text watermarks often include words like “Draft” or your name, while image watermarks can be your logo or a faint graphic.
Can I match the watermark color to my presentation?
Yes. You can adjust the color of text watermarks or apply filters to image watermarks to match your slides. This helps your watermark blend in naturally while staying visible.
How do I add a logo to Google Slides?
Go to the slide where you want the logo, click “Insert,” then “Image,” and choose your logo file. You can resize, move, or adjust the transparency so it works as a subtle watermark.


You may also be interested in ...

How To Create An Eye-Catching Portfolio
If you’re looking to create an eye-catching portfolio, this post will come in handy. In this article, you can find the easies...
23 Jun, 2024

How To Easily Create An Infographic
Infographics are the perfect way to make a presentation that will impact an audience, but their design and composition might...
08 Jun, 2024

PowerPoint Template Tips & Tricks You Ne...
PowerPoint seems to be an unknown world for many people, especially those who have been assigned to create a presentation out...
08 Jun, 2024