How to Delete a Slide in Google Slides: Everything You Need to Know
Many people build Google Slides presentations and later find extra slides they no longer need. These slides can slow down editing and make the presentation harder to follow for others. A cluttered deck also takes more time to review before sharing or presenting. Then, removing a slide helps keep the deck focused and easy to read. You can delete one slide or remove several at once using simple tools in Google Slides. This process works through keyboard, right click, or menu options. A clean slide list improves flow and makes your message clearer for viewers. This guide shows each step so you can manage slides with confidence. It stays simple and quick.
Why You Might Need to Delete Slides in Google Slides
Slides can build up fast in a presentation. Some slides may no longer fit the message. Some may even cause confusion. A slide may contain wrong details. It can also show old data that no longer matches your topic. Keeping these slides can make your presentation unclear. Duplicate slides can appear during editing. These repeats take up space and make the deck longer than needed. Removing them keeps the flow clean. Some slides only add extra text or images without real value. Too many of these can distract the audience from the main point. Blank slides also show up by mistake. These empty pages interrupt the flow during a presentation. A shorter slide deck helps keep attention on key points. It also makes it easier to move through the content during a presentation.
Understanding How Slide Deletion Works in Google Slides
Google Slides lets you manage slides in a simple way. Each slide sits in a list on the left side. Deleting a slide removes it from that list. The slide also disappears from the presentation flow.
What Happens When You Delete a Slide?
A deleted slide leaves the slide deck. Its content no longer appears in the slideshow. The order of the remaining slides updates right away. The presentation moves forward without that slide.
Can You Recover a Deleted Slide?
Google Slides keeps past versions of your file. These versions show earlier states of the presentation. A previous version can bring back removed slides. The slide content returns through version history.
Delete vs. Hide a Slide: What's the Difference?
Deleting removes a slide from the file. The slide no longer exists in the current version of the deck. Hiding a slide keeps it in the file. The slide stays stored but does not appear during the presentation. Hidden slides still sit in the sidebar list. They remain easy to bring back into view later. This option helps when a slide may be useful again later. Deleting works better when a slide is no longer needed at all. Hidden slides give more control during editing and presenting. The choice depends on whether the slide may return or not.
How to Delete a Slide in Google Slides
You can delete a slide in Google Slides using a few simple methods. These methods include using the Delete key, the right-click menu, selecting multiple slides, and using the top Slide menu. Each method removes slides from your presentation in a different way based on your workflow.
Method 1: Use the Delete Key to Remove Slides
This method uses the keyboard for fast removal.
Step 1: Select the slide from the left panel using a mouse click or the arrow keys on the keyboard.
Step 2: Press the Delete key or Backspace key. The slide will be removed from the presentation.
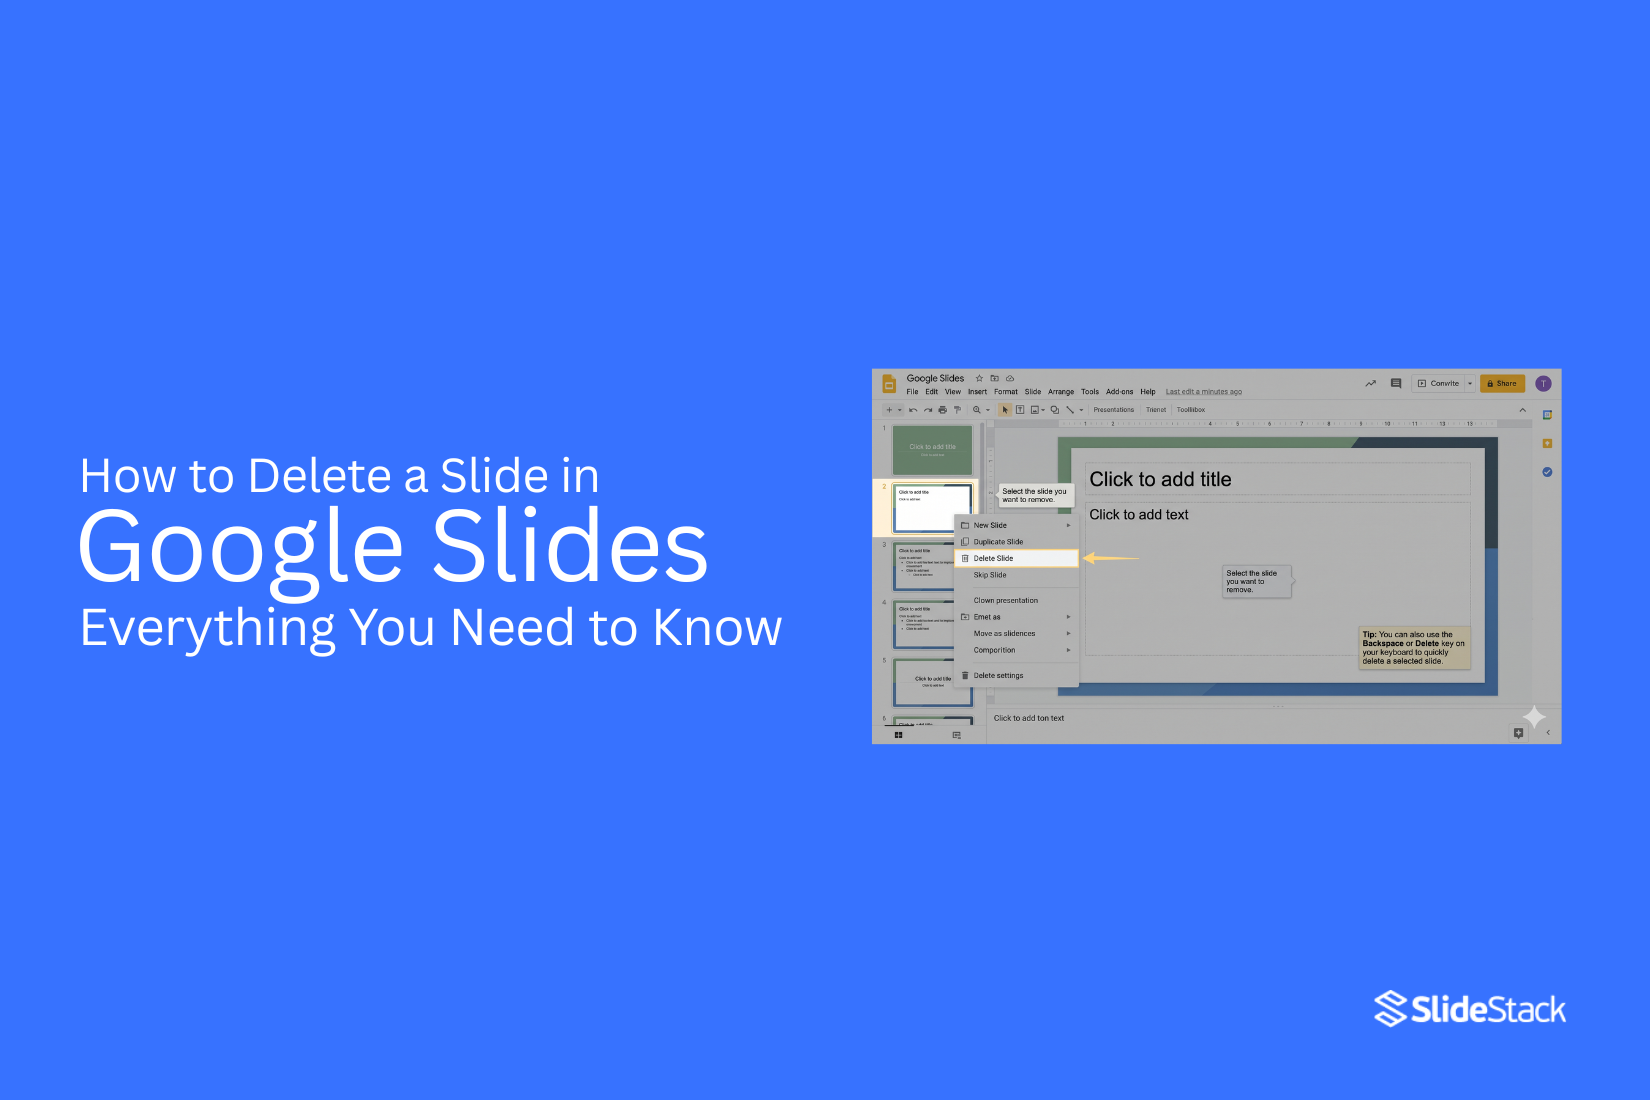
Method 2: Delete a Slide Using Right-Click
This method uses the mouse and context menu.
Step 1: Open your Google Slides file and go to the slide list on the left side.
Step 2: Right-click on the slide thumbnail. Click Delete. The slide is removed from the deck.
Method 3: Delete Multiple Slides Simultaneously
This method removes more than one slide at the same time.
Step 1: Hold Ctrl on Windows or Command on Mac and select the slides in the left panel.
Step 2: Press Delete or right-click and select Delete. Multiple slides are removed together.
Method 4: Delete Slides from the Slide Menu
This method uses the top menu bar.
Step 1: Select the slide or slides from the left panel.
Step 2: Go to Slide in the top menu. Click Delete slides. The selected slides are removed.
How to Delete a Slide in Google Slides on Different Devices
Deleting a slide is simple. The steps change based on the device you use. Each device has its own layout and controls.
On Windows
Open your presentation in Google Slides. Look at the left panel. Find the slide you want to remove. Click on it. Press the Delete key on your keyboard. The slide disappears from your list.
On Mac
Open Google Slides in your browser. Go to the slide panel on the left side. Select the slide you want to remove. Press the Delete key or Backspace key. The slide is removed right away.
On Chromebook
Open your presentation in Google Slides. Move to the left slide panel. Tap the slide you want to remove. Press the Backspace key or Delete key. The slide is gone from your deck.
On Android
Open the Google Slides app. Open your presentation. Tap the slide you want to remove. Tap the three-dot menu. Tap Delete. The slide is removed from the file.
On iPhone and iPad
Open the Google Slides app. Open your presentation file. Tap the slide thumbnail you want to remove. Tap the menu icon. Tap Delete slide. The slide is removed from your presentation.
Alternative Ways to Remove Slides Without Deleting Them
Some slides do not need to stay in the main presentation. Removing them is not the only option. Google Slides gives other ways to manage them while keeping the content safe.
Hide a Slide from the Presentation
Google Slides allows slides to be hidden from the main flow. Hidden slides stay in the file. They do not appear during the presentation. The content remains ready for later use.
Move Slides to Another File
Slides can be moved into a separate presentation. This keeps the main deck clean. The removed slides are stored in another file for future access or editing.
Copy Slides for Backup Use
A slide can be copied and saved in a different section or file. This helps keep an original version while working with a cleaner version in the main deck.
Keep Slides for Future Updates
Some slides hold useful data that may be needed later. They can stay at the end of the deck. They remain inactive during the presentation flow but are still available for edits.
Recovering Deleted Slides in Google Slides
Deleted slides are not gone right away. Google Slides keeps a record of changes. This record is called version history. Open the presentation file. Go to the File menu at the top. Select Version history. Then choose See version history. A panel opens on the right side of the screen. Older versions of the file appear in a list. Click on a version that still has the slide you need. The main screen shows how the file looked at that time.
Find the missing slide in that version. Restore that version to bring it back into the file. The slide returns to the deck along with other content from that saved state. Another option is to copy content from an older version. Open the version. Select the slide content. Copy and paste it into the current file. This keeps other recent edits in place.
Common Problems When Deleting Slides and How to Fix Them
Some slides stay undeleted because editing rights are limited. View only access to block changes. Full edit access allows slide removal. Shared files sometimes include locked layouts. These slides do not move or delete like normal ones. Copy the content into a new slide and remove the locked version. Browser issues also stop slide actions. Old cache data slows down commands. Clearing the cache and reopening Google Slides restores normal behavior.
Slow internet creates delays in updates. Slides appear unchanged even after removal. Refresh the page and check the slide list again. Corrupted browser extensions also interrupt actions. Disable extra extensions and reload the presentation. A clean browser session brings stable performance. Slides inside imported templates sometimes behave differently. Template structure limits editing on certain elements. Move the needed content into standard slides and remove the template slide after that.
Best Practices for Managing Slides Before Deleting
A slide often carries more than just text or images. It can hold key points, design work, or data that took time to build. Removing a slide without a quick check can lead to missing details later. Start by scanning the full presentation. Look at the slide you plan to remove and the ones around it. This helps you see if the idea still connects to nearby content or if it stands alone. A quick copy can save effort later. Place the slide in a separate file before removing it from the main deck. This keeps a backup without changing the flow of your current work.
Some slides repeat similar ideas. Spotting these helps you decide what stays and what goes. Removing repeated content keeps the presentation clean and easy to follow. Slide order also matters. A deleted slide can shift the story. Glance through the sequence to make sure the message still moves in a clear path after changes. Small checks like these reduce mistakes and keep your presentation stable while you refine it.
Tips for Organizing Google Slides Presentations
A clear slide deck helps people follow your message with ease. A messy one can distract and confuse. Good organization makes a big difference. Start by grouping slides by topic. Each section should focus on one idea. This keeps the flow steady and easy to follow. It also helps you spot extra or repeated slides. Keep slide titles short and clear. A strong title tells the main idea right away. This helps you scan through your deck faster.
Order matters too. Place the most important points near the start or in key spots. This keeps attention where it matters most. Too many slides can slow things down. Removing extra slides keeps your message tight. Every slide should have a clear purpose. Use consistent layouts across slides. This makes the presentation feel neat and connected. It also helps the audience focus on content, not design changes. A final check helps a lot. Go through each slide and ask if it still adds value. If it does not, it may be time to remove it.
Final Notes
A slide deck works best with a clear structure. Extra slides can break that flow. Removing them keeps the message direct and easy to follow. Google Slides gives simple ways to remove slides. Keyboard actions, right-click tools, and top menu options all work well. Multiple slides can also be removed at the same time. This helps during cleanup work in larger presentations.
Deleted slides do not disappear forever right away. Version history stores older copies of the file. This gives a way to bring back lost content if needed. Some slides may still hold value even if they are not part of the main flow. Hiding or moving slides keeps the deck flexible while keeping the main content clean. Strong organizational habits make a big difference. Clear grouping, simple titles, and steady slide order keep the presentation easy to follow. Regular review helps keep only useful content in place.
FAQs
Can I delete more than one slide at a time in Google Slides?
Yes. You can select multiple slides in the left panel. Then press Delete or Backspace. All selected slides will be removed together.
Is a deleted slide gone forever?
No. Google Slides keeps older versions of your file. You can open the version history and restore a slide from there.
What is the difference between delete and hide slide?
Delete removes the slide from the file. Hide keeps the slide in the file but stops it from showing during the presentation.
Can I recover a slide after deleting it?
Yes. Open version history from the File menu. Pick an earlier version that still has the slide. Restore it or copy the content back.
Why can I not delete a slide in Google Slides?
Some slides are locked in shared files or templates. You may also have view-only access. A weak internet connection or browser issue can also stop deletion.
Does deleting a slide affect the rest of the presentation?
Yes. The slide order updates right away. The presentation continues without that slide.


You may also be interested in ...

How To Create An Eye-Catching Portfolio
If you’re looking to create an eye-catching portfolio, this post will come in handy. In this article, you can find the easies...
23 Jun, 2024

How To Easily Create An Infographic
Infographics are the perfect way to make a presentation that will impact an audience, but their design and composition might...
08 Jun, 2024

PowerPoint Template Tips & Tricks You Ne...
PowerPoint seems to be an unknown world for many people, especially those who have been assigned to create a presentation out...
08 Jun, 2024