How to Fix a Corrupted AI-Generated PowerPoint File
An AI-generated PowerPoint file can become corrupted during export, download, or editing. You may see an error message, missing slides, damaged images, or text that no longer fits. In some cases, PowerPoint may not open the file at all. These issues can put your presentation work at risk.
A damaged file can also affect fonts, charts, tables, shapes, and slide layouts. You may spend extra time fixing each slide by hand. Missing content can make the presentation hard to use or share.
This guide explains how to check the file, try repair options, recover missing content, and fix common display problems. Follow the steps to restore your slides and test the repaired PPTX file in PowerPoint.
Why AI-Generated PowerPoint Files Break
AI tools can create PowerPoint slides in less time. They can add text, images, charts, and layouts to a presentation. However, the final PPTX file may not always work as expected. Some files fail to open. Others show missing images, broken layouts, or error messages.
There are several reasons behind these problems. AI tools may use unsupported slide elements or create errors in the file structure. A problem can also occur during the download or export process. Even a small error can stop PowerPoint from opening the file.
Understanding the cause is the first step toward fixing a corrupted AI-generated PowerPoint file. It also helps you choose the right repair method and avoid losing your slide content.
How to Fix an AI-Generated PowerPoint File That Won't Open
An AI-generated PowerPoint file may fail to open due to missing data, damaged file parts, or an incomplete download. You may see an error message or a blank screen after opening the file. This can stop you from accessing your slides and using their content.
There are several ways to fix this issue. Start with PowerPoint's built-in repair feature. Then try other methods to check the file and recover its content. The following steps can help you restore access to your damaged presentation.
Use PowerPoint's Open and Repair Feature
Microsoft PowerPoint has a built-in feature called Open and Repair. It can help fix some presentation files that fail to open. This is a good first step because you do not need extra software.
Follow these steps:
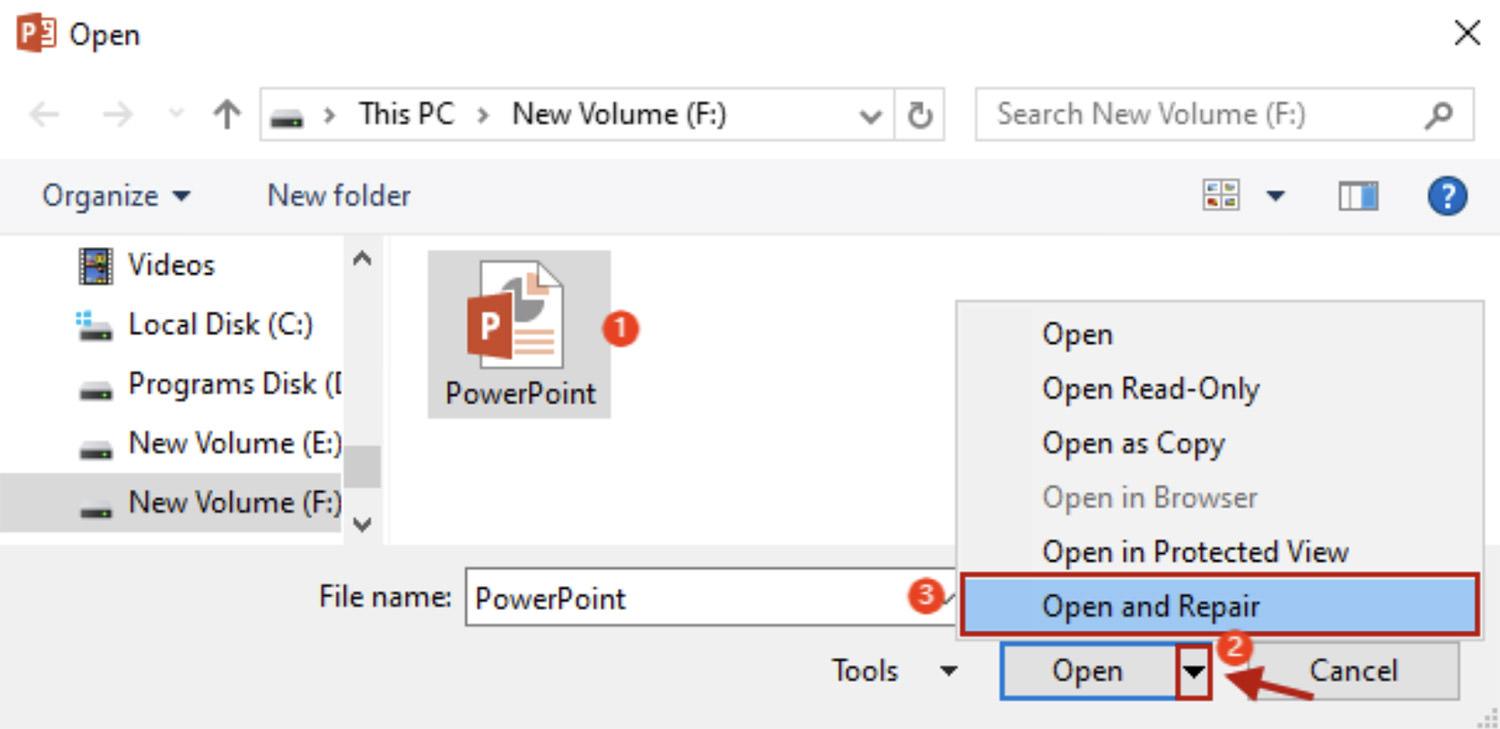
- Open Microsoft PowerPoint on your computer.
- Click File and select Open.
- Click Browse to find your damaged PPTX file.
- Select the file with a single click.
- Click the small arrow next to the Open button.
- Select Open and Repair from the menu.
- Wait for PowerPoint to check and repair the file.
After the repair process, PowerPoint may open the presentation. Check each slide to see if the text, images, charts, and other elements are still in place. Save the recovered file with a new name. This keeps the original damaged file available in case you need it later.
Check Whether the PPTX File Download Is Complete
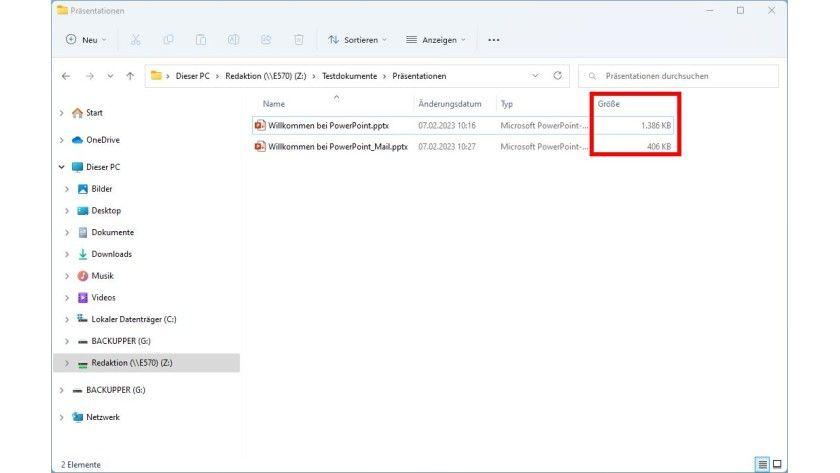
An incomplete download is another possible reason for a PowerPoint file not opening. This can happen if your internet connection drops during the download. The file may appear on your computer, but some of its data may be missing. Start by checking the file size. Compare it with the size shown on the download page, if available. A much smaller file may indicate an incomplete download.
You can also try these steps:
- Open the folder where you saved the AI-generated presentation.
- Check the file size and make sure it is not unusually small.
- Delete the incomplete copy only after confirming that you can download it again.
- Download the PPTX file from the original source.
- Wait for the download to finish before opening it.
- Open the new file in Microsoft PowerPoint.
Avoid closing the browser or turning off your computer during the download. A fresh copy may solve the problem without any repair steps.
Extract the PPTX File Using a ZIP Utility
A PPTX file is a ZIP-based package. It contains several folders and files that store slide content, images, themes, and other presentation data. You can use a ZIP utility to check whether these parts are still accessible. This method can also help you recover some presentation content from a damaged file.
Follow these steps:
- Make a copy of your damaged PPTX file.
- Open File Explorer and find the copied file.
- Right-click the file and select Rename.
- Change the file extension from .pptx to .zip.
- Confirm the file extension change.
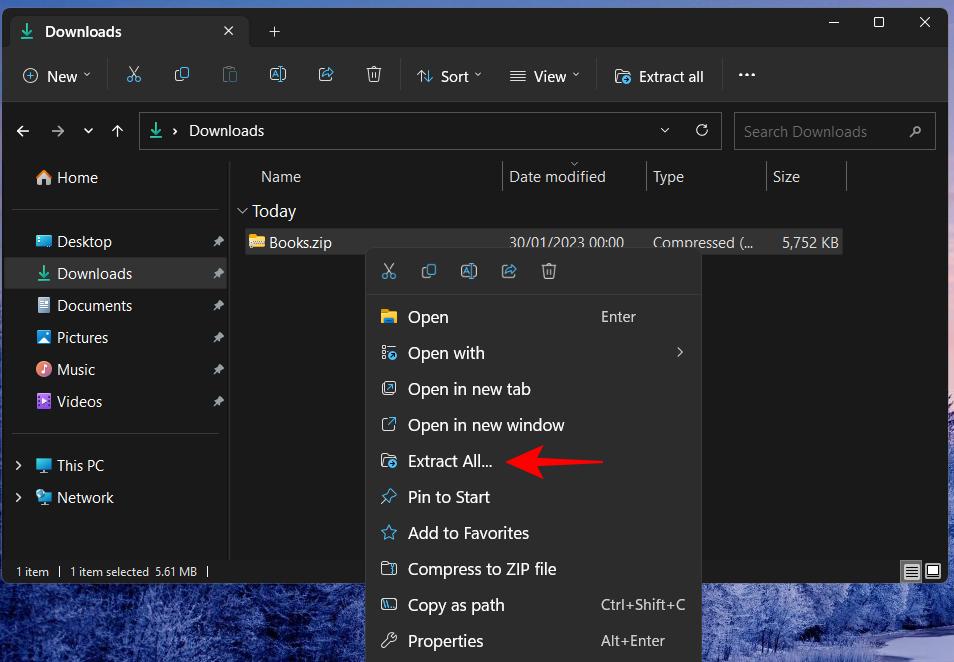
- Right-click the ZIP file and select Extract All.
- Open the extracted folder and check its contents.
Look for folders such as ppt, media, and slides. The media folder may contain images used in your presentation. The slides folder stores individual slide files. You can copy recovered images to a separate folder. However, extracting the ZIP file does not repair the original presentation. It only gives you access to the parts that remain readable.
Open the Presentation in Google Slides
Google Slides supports PPTX files. You can upload a damaged PowerPoint file and check whether Google Slides can read it. This may work if the issue is related to PowerPoint rather than the file's content.
Here is how to try it:
- Open Google Drive in your web browser.
- Click New and select File upload.
- Choose your damaged PPTX file.
- Wait for the upload to finish.
- Right-click the uploaded file.
- Select Open with and choose Google Slides.
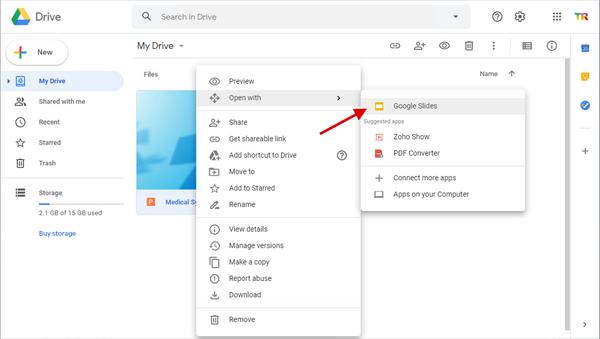 If the presentation opens, check all the slides. Some fonts, animations, charts, or layouts may look different after the conversion. You can also save the recovered presentation as a PowerPoint file. Go to File, select Download, and choose Microsoft PowerPoint (.pptx). This gives you a new PPTX copy to test in Microsoft PowerPoint.
Use a PowerPoint Repair Tool
Some damaged PowerPoint files may not open with the built-in repair feature. A dedicated PowerPoint repair tool may help in such cases. These tools can scan a presentation and attempt to recover its slide content.
Most repair tools follow a similar process:
- Open a trusted PowerPoint repair tool.
- Select the damaged PPTX file from your computer.
- Start the scanning or repair process.
- Wait for the tool to check the file.
- Preview the recovered slides, if the tool supports this feature.
- Save the repaired presentation as a new PPTX file.
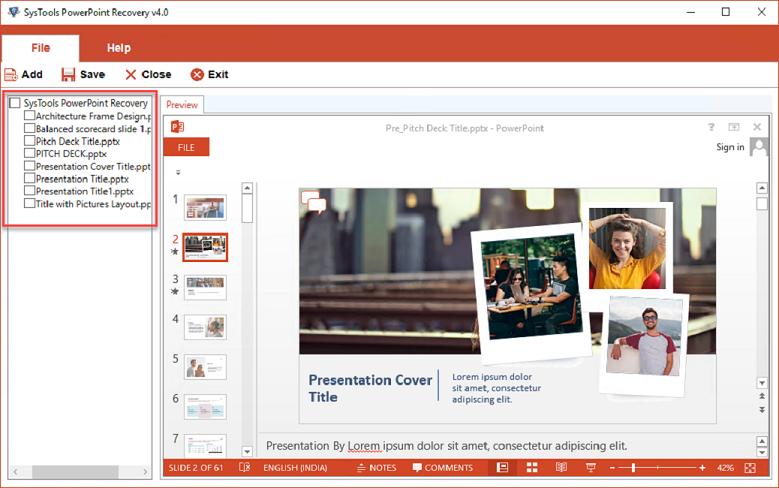 Before using any third-party tool, check its safety, privacy policy, and file upload rules. Some tools require you to upload your presentation to an online server. Avoid uploading files that contain private or business data to services you do not trust. Also, keep in mind that no repair tool can guarantee full recovery. The result depends on how much of the original file data is still readable.
Recover Images and Media from the Damaged File
A corrupted PowerPoint file may still contain usable images, videos, and other media. You may not be able to recover the full presentation, but you can save some of its visual content.
The ZIP extraction method can help you access these files.
Follow these steps:
- Make a copy of the damaged PPTX file.
- Change the copied file extension from .pptx to .zip.
- Extract the ZIP archive using a file extraction tool.
- Open the extracted folder.
- Find the ppt folder and open it.
- Open the media folder.
- Copy the available images, audio, and video files to a safe location.
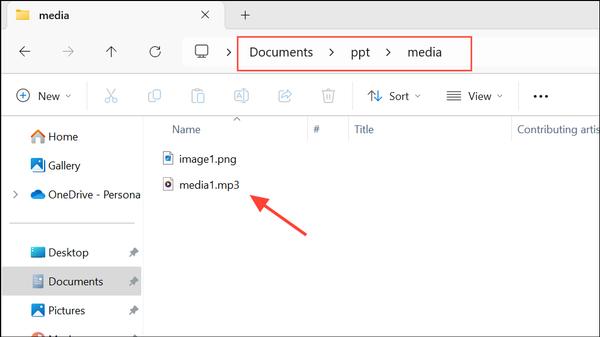 The recovered files may include JPG, PNG, SVG, MP4, and other media formats. You can open these files separately to check their quality. Once you have recovered the media, create a new PowerPoint presentation. Add the saved images and videos to the slides. You may also need to rewrite the text and rebuild charts or other slide elements. This method will not restore the original slide layouts or animations. However, it can help you save useful content without starting from scratch.
How to Fix Missing or Changed Fonts in AI-Generated PowerPoint
Missing or changed fonts can affect the look of an AI-generated PowerPoint file. Text may appear in a different style. Some words may take up more space than expected. This can also change the layout of your slides. PowerPoint may replace a missing font with another font on your computer. Here are four ways to fix this issue.
Identify Missing Fonts in PowerPoint
Start by checking which fonts are missing from your presentation. Open the PowerPoint file and look for changes in the text. Pay close attention to headings, titles, and text boxes. PowerPoint may also show a warning about missing fonts. You can use this message to find the font names that need attention.
Follow these steps:
- Open your presentation in PowerPoint.
- Check the slides for text that looks different from the original design.
- Look for missing font warnings.
- Note the names of the fonts that PowerPoint cannot find.
This check helps you find the fonts that need to be fixed.
Replace Unsupported Fonts
Replacing unsupported fonts is a simple way to fix text appearance. This method works well if you do not have access to the original fonts. Choose a font that looks close to the original. Make sure it is easy to read and fits the text boxes.
Follow these steps:
- Open your PowerPoint presentation.
- Go to the Home tab.
- Select Replace in the Editing group.
- Click Replace Fonts.
- Select the missing font from the first dropdown.
- Choose a replacement font from the second dropdown.
- Click Replace to apply the change.
PowerPoint will update the selected font across your presentation. Review each slide to check for text wrapping or spacing changes.
Install the Required Fonts
Installing the original fonts can help restore the intended slide design. This is a good option if the AI tool used a specific font to create the presentation. First, find the font name in the original design or AI-generated file. Then, get the font file from a trusted source.
Follow these steps:
- Close PowerPoint.
- Find the required font file on your computer.
- Right-click the font file.
- Select Install or Install for all users.
- Wait for the installation to finish.
- Open PowerPoint again.
- Check your slides to see if the text looks correct.
You may need to restart PowerPoint before the new font appears in the font list.
Use Font Embedding to Preserve Text Appearance
Font embedding helps keep your presentation text consistent across different computers. It stores supported font data inside the PowerPoint file. This reduces the chance of font replacement on another device.
Follow these steps to embed fonts:
- Open your presentation in PowerPoint.
- Click File and select Options.
- Go to the Save section.
- Find the Preserve fidelity when sharing this presentation section.
- Check Embed fonts in the file.
- Choose Embed all characters or Embed only the characters used in the presentation.
- Click OK and save your file.
Note: Not all fonts support embedding. Some font licenses also restrict this feature. Check the font's permissions before sharing your presentation. After saving the file, close it and open it again. Check the text on each slide to make sure the font appearance stays the same.
How to Fix Text Overflow in AI-Generated PowerPoint
Text overflow is a common issue in AI-generated PowerPoint files. It happens when text extends beyond a text box or slide. Some words may get cut off. Other lines may overlap with images or shapes. This can make the content hard to read. PowerPoint offers several ways to fix this issue. You can resize text boxes, adjust font sizes, or change paragraph spacing. These steps can help restore the text layout without removing important content.
Resize Text Boxes to Fit the Content
A text box may be too small for the amount of text inside it. This often happens in AI-generated slides with long headings or large blocks of text.
Follow these steps to resize a text box:
- Open the affected slide in PowerPoint.
- Select the text box that contains the overflowing text.
- Move your cursor to one of the corner handles.
- Drag the handle outward to increase the box size.
- Check whether all text now fits inside the box.
- Repeat the process for other text boxes on the slide.
You can also move the text box to create more space between other slide elements. Keep enough room around images, shapes, and other text boxes. This helps maintain a clean slide layout.
Use AutoFit Options in PowerPoint
PowerPoint has AutoFit settings that help text fit inside a text box. These settings can reduce the font size or resize the box based on the amount of text.
Here is how to use AutoFit:
- Select the text box with overflowing text.
- Right-click the text box border.
- Select Format Shape from the menu.
- Open the Text Options tab.
- Select Text Box.
- Find the AutoFit settings.
- Choose Shrink text on overflow to reduce the font size automatically.
You can also select Resize shape to fit text. This option expands the text box to fit the content. Choose the option that works best for your slide layout. Shrinking text may affect readability. Resizing the shape may move other slide elements.
Adjust Font Size and Paragraph Spacing
Large fonts and wide paragraph spacing can cause text to overflow. This is common in AI-generated presentations with long descriptions or detailed bullet points.
You can fix this by making a few text adjustments.
- Select the text that extends beyond the text box.
- Open the Home tab.
- Find the Font Size box.
- Reduce the font size by one or two points.
- Select the text again and open the Paragraph settings.
- Reduce the spacing before or after paragraphs.
- Check the line spacing and adjust it as needed.
Avoid making the text too small. It should remain easy to read during a presentation. You can also shorten long sentences or remove repeated words to save space.
Fix Text Overflow Through Slide Master
Text overflow may appear across several slides. This can happen if the AI-generated file uses the same layout for multiple slides. In this case, editing each slide one by one can take extra time. PowerPoint's Slide Master lets you adjust shared layouts. Changes to a master layout can affect all slides that use it.
Follow these steps:
- Open your PowerPoint presentation.
- Go to the View tab.
- Select Slide Master.
- Choose the layout linked to the affected slides.
- Select the text placeholder that causes the overflow.
- Resize the placeholder or adjust its font settings.
- Review the other layout elements to make sure they still fit.
- Select Close Master View to return to the main presentation.
Check the affected slides after making these changes. Some slides may contain manually edited text boxes that do not follow the master layout. You may need to fix those boxes separately. Using Slide Master can save time across large presentations. It also helps keep text sizes and positions consistent throughout the file.
How to Fix Images and Shapes That Appear Off-Slide
Images and shapes may appear outside the slide area in a corrupted AI-generated PowerPoint file. Some objects may also become hidden behind other elements. Others may appear cut off, stretched, or missing. These issues can affect the layout and make slides hard to read. PowerPoint has several tools that can help you locate and fix these visual problems.
Locate Hidden Objects Using the Selection Pane
The Selection Pane helps you find objects on a slide. It lists images, shapes, text boxes, and other elements. You can use it to find hidden objects and check their position in the slide layout.
Follow these steps:
- Open the affected slide in PowerPoint.
- Go to the Home tab.
- Click Select in the Editing group.
- Choose Selection Pane.
- Review the list of objects on the right side.
- Click an object name to select it on the slide.
- Use the eye icon to show or hide an object.
The Selection Pane makes it easier to find images and shapes that are hidden behind other elements. You can also rename objects to make them easier to manage.
Reposition Images and Shapes
Some AI-generated PowerPoint files may place images or shapes outside the slide boundaries. This can happen after a file repair or layout change. You can move these objects back into the correct position.
Use these steps:
- Open the affected slide.
- Select the image or shape you want to move.
- Drag the object toward the correct position.
- Use the arrow keys for small position changes.
- Open the Picture Format or Shape Format tab.
- Adjust the position settings to place the object correctly.
- Check the slide in Slide Show mode.
Keep enough space between objects. Make sure all important elements stay inside the slide boundaries. Also, check that text and images do not overlap.
Restore Missing Images
Missing images can leave empty spaces in your slides. This may happen if the image files were not saved correctly or the presentation lost access to linked images.
You can try these steps to restore them:
- Open the slide with the missing image.
- Check whether PowerPoint shows an empty image box or a broken image link.
- Look for the original image on your computer.
- Go to the Insert tab.
- Select Pictures and choose the image file.
- Insert the image into the slide.
- Resize and position it to match the original layout.
If the original image is no longer available, use another image that fits the slide content. Try to keep its size and placement close to the original design. Save the repaired presentation after restoring the missing visuals.
Fix Cropped and Distorted Visual Elements
Images and shapes may look different after a PowerPoint file becomes corrupted. Some images may lose parts of their original content. Others may appear stretched or squeezed. These problems can affect the visual quality of your slides.
Use the following steps to fix them:
- Select the affected image or shape.
- Open the Picture Format or Shape Format tab.
- Select Crop to adjust the visible image area.
- Drag the crop handles to show the required parts.
- Use the corner handles to resize the image without changing its proportions.
- Check the height and width settings for any unwanted changes.
- Review the object in Slide Show mode.
Avoid resizing images from the side handles if you want to keep their original proportions. Also, check the position and size of nearby objects. This helps keep the slide layout consistent after the repair.
How to Fix Charts and Tables That Become Images
Charts and tables in an AI-generated PowerPoint file may appear as flat images. This can stop you from editing text, changing values, or adjusting colors. You may need to rebuild these elements in PowerPoint. Start by checking the original objects. Then restore their data and formatting.
Check Whether Charts Are Editable
Start by selecting the chart on your slide. Look at the ribbon menu for chart editing options. An editable chart usually shows the Chart Design and Format tabs. You can also double-click the chart. An editable chart may open a data sheet with its values. A flat image will only show image editing options.
Follow these steps:
- Open the affected PowerPoint slide.
- Select the chart.
- Check for the Chart Design tab.
- Double-click the chart to see if its data sheet opens.
- Check whether you can change the chart values.
If PowerPoint treats the chart as an image, you cannot edit its data directly. You will need to create a new chart.
Rebuild Charts Using PowerPoint Data
PowerPoint lets you create charts with built-in data sheets. You can use this feature to replace a chart that became an image.
Follow these steps:
- Open the slide with the damaged chart.
- Go to Insert and select Chart.
- Choose the chart type that matches the original.
- Click OK to open the data sheet.
- Replace the sample values with your original data.
- Close the data sheet.
- Resize and position the new chart.
Check the chart against the original slide. Make sure the values and labels match. You can also change the chart type to match the original design.
Recreate Tables as Editable PowerPoint Elements
A table saved as an image does not allow direct text editing. You must create a new PowerPoint table to restore its editing features.
Here is how to do it:
- Open the slide with the table image.
- Go to Insert and select Table.
- Choose the required number of rows and columns.
- Enter the original text and values.
- Adjust the column widths and row heights.
- Apply borders, colors, and text alignment.
- Place the new table in the same position as the original.
Check each cell after entering the data. Keep the text clear and make sure all values appear in the correct rows and columns. Remove the old image after confirming that the new table is correct.
Restore Chart La





You may also be interested in ...

Tips To Create A Great Infographic
Infographics Have been around for a while, but not many people know about them or are their preferred presentation choice. If...
08 Jun, 2024

3 Steps To Create The Best Presentation...
Presentations are something wonderful when well done, you can captivate an audience or be super interested in what another pe...
23 Jun, 2024

3 Tips For Your Next Presentation You MU...
PowerPoint presentations are perfect for explaining a topic and communicating your ideas with a visual aid. But most people s...
08 Jun, 2024