How to Easily Add and Edit Audio or Music in Google Slides
Adding audio to a slide sounds easy, but it can quickly become confusing. Files might not upload, or the sound might not play the way you want. This can leave you stuck and frustrated, especially if you need to finish your work fast. It does not have to be difficult. This guide will show you five simple ways to add and edit audio in Google Slides without extra tools or hassle.
How to Insert Audio Into Google Slides: 5 Easy Ways
Adding audio to your Google Slides can make your presentations more engaging and dynamic. Whether it’s background music or voice narration, sound helps keep your audience interested. Below, you’ll find five simple methods to add audio to your slides. Read on to learn how to make your presentations stand out.
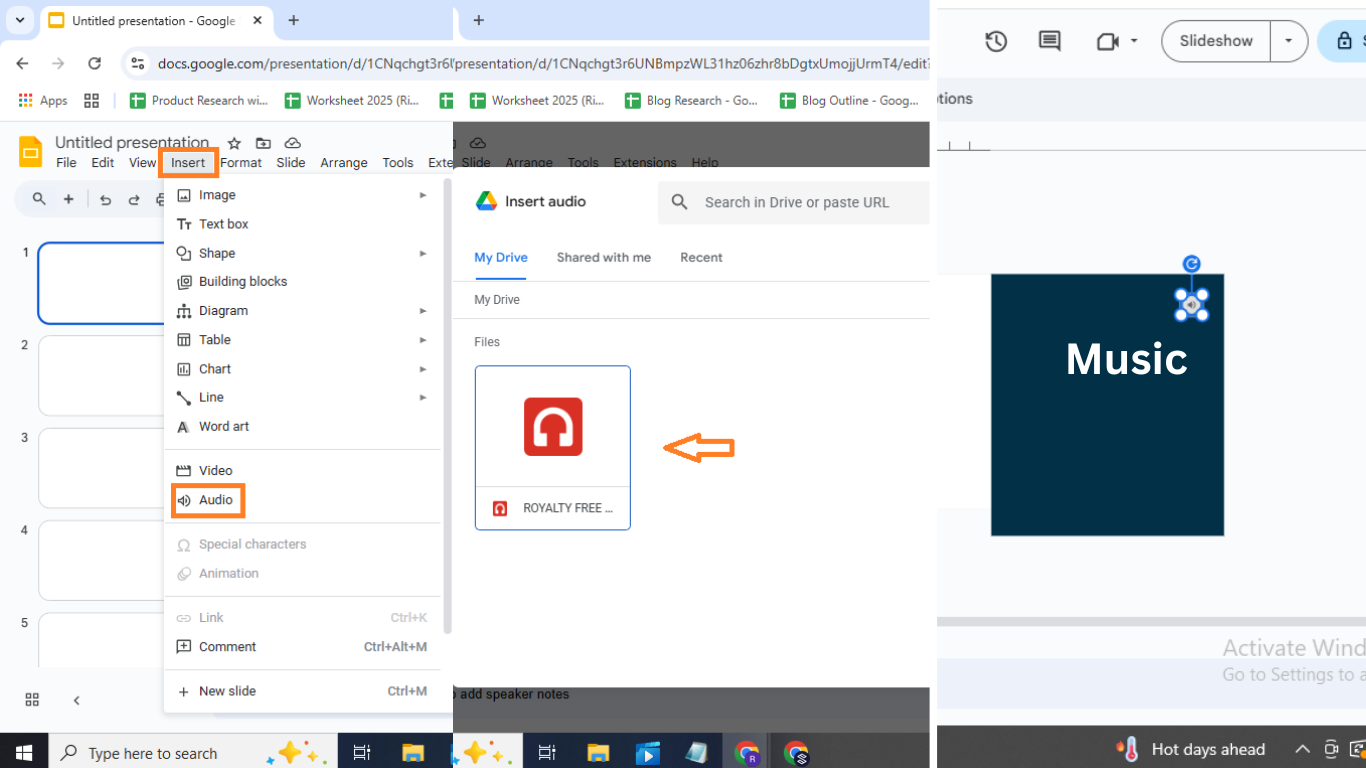
1. Adding Audio from Google Drive

Upload: First, go to Google Drive and click the +New button. Select File Upload, then choose your audio file. The upload will start automatically.
Insert: Open your Google Slides presentation. Pick the slide where you want the audio. Click Insert, then Audio, and select your uploaded file from Drive.
Play: The audio will play during your presentation. You can adjust settings like autoplay or loop.
Offline Access: Audio files from Drive need an internet connection to work. If you plan to present offline, download the audio and embed it directly into your slides.
Tip: Make sure your audio files are accessible before presenting to avoid any playback issues.
2. Adding Audio from Online
Select: Click the audio icon after adding your file to the slide.
Format: Open Format options to control playback settings.
Playback: Choose autoplay, play on click, or loop.
Adjust: Customize these settings to match your presentation.
Tip: Check audio access before presenting to avoid issues.
Embed a YouTube Video (For Music or Sound Effects)
Open your Google Slides presentation. Select the slide where you want the video. Insert > Video > Paste YouTube link. Click on the video thumbnail to select it. Use the Format options on the right panel. Check “Autoplay when presenting” or “Loop video”. Embedding a YouTube video in Google Slides lets you add music, sound effects, or audio to your presentation. After inserting the video, you can make it start automatically by selecting “Autoplay when presenting” in the format options. This means the video plays as soon as the slide appears. You can also choose “Loop video” to have the video play repeatedly without stopping. These settings help create a smooth, hands-free audio experience that keeps your audience engaged without extra clicks. You can still resize or move the video thumbnail to fit your slide design.
Record Audio for Google Slides
Recording audio for Google Slides is simple and can add a personal touch to your presentation. First, you’ll need a microphone. Most laptops have one built in, but you can also use an external mic for better sound. Start by opening a voice recording app on your device. On Windows, try Voice Recorder. On Mac, use QuickTime Player. Record your audio and save the file as an MP3 or WAV format, which Google Slides supports.
Next, open your Google Slides presentation. Go to the slide where you want to add audio. Click Insert, then choose Audio. Upload your recorded file from your computer or Google Drive. Before presenting, play the audio to check sound quality and timing. Adjust volume if needed. This step helps avoid surprises during your presentation.
Adding Audio to Google Slides Using Your Phone
Start by opening the Google Slides app on your phone. Find the presentation you want to add audio to and tap to open it. Next, choose the slide where you want the sound. Look for the "+" button or the insert option at the top or bottom of the screen. Tap it and select "Audio" from the menu.
Your phone will show the audio files available. Pick the one you want to add. It will upload and appear on the slide as a small icon. You can move this icon to any spot on the slide by dragging it. To play the audio during the presentation, just tap the icon. One useful tip is to test the sound before presenting. This way, you make sure it plays smoothly and is loud enough for your audience
Why Adding Audio to Google Slides Enhances Your Presentation?
Adding audio can change how your message lands. Here are ten clear reasons why using audio in Google Slides makes your presentation stronger:
Engages listeners: Audio grabs attention and keeps people interested.
Sets the tone: Music or voice can create the right mood.
Clarifies points: Spoken words help explain complex ideas.
Improves recall: People remember what they hear better.
Supports accessibility: Audio helps those who struggle with reading.
Adds variety: Breaks up text and visuals for balance.
Saves time: Audio can deliver info quickly and clearly.
Builds connection: A speaker’s voice feels personal and warm.
Enhances professionalism: Well-done audio boosts your presentation’s polish.
Enables practice: Record once, reuse anytime without live speaking.
Try adding audio to your next slide deck to see these benefits in action. Ready for tips on how to do it?
How to Play Audio During The Slideshow?
To play audio during a slideshow, follow these steps:
Step 1: Open Your Presentation
Start by opening your slideshow file where you want to add audio.
Step 2: Insert Audio File
Click on the Insert menu, then choose Audio. Select the audio file saved on your device.
Step 3: Adjust Playback Settings
Click the audio icon on the slide and open Playback options. Choose to play automatically or when clicked.
Step 4: Test the Audio
Run your slideshow and check if the audio plays as planned during the presentation. Adding audio can make your slides more engaging. Tools like Microsoft PowerPoint and Google Slides both support audio playback. For easy audio editing and better control, software such as Audacity helps trim and improve sound files before adding them to your slides. Using the right tools saves time and ensures your presentation sounds professional.
Conclusion:
Adding audio to Google Slides is easier than many expect. A short clip or background track can turn plain slides into something that holds attention and feels more alive. With a few clicks, you can insert music, adjust settings, and fine-tune playback to match the flow of your talk. Clear steps and small edits go a long way in making your slides stand out. Try adding sound in your next project and see how much stronger your presentation feels.
FAQS
How do you delete audio from Google Slides?
Click on the audio icon on your slide. Press the Delete key on your keyboard. That’s it, the audio is removed from your presentation.
What audio formats does Google Slides support?
Google Slides supports MP3 and WAV audio files. Make sure your file is in one of these formats before adding it to your slide.
Can I add narration to my slides?
Yes, you can. Record your narration using any voice recorder app, save it as an MP3 or WAV file, and upload it to your Google Drive. Then insert it into your slide like any other audio.
Can I add multiple audio files to one presentation?
Yes. You can add different audio files to different slides in the same presentation. Just insert one audio file per slide.
How do I control when the audio starts playing?
After inserting the audio, click on the audio icon and open the Format options. Under Audio playback, choose to play the audio either on click or automatically when the slide loads.
Can I adjust the audio volume during the presentation?
No, Google Slides doesn’t have in-slide volume controls. You’ll need to adjust the volume on your computer or device before presenting.
Can I hide the audio icon during the presentation?
Yes. Click the audio icon, open Format options, and check the box that says Hide icon when presenting. The audio will still play based on your settings.
Can I add audio from the web directly to Google Slides?
Not directly. You need to download the audio first, upload it to your Google Drive, and then insert it into your slide.
How do I edit the audio file after adding it to my presentation?
Google Slides doesn’t let you edit the audio itself. To make changes, use an audio editing tool, save the new version, upload it to Google Drive, and replace the old file.
Can I add sound effects or transitions between audio clips?
Not within Google Slides. If you want sound effects or smooth transitions, combine the clips using audio software before uploading them.
How do I fade in/out audio in Google Slides?
Google Slides doesn’t offer fade-in or fade-out options. You’ll need to use an audio editor to add those effects before uploading the file.
Can I add audio to a specific part of a slide?
No. Audio plays based on the slide, not where you click or scroll on it. To control timing, you can break your content into separate slides.
Can I loop the audio or stop it on specific slides?
Looping isn’t built in. But if you need to stop the audio, you can link to a new slide without audio. To loop, you'd need to manually copy the audio onto each slide you want it to replay.


You may also be interested in ...

How To Create An Eye-Catching Portfolio
If you’re looking to create an eye-catching portfolio, this post will come in handy. In this article, you can find the easies...
23 Jun, 2024

How To Easily Create An Infographic
Infographics are the perfect way to make a presentation that will impact an audience, but their design and composition might...
08 Jun, 2024

PowerPoint Template Tips & Tricks You Ne...
PowerPoint seems to be an unknown world for many people, especially those who have been assigned to create a presentation out...
08 Jun, 2024